Applicant Profile Page - Summary Tab
The Summary tab displays applicant details. The tab is divided into two sections: Applicant Summary and Requisition Summary. The Summary tab displays by default when accessing the Applicant Profile page.
If the recruiter is not part of the hiring team and therefore does not have access to the summary information, then "You do not have access to this application" displays. The applicant summary information and Job Details link are hidden for recruiters who are not part of the hiring team. However, the requisition owners are displayed.
To access the Applicant Profile page, click the applicant's name from any of the following pages:
- Manage Job Requisitions >
- Recruit > Interview Manager
- Recruit > Review Applicants
- Recruit > Manage Candidates (Note:This functionality is in the Early Adopter phase. For more information about availability,see the Overview topic for this functionality.)
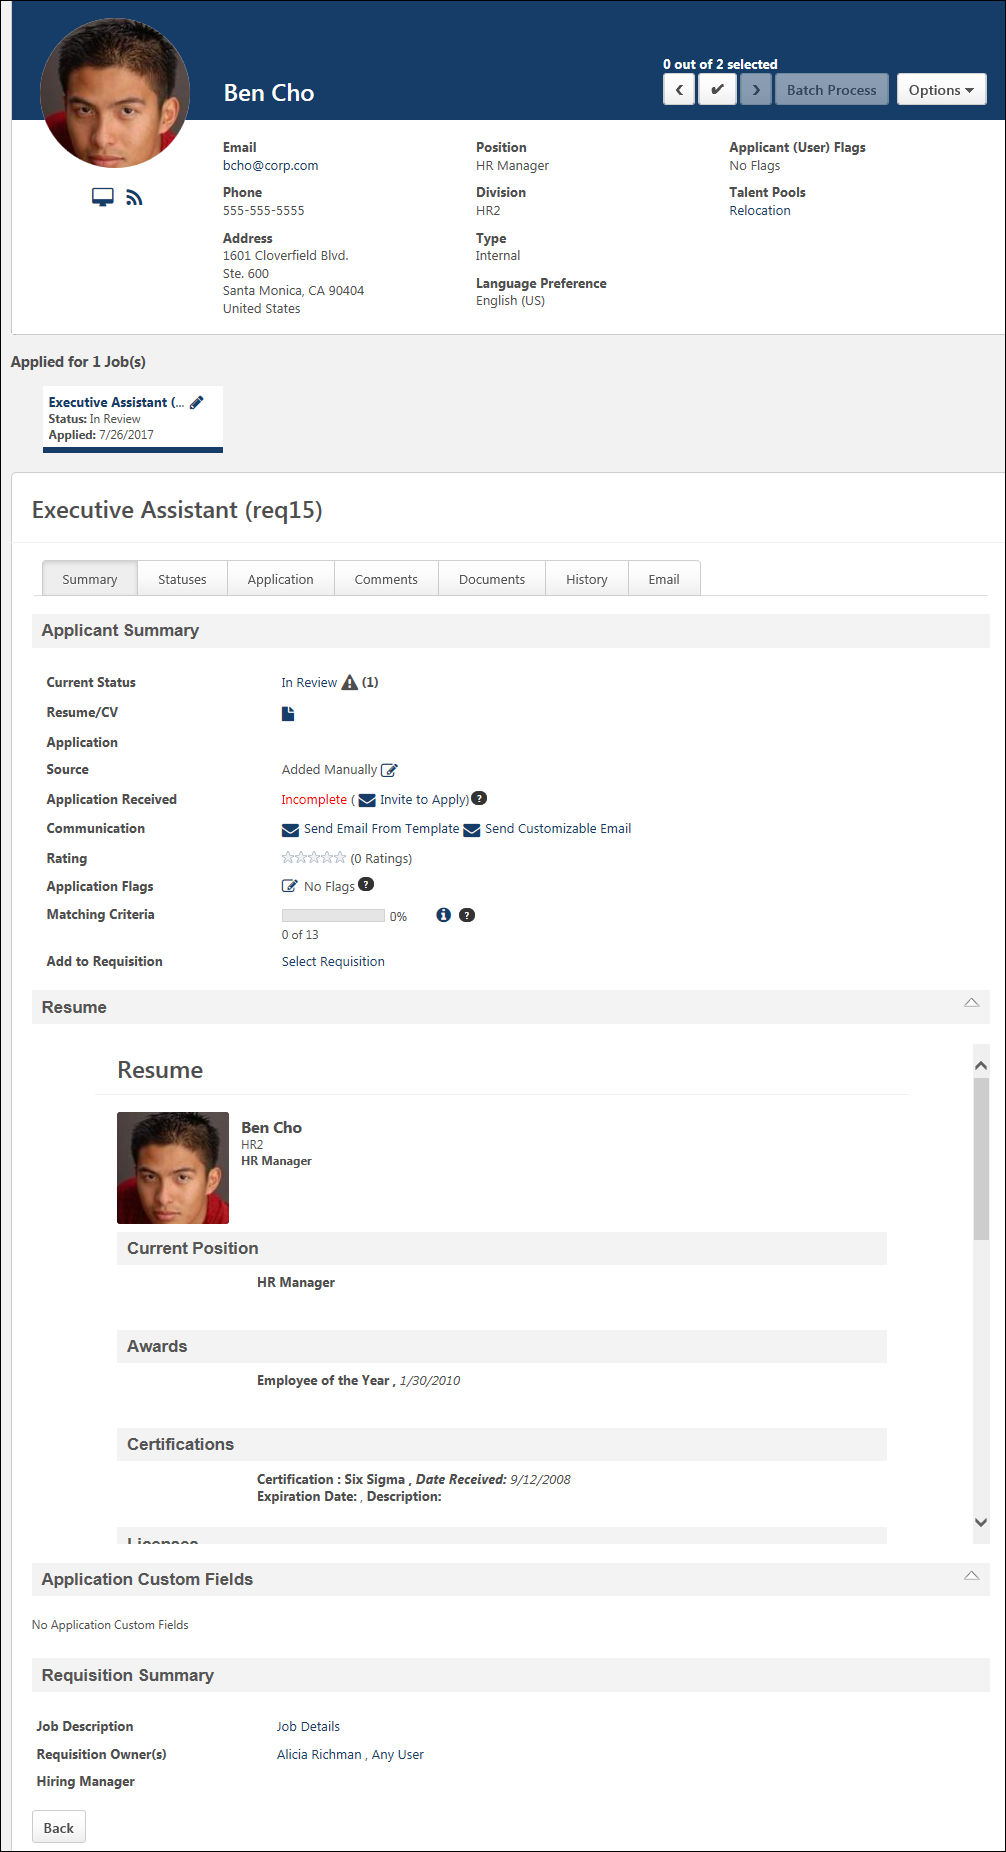
Applicant Summary
The Applicant Summary panel displays the following fields:
When viewing the Summary tab for applicants who are merged with the target profile, an Original Applicant field displays at the top of the summary. This field only displays for merged applicants. The field displays the name of the merged applicant as a link. Clicking the link opens the Applicant Profile page of the merged applicant. Note: If the merged applicant has been archived, then "Archived" displays instead of the applicant's name. If the applicant is configured as anonymous, then the Original Applicant field is hidden.
The applicant's current status appears at the top of the Applicant Profile page. A warning icon displays to the right of the status if enabled in Compliance Enablement Preferences. If the applicant has more than one warning, the number of warnings appears to the right of the warning icon. To view a warning, hover the mouse over the warning icon. The following warnings may appear for an applicant:
- Application Status - This warning indicates that the applicant's application is incomplete.
- Pre-Screening - This warning indicates that the applicant failed the pre-screening questions. This warning can only display if an applicant's submission is manually moved to the Manage Applicants page via a manual status change.
- Unqualified Applicant - This warning indicates that the applicant is considered unqualified.
Note: If the applicant's status is New Submission, the status is not a link and cannot be changed from the Applicant Profile page.
Change Applicant Status
The requisition owner can change the applicant's status. For users who are not the requisition owner, the status is grayed out and not selectable.
To change an applicant's status, click the linked status name in the Current Status field on the Summary tab of the Applicant Profile page. This opens the Change Status pop-up.
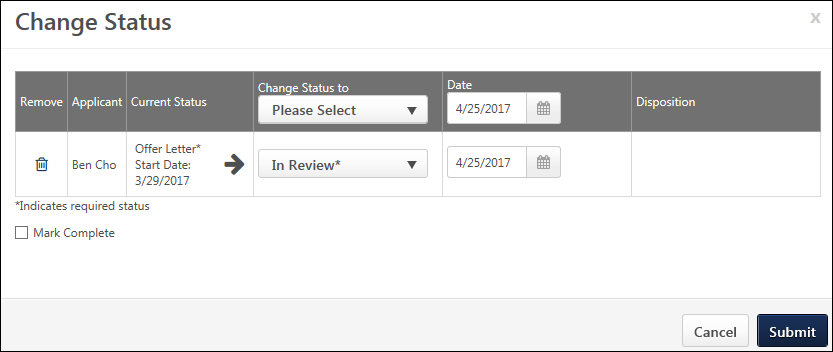
The following information displays in the Change Status pop-up:
| Column | Description |
|---|---|
| Remove | Click the Remove icon |
| Applicant | This column displays the applicant's name. |
| Current Status | This column displays the applicant's current status in the applicant status workflow. If the status is a required status, then an asterisk displays to the right of the status. Required statuses cannot be skipped and must be marked complete by checking the Mark Complete option in order to change the current status to a status that comes after the current status in the applicant status workflow. Upon clicking , the required status is marked complete, and the status changes to the selected status. |
| Change Status to |
To change the status, select a status from the drop-down in the applicant's row. The statuses display in the drop-down in the order in which they are configured for the applicant status workflow. If the status is a required status, then an asterisk displays to the right of the status. Required statuses cannot be skipped and must be marked complete by checking the Mark Complete option in order to change the current status to a status that comes after the current status in the applicant status workflow. Upon clicking , the required status is marked complete, and the status changes to the selected status. Note: The drop-down in the top row of the column can also be used to select an applicant status. There is no difference in selecting a status from this drop-down or the one in the applicant row. Auto-Progression/Disposition (Early Adopter)If auto-progression is configured for the status (via the requisition template), then candidates are automatically moved to the next status in the workflow upon receiving a Pass value for the pre-employment verification. If auto-disposition is configured for the status (via the requisition template), then candidates are automatically dispositioned if they receive a Fail value for the pre-employment verification. |
| Date |
The date selector field allows you to manually adjust the date on which an applicant's status is changed. This field only displays if enabled by the administrator in General Preferences. Batch Select DateThe date can be changed for all applicants in the pop-up by using the top row date field. Enter a date in the numeric text box or use the calendar to select a date. The date can be the current date or a past date. The date cannot be in the future and also cannot be prior to the most recent status change date. Select Date for Individual ApplicantsThe date can be changed for individual applicants by using the date field in the applicant's row. Enter a date in the numeric text box or use the calendar to select a date. The date can be the current date or a past date. The date cannot be in the future and also cannot be prior to the most recent status change date. |
| Disposition |
This column allows the recruiter to select the disposition when changing the status to Closed. This is a required field for the Closed status. To define a disposition, select the disposition from the drop-down in the applicant row. The disposition options only display if the Closed status is selected in the Change Status to column. Note: The drop-down in the top row of the column can also be used to select a disposition. There is no difference in selecting a disposition from this drop-down or the one in the applicant row. |
| Mark Complete | This option enables recruiters to mark a required status complete for the applicant. This then allows the recruiter to change the applicant's status without the limitation of not being able to skip a required status. |
| Submit | Click to submit the status changes. |
| Cancel | Click to cancel the status change actions. |
Notes about Required Statuses
- The applicant's status can be changed to any previous status in the status workflow or to Closed. However, statuses that are configured as required cannot be skipped (except when changing the status to a previous status or to Closed). If required statuses exist in the status workflow, the status can be changed up to the first required status in the status workflow.
- If an applicant's status is changed back to a required status and you then attempt to change the status to one that follows a required status, then the Mark Complete box must be checked in order to change the status.
Warning Icons
A warning icon displays to the right of the status if enabled in Compliance Enablement Preferences. If the applicant has more than one warning, the number of warnings appears to the right of the warning icon. To view a warning, hover the mouse over the warning icon. The following warnings may appear for an applicant:
- Application Status - This warning indicates that the applicant's application is incomplete.
- Pre-Screening - This warning indicates that the applicant failed the pre-screening questions. This warning can only display if an applicant's submission is manually moved to the Manage Applicants page via a manual status change.
Note: If the applicant's status is New Submission, the status is not a link and cannot be changed from the Applicant Profile page.
Manage Remaining Applicants
If enabled by the administrator in Requisition and Applicant Preferences, the status of all remaining applicants can be changed to Closed at the same time when all openings for a requisition are filled. In addition, all applicants can be assigned a single disposition when the applicants are closed. This can be done from the new Manage Remaining Applicants pop-up. This pop-up displays if an applicant's status is changed to Hired from the Current Status field and there are no remaining openings for the requisition. See Manage Remaining Applicants Pop-Up.
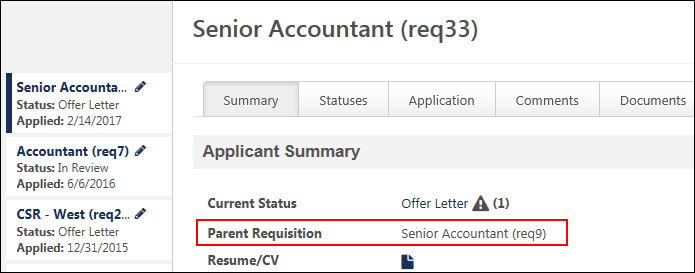
This field displays the name of the parent requisition and the requisition ID for the parent. The field helps recruiters know that the applicant has applied to a Related Requisitions (Apply to Multiple Jobs) that is associated to the parent.
The Parent Requisition field only displays for related requisitions, and the candidate has applied to a child requisition of the parent. The name of the parent requisition is not a link, and users who have access to the candidate but do not have access to the parent requisition (based on the user's organizational unit or permission to manage job requisitions) cannot view the details of the parent requisition. The field does not display on the applicant's profile for the parent requisition.
The Resume/CV field enables you to view the applicant's resume directly from the main Application Details section. Click the linked View Resume/CV icon ![]() to view the applicant's resume.
to view the applicant's resume.
For applicants who applied using their Seek profile, a Seek icon ![]() displays. Click the icon to view the applicant's profile.
displays. Click the icon to view the applicant's profile.
Anonymous Applicants
For anonymous applicants who are in a New Submission status, if the resume is attached as a separate document, manually entered, or from LinkedIn, then the resume data is made anonymous when the Resume/CV icon is clicked. Users can open or save the anonymous resume data. All personal data is removed from the resume.
Note: When viewing a PDF of the application by clicking the application icon in the Application field on the Summary tab, any Selection components included in the application do not display in the PDF. The full details of the Selection components can be viewed instead via the Detailed Results page by clicking the View Details link on the Manage Applicants page. The full results can also be viewed from the Application tab on the Applicant Profile page by clicking the View Details link in the Selection skills assessment and skills test sections.
Mobile Submissions
A PDF version of mobile application submissions is available from the Application field. The PDF is updated whenever the application is updated to display the latest version of the application.
Anonymous Applicants
For anonymous applicants who are in a New Submission status, the linked document icon is hidden.
The Source field displays the source the applicant used to apply for the job. For referral and recruiting agency sources, the source displays as a link that opens an information pop-up. The pop-up displays the name, position, and contact information for the source.
For portals with Referral Suite enabled and for sources that are manually added, the source can be edited. Editing the source only affects the source for that application and does not affect the source for other applications to which the applicant has applied.
For applications that originated from a mobile device, the Source field displays a mobile icon ![]() to the right of the career site source name.
to the right of the career site source name.
For applicants who submit their application via Connect With Us, the source will display as [Career Site Name].
Best Practice: Because editing the referral source for an application impacts many other pages in the system, changing the source should be handled cautiously. Changing the source affects all pages that display the referral source, which include the following:
- Applicant Profile page
- Manage Candidates page
- View Requisition Details page
- Career Center - Refer Jobs tab
The referral source also appears in standard and custom reporting.
To edit the source:
- Click the Update Source icon
 in the Source field. This opens the Update Source pop-up. The Current Source field displays the current source from which the application was submitted.
- For referral applicants, the Referral option will already be selected in the New Source field.
- For recruiting agency submissions, the Agency Submission option will already be selected in the New Source field.
- For manually added applicants, the Other option will already be selected in the New Source field.
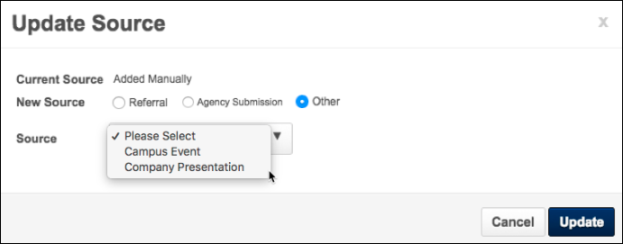
- Select a source option in the New Source field. The options that are available are dependent upon the functionality that is configured for your portal.
- Referral - This option is only available for portals with Referral Suite enabled. Select this option to indicate that the applicant's source is a referral. Once the option is selected, use the Select icon to open the Select User pop-up and choose the user who referred the applicant.
- Agency Submission - This option is only available for portals with the Recruiting Agency functionality enabled. Select this option to indicate that the applicant was submitted by a recruiting agency. Once the option is selected, the following additional options appear:
- Agency - Select the agency from the drop-down. The agency selected determines the recruiter names that are available to select in the Recruiter field.
- Recruiter - This field enables you to select the recruiter associated with the source. Click the Select icon in the Recruiter field to open the Select User pop-up. Select a user from the pop-up, and then click . The user displays in the Recruiter field.
- Other - Select this option to change the source to a source that was created on the Applicant Sources page. The only source options that are available to select from the Source drop-down are the sources from the Applicant Sources page. Other sources, such as a specific career site or job board, are not available to select.
- Click . This changes the source for the applicant in all areas of Recruiting.
To edit the referral source:
- Click the Edit icon in the Source field on the Summary tab. This opens the Referral pop-up. The referral source that appears in the Referral field is the application's current referral source. If the application does not yet have a referral source, then the field is blank.
- Click the Select icon in the Referral field to change the referral source or to add a referral source for an application that does not yet have a source. This opens the Select User pop-up.
- Select a user. This populates the Referral field in the pop-up with the user. Note: There are no constraints on which users are available to select. All active users in the portal are available to select.
- Click .
The selected user is now the referral source for the application. The referral method is changed to Referral-Other. The source change is recorded on the History tab. Note: The user's name does not appear in the Source field on the Applicant Profile page. Instead, the referral method displays. The referral source is visible by hovering over the referral method, which opens the Referrer Information pop-up.
Considerations
- The referral source for an application can only be edited at the application level.
- If the referral source is edited, the system automatically changes the value in the Source field to Referral-Other.
- The referral source can be changed multiple times.
- The referral source for an application can be updated from any source level to a referral. Note: In doing so, the referral method is always updated to Referral-Other.
- The referral source determines ownership for the referral. Changes to referral ownership are reflected on the Existing Referrals table in Career Center and in Referral Suite reports.
The Application Received field displays the date on which the application was received. If an application has not been submitted, then "Incomplete" displays. Note: For applicants associated with a recruiting agency, the application received date is the date on which the applicant submitted the application. The value in this field does not reflect the date on which a recruiting agency submitted an applicant.
The Invite to Apply link displays if the applicant has not yet submitted an application for the position. Clicking the link sends the applicant an email inviting them to apply to the requisition. Important Note: Clicking the link does not open a confirmation pop-up asking if you are sure that you would like to send the invitation. An email is automatically sent as soon as the link is clicked.
Mobile Submissions
For applicants who submit partially completed applications from a mobile device, the Application Received field displays "Incomplete." The Invite to Apply option does not display.
The Consider for other jobs field indicates whether or not the applicant would like to be considered for other jobs. The value is either "Yes" or "No."
If a candidate has opted out of being considered for other jobs, then "Candidate Search - Data is not searchable for other positions" appears in the header of the Applicant Profile page.
For information about sending an email from a template, see the Manage Applicants - Send Email from Template topic in Online Help.
For information about sending a customizable email, see the Send Customizable Email topic in Online Help.
This field displays the applicant's rating and total number of ratings. Ratings are visible to any user with permission to view the Applicant Profile page. If more than one user has rated the candidate, the rating displays as an average of the total number of ratings. If the candidate has not yet been rated by any user, all stars are gray.
By clicking the appropriate star, you can rate the candidate or edit your rating of the candidate. When you edit your rating, the stars appear red until you no longer hover over them, and then they appear yellow again. You cannot edit another user's rating. Note: If you have already rated the candidate, a message appears when you hover over the stars that indicates you have already given a rating. However, you can still change your rating.
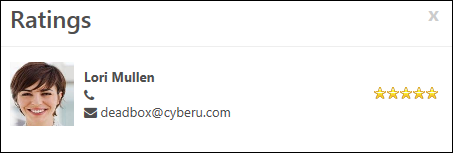
You can also view ratings made by other users by clicking the Ratings link in parentheses. A Ratings pop-up opens, displaying each user who has rated the candidate. The list is sorted in chronological order from first rater to last and includes the following for each rater:
- Photo, if available; ghost image displays if no photo is available
- Full name
- Current position
- Primary phone number
- Email address link
- Candidate's rating
Note: The rating functionality is only available if the "Allow Ratings" box is checked in General Preferences.
Application flags can be added to applications to flag the application under a certain classification, such as Keep on File. This feature is only available to recruiters who are defined by the administrator in the visibility settings for each flag. Recruiters must also have permission to manage flags in order to access the feature on the Applicant Profile page.
To add application flags to an application:
- Click the Edit icon in the Application Flags field on the Summary tab. This opens the Select Flags pop-up.
- Click the plus icon in the Add column next to the appropriate flags. This adds the flag to the selected flags table and displays the flag color, title, and description, as well as an option to remove the flag. For portals with multiple languages enabled, the flag name and description display in the viewing user's language, if available. There is no limit to the number of flags that can be added.
- Click . This adds the flags to the Application Flags field on the Summary tab. In addition, the History tab is updated with the event. Click to cancel the flag selections and/or deletions.
The flags that are available to select are the flags that are defined by the administrator as visible to the user. Flags can be removed from the selected flags table by clicking the Trash Can icon in the Remove column. This moves the flag from the selected flags table to the bottom table and also removes the flag from the application.
Note: Application flags are different from Applicant flags in that Application flags apply to the application, whereas Applicant flags apply to the applicant. For example, an Application flag could be created to mark an application as something like "Review Later" so that you remember to review the application at a later time. Conversely, an Applicant flag could be created to mark an applicant as "Close-By Headquarters" so that you identify the applicant as someone who resides in close proximity to your corporate headquarters location.
Viewing Application Flags
Application flags that are defined for the application and within the flag's visibility settings for the recruiter display in Application Flags field on the Summary tab on the Applicant Profile page. Hover over the flag to display a tool tip with the flag name. Click the flag to view the flag details. This opens the Application Flag pop-up that displays the flag name and description. The user who added the flag also displays, as well as the date on which the flag was added. For portals with multiple languages enabled, the name and description display in the viewing user's language, if available.
If there are more than 10 flags defined for the application, click the See more flags link. This opens the All Flags pop-up, which displays a table with each flag's color, title, and description. For portals with multiple languages enabled, the flag name and description display in the viewing user's language, if available.
If there are no flags defined for the application, then "No Flags" displays.
The Matching Criteria field displays the number of criteria associated with the job for which the applicant matches, as well as the match percentage. The percentage is calculated by dividing the number of matching attributes with the number of attributes for the position. The match percentage displays as both a number and color:
- Red = 0-32%
- Yellow = 33-65%
- Green = 66-100%
Clicking the Information icon  opens a pop-up of the position criteria. A green checkmark next to an attribute indicates a match. A red warning icon next to an attribute indicates the candidate does not match the attribute. Note: The position's attributes are matched against an applicant's resume.
This field displays reviewer feedback for applicants, once at least once reviewer has provided feedback. Reviewer feedback is submitted by reviewers and hiring managers on the Resume/CV Review page.
- Number of Reviews - This displays the number of users who have reviewed the applicant and the number of users who have not yet reviewed them. You can click the link to open a pop-up that shows the list of reviewers for the applicant and their feedback decision as Advance
 , Pass
  , or Pending
  .
. - Reviewer Feedback - The reviewers' decision displays below the number of reviews. The decision will either be Advance
 or Pass .
You can add applicants to requisitions for which they did not apply by using the Add to Requisition feature. The applicant appears on the new requisition as though they applied for the job themselves.
When an applicant is added, they will not need to complete application steps in the new requisition that are identical to application steps in the requisition from which they were added or moved. Also, the recruiter can choose to persist the original status or select a new status when moving an applicant.
In addition, applicant documents and attachments on the Applicant Profile page for the source requisition move with the applicant to the new requisition. The documents and attachments display on the Documents tab of the Applicant Profile page for the new requisition. For all attachments in the Attachments table, the status in the Applicant Status column is New Submission.
Note: Only candidates who checked the Consider me for other positions option when completing their application can be added to a requisition.
To add an applicant to a requisition:
- Click the Select Requisition link in the Add to Requisition field. This opens the Add to Requisition pop-up.
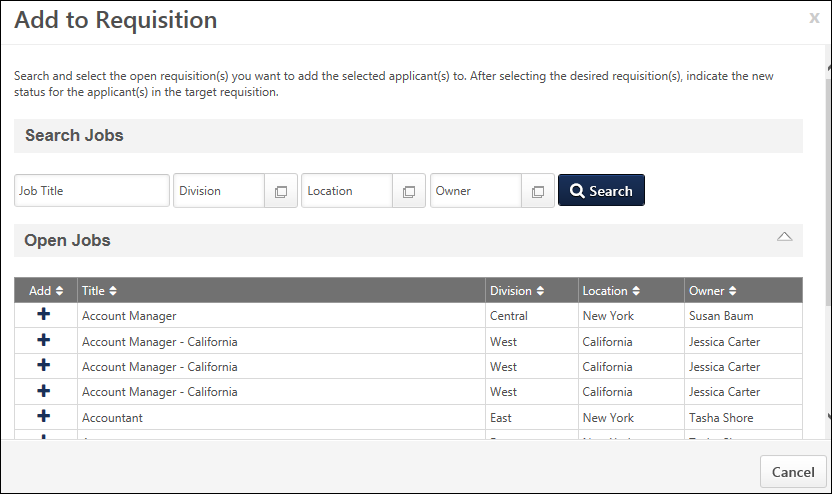
- Click the button, which enables the Open Jobs table to appear and lists all available requisitions. Or, enter criteria in the filters, then click to narrow the results.
- The Open Jobs table lists the requisitions that match your search criteria. The title, division, location, and owner display, as well as a column to select the requisition. Note: The results are dependent upon your permission constraints.
- Click the plus icon in the Add column to select the requisition. This enables the Selected Jobs table to appear and places the job in the table.
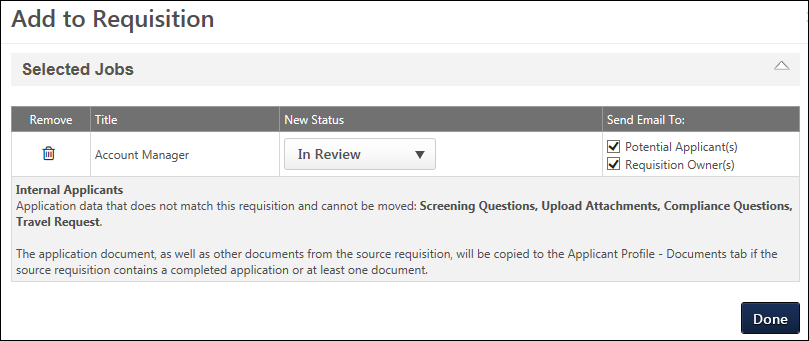
This table only displays once you have selected at least one requisition in the Open Jobs table. Jobs display in the table in the order in which they are added.
The following information displays in the table:
- Remove - You can delete jobs added to the Selected Requisitions table by clicking the Remove icon
 .
. - Title - This column displays the job title for the requisition.
- New Status - The New Status column allows you to select the status in which the applicant will be placed when they are added/moved to a different requisition. To configure the applicant's status:
- Click the drop-down in the New Status column. All applicant statuses for the requisition display in the drop-down.
- Select the status from the drop-down. Required statuses are marked with an asterisk and cannot be skipped. The New Submission status is selected by default. The Closed status is not available to select, as applicants cannot be added or moved to a requisition in a Closed status. Note: Statuses are defined as required by the administrator when configuring the job requisition template and by the recruiter when configuring the job requisition.
- Send Email To - Check the box to send an email to the requisition owner and/or the potential applicant, notifying them that the applicant has been added to the requisition. Both boxes are unchecked by default. Note: If the requisition to which you are adding the applicant requires applicants to complete certain steps prior to submitting their application, the email can be configured by the administrator in Email Management to include a link for the applicant to apply directly to the requisition. Further, the application materials for the requisition will be pre-populated with the applicant's existing information.
Apply with LinkedIn (With Apply Starters)
For portals that have enabled LinkedIn's Apply with LinkedIn (With Apply Starters) integration, recruiters can invite applicants to apply to other jobs by using the Invite to Apply feature. The ability to add/move applicants to other jobs is not inherent to the Apply with LinkedIn (With Apply Starters) integration, so the Invite to Apply feature lets recruiters do this in Cornerstone.
Apply with LinkedIn (With Apply Starters) is available for Recruiting clients who also have LinkedIn Recruiter and/or active LinkedIn Job Slots. The plugin is available without cost to those clients. The plugin must be enabled from the Edge Marketplace. For questions about the plugin, please reach out to your LinkedIn representative. For more information about the Apply with LinkedIn (With Apply Starters) integration, see the integration content in Online Help.
- Sarah is a recruiter at ACME.
- ACME just recently enabled the new Apply with LinkedIn (With Apply Starters) because the old Apply with LinkedIn was sunset by LinkedIn at the end of the year.
- Jack applies to a senior level position on ACME's career site, using his LinkedIn profile.
- Sarah conducts a phone screening with Jack and asks if Jack would be interested in a junior-level role instead. Jack agrees.
- Sarah notifies Jack that he will see an invitation via email to apply to the new position. He can apply with his LinkedIn profile, which makes the application experience fast and easy.
- Sarah returns to his profile, clicks the Invite to Apply link, and selects the desired position.
- Sarah sends the email and sees a green notification bar on the Applicant Profile page that the email was sent.
- Sarah returns to Jack's profile at a later time, selects the applicant feed, and sees confirmation that the invitation to apply has been sent.
Clicking the Invite to Apply link opens a pop-up that lets you select the position and send the applicant an email inviting them to apply to the job. The email is sent to the email address that the applicant used with their application. A confirmation that the email was sent appears in the applicant feed.
Important Email Note: An email is only sent to the applicant if the Invite to Apply email is configured and active in Email Administration. However, the Invite to Apply link still appears on the Applicant Profile page for applicants who apply using Apply with LinkedIn (With Apply Starters), even if the Invite to Apply email has not been configured.
This section explains which applicant data will be carried over for the internal or external applicant when they are added or moved to a different requisition. Since the internal and external application workflow may differ, the Internal Applicant and External Applicant labels identify the appropriate internal or external application workflow item that can be carried over. Each applicant workflow item will be listed separately by the name of the action item.
If there is at least one document included in the application, such as a cover letter or resume, then this section also indicates that the document will be carried over.
The only application data that can be carried over is data that matches the requisition to which the applicant is being added or moved. For example, if an applicant completed a Compliance Questions section on the application for the current requisition, but the application for the new requisition does not include a Compliance Questions section, then the applicant's responses to the compliance questions are not carried over.
Note: The applicant must have selected to be considered for other positions in order for application data to be moved.
Resume
The Resume section on the Summary tab displays an internal or external applicant's full resume directly on the tab. You can also download the applicant's resume by clicking the View Resume/CV icon ![]() in the Resume/CV field above the Resume section.
in the Resume/CV field above the Resume section.
If there is no resume for the applicant, then the section will indicate that a resume does not exist for the applicant.
Application Custom Fields
The Application Custom Fields section lists all Application custom fields for which the recruiter meets the availability. The section displays the value for the custom field and enables recruiters to add or edit the value. For recruiters who do not have permission to edit application custom field values, the tab displays but the custom fields are hidden.
The following information displays in the table:
| Column Name | Description |
|---|---|
| Title | This column displays the title of the custom field. |
| Value | This column displays the custom field's value. Note: The value is defined on the Applicant Profile Snapshot page by users with permission to edit custom field values. |
Add/Edit Custom Field Value
To add or change the value of the custom field:
- Click the button. This refreshes the fields to edit mode.
- Update the values for the applicable custom fields.
- Click the button. This saves the changes to the Applicant Profile page. The fields return to view mode.
Requisition Summary
The Requisition Summary panel displays the following information:
- Job Description - The Job Details link allows for quick access to the job description and job qualifications for the requisition. Clicking the link opens the Job Details pop-up. The pop-up displays the requisition's internal and external job description, minimum qualifications, and ideal qualifications. Note: The fields on the pop-up are not editable from the pop-up.
- Requisition Owner(s) - This field displays the owner of the requisition to which the applicant applied. If there are multiple owners, they appear in the order in which they are listed on the requisition. To view additional information about the owner, place your computer mouse over the owner's name. A small pop-up appears displaying the user's profile image, name, position, telephone number, and clickable email address, if available.
- Hiring Manager - This field displays the hiring manager for the job requisition. Hover over the hiring manager's name to view a pop-up displaying the user's profile image, name, position, telephone number, and clickable email address, if available.