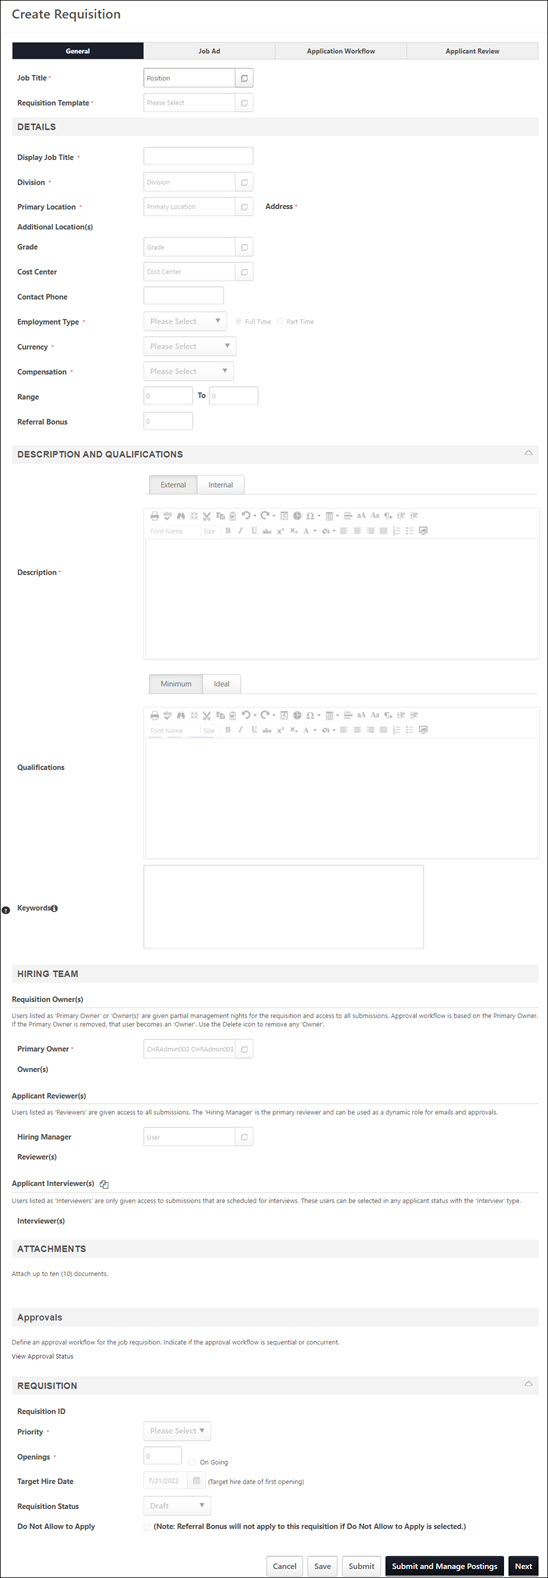
Create Job Requisition - General
The Create Job Requisition - General step enables recruiters to configure the following information for the requisition:
- The job title that is displayed to the applicant.
- Metadata and custom field values.
- The approval requirements and people who approve the job requisition.
- The people who review and interview new applicants.
In addition, if enabled by the administrator in Requisition and Applicant Preferences, recruiters can create hierarchical relationships between job requisitions by adding child requisitions. From the Requisition section of the General tab, recruiters can also decide whether or not to allow applicants to apply to the parent requisition. Child requisitions can be created once the requisition is submitted the Applicant Review step.
When creating a job requisition, the job title and requisition template must be selected before the additional fields can be completed. After selecting the position and requisition template for which you are creating the job requisition, the form is populated with the values set in the job requisition template for the position. The information can then be modified as needed.
| PERMISSION NAME | PERMISSION DESCRIPTION | CATEGORY |
| Localization: Default language | Grants access to change the default languages for a job requisition. This permission cannot be constrained. | Recruiting |
| Requisition: Localization Delete | Grants access to delete languages for a requisition. This permission cannot be constrained. | Recruiting |
| Requisition: Edit Attachments | Grants ability to add and delete attachments to requisitions and requisition templates. This permission cannot be constrained. Note: This permission does not grant access to remove attachments on the Applicant Profile page that are submitted by the applicant. | Recruiting |
| Requisition: Edit Description | Grants ability to edit the internal and external descriptions for requisitions. This permission cannot be constrained. This permission must be used in conjunction with the Requisition: Manage permission. Note: For requisition owners and managers who do not have this permission, when editing a job requisition, the requisition description section is read-only. | Recruiting |
| Requisition: Edit Job Ad | Grants ability to edit the Job Ad tab of the Edit Requisition page. This permission cannot be constrained. | Recruiting |
| Requisition: Edit Qualifications | Grants ability to edit the minimum and ideal qualifications for requisitions. This permission cannot be constrained. This permission must be used in conjunction with the Requisition: Manage permission. Note: For requisition owners and managers who do not have this permission, when editing a job requisition, the requisition description section is read-only. | Recruiting |
| Requisition: Edit Reviewers | Grants ability to edit the requisition reviewers section for requisitions. This permission can be constrained by OU. | Recruiting |
| Requisition: Manage | Grants ability to access and manage all requisitions regardless of ownership (constraints permitting). This permission also grants read-only access to the Applicant Review tab when creating or editing a job requisition. This permission can be constrained by OU, User's OU, and Grade. | Recruiting |
General Tab Sections
The following sections display on the General tab:
The following fields appear in the general information section:
The Job Title field determines which requisition templates are available to select. A job title must have at least one active requisition template in order to be used in a requisition. Until a job title is selected, all other fields on the requisition are grayed out and not selectable. Note: Requisition templates are configured by the administrator in Requisition Templates. See Requisition Template - Create.
To select a job title:
- Click the Select icon in the Job Title field. This opens the Search Position pop-up.
- Select a position from the list. You can use the Title and ID fields to filter the list. Note: The Search Position pop-up only displays positions that are within the user's constraints defined for the Requisition: Manage permission.
- Once a position is selected, the pop-up closes and the Job Title field is populated with the position.
Selecting a job title enables only the Requisition Template field.
Note: If there is only one active template that is configured for the position, then selecting the job title automatically populates the Requisition Template field and activates all other fields.
Considerations
- If you change the selection in the Job Title field after modifying on the requisition, any information entered in the fields prior to changing the selection is lost. A new requisition template may need to be selected, depending on the templates that are active for the new job title. If the same template is active for the job title, then the same template can be used but the field values may or may not be the same as those for the previous job title.
- If you click the Remove icon in the Job Title field and then reselect the same job title and template, any information entered in the fields prior to removing the job title reappears and is not lost.
Once a job title is selected, the active templates for the job are available in the Requisition Template field. Note: All fields below the Requisition Template field are disabled until a template is selected.
To select a template:
- Click the Select icon in the Requisition Template field. This opens the Select Requisition Template pop-up from which to select the template.
- Select a template from the list. This closes the pop-up and populates the Requisition Template field.
Or, if a default requisition template is available, then the Default Requisition Template link displays at the top of the pop-up. Clicking the link selects the default template and closes the pop-up. The Requisition Template field is populated with the default template. Note: A default template must be defined for the recruiter's organizational unit (OU) in order for a default template to be available to select. In addition, the Default Requisition Template link only displays if the Default Requisition Template option is selected by the administrator in Requisition and Applicant Preferences. See Requisition and Applicant Preferences.
Once a template is selected, all other fields are enabled on the General tab. This also populates the fields that have been configured for the template.
Note: When editing the Requisition Template field for a job requisition, if a default template is not defined for the recruiter's OU, then the Default Requisition Template link does not display in the Select Requisition Template pop-up. The link does not display even if a default template was defined for the requisition prior to editing the requisition. In addition, if a recruiter from a different OU edits the Requisition Template field, then the default template defined for the OU of the recruiter editing the requisition replaces the previous default template.
- If you change the selection in the Requisition Template field after modifying the requisition, any information entered in the fields prior to changing the selection is lost.
- If you change the selection in the Requisition Template field after the requisition has been approved, the requisition does not require re-approval. Changes made to the field are tracked in the Requisition History pop-up. See Requisition History Pop-up.
- The Requisition Template field is inactive when the requisition is in a status of Open, Pending Approval, Open Pending Re-approval, or Cancelled.
- When editing a job requisition, the Job Title and Requisition Template fields must contain valid values. It is also important to note that changing the Job Title field always refreshes all fields on the page.
When configuring the requisition template (including the default requisition template), the administrator may have hidden some of the fields that would normally be visible on the General tab. Fields that were hidden are not visible when configuring a requisition that uses a template with hidden fields. See Requisition Template - Create - General Tab.
The following lists the fields can be hidden in each section of the requisition:
The following fields can be hidden in the Details section and will not appear if they were hidden:
Even if a field is hidden from the requisition, the administrator may have filled in the field on the requisition template. The value in the field will not be visible when viewing the requisition.
The EEO Category field will only display on the requisition if the administrator has enabled the following in Compliance Enablement Preferences and the relevant OU is selected:
- The Require OFCCP Compliance Enablement functionality field is checked. Or,
- The Record EEO field is checked.
The following fields can be hidden in the Description and Qualifications section and will not appear if they were hidden:
- Minimum Qualifications
- Ideal Qualifications
- Keywords
Even if a field is hidden from the requisition, the administrator could still have filled in the field on the requisition template. The value in the field will not be visible when viewing the requisition.
The following fields can be hidden in the Hiring Team section and will not appear if they were hidden:
- Owner(s) - (Note: For requisition requests, this field appears in the Requisition Owner(s) section.)
- Hiring Manager
- Reviewer(s)
Even if a field is hidden from the requisition, the administrator could still have filled in the field on the requisition template. The value in the field will not be visible when viewing the requisition.
The entire Attachments section can be hidden by the administrator when configuring the requisition template. If the section is hidden, then it will not be visible on the General tab of the requisition.
Even if the Attachments section is hidden from the requisition, the administrator could still have added attachments on the requisition template. In such cases, any attachments added by the administrator would not be visible on the requisition.
The entire Approvals section can be hidden by the administrator when configuring the requisition template. If the section is hidden, then it will not be visible on the General tab of the requisition.
Even if the Approvals section is hidden, it may have been filled out by the administrator on the requisition template. In such cases, the requisition will be placed into a Pending Approval status and an approval workflow will need to be completed by the approvers once the requisition is submitted.
Note: This section does not apply to requisition requests.
The following fields can be hidden in the Requisition section and will not appear if they were hidden:
- Do Not Allow to Apply - (Note: This field does not apply to requisition requests.)
- Target Hire Date
Note: The Do Not Allow to Apply and Target Hire Date fields do not appear on requisition templates. However, they do appear in the Manage Field Visibility pop-up when configuring the requisition template, and the administrator can choose to hide them by checking the box on the pop-up.
When copying a requisition, any fields that were hidden on the requisition template for the requisition will be hidden on the copied requisition.
Note: The localization fields (View In, Default, Localized Languages) only display for portals with multiple languages enabled.
Sven is a recruiter in Germany whose portal language is set to German. Sven edits a job requisition that has a default language of English (UK). Sven wants to edit the English (UK) language values. Also, he does not want the requisition to exist in his German language. Sven needs a way to see the default language of the requisition, as well as edit the requisition in English (UK).
When editing the job requisition, Sven clicks the Localized Languages link. This opens the Requisition Languages pop-up. He clicks the Delete option to the left of German, and then clicks . This deletes the translated German values from the Display Job Title field, the Description and Qualifications section, and the Job Ad step.
Next, he clicks the English (UK) option in the View In field. He makes changes to the job ad and the description and qualifications. Then, with English (UK) still selected in the View In field, he checks the Set As Default box to set English (UK) as the new default language.
Finally, he saves the job requisition. The requisition now has a new default language of English (UK), and there are no fields translated into German.
View In
The View In field allows you to select a language from a new drop-down, and then edit the requisition in the selected language.
To view and edit the requisition in a specific language:
- Click the View In drop-down. The language that displays at the top of the list in the drop-down is the user's portal language. The additional languages are the languages that are enabled for the portal. Even if a language does not have a translated value, the language still appears in the drop-down.
- Select a language from the drop-down.
- Enter translated values in the localizable fields for the requisition. If a field currently has a translated value, as defined on the requisition template, then the value displays in the field and can be modified.
Once the translations are made in one language, you can select another language from the drop-down and translate the fields into that language. The values are saved when toggling between languages. Editing Note: This field can be modified when editing the requisition.
Default/Set as Default
The Default/Set As Default option allows you to change the default language of the requisition. The field name displays as Default when only one language is configured for the requisition. Once you select a different language from the View In field, the field name changes to Set as Default to allow you to set the selected language as the default for the requisition.
To change the default language:
- Select the new default language from the View In field.
- Check the Set As Default box. This changes the default language to the selected language.
- If there are any required fields that have not been completed in the default language, enter translated values into the fields. The job requisition cannot be saved until all required fields are completed in the new default language.
- Click to save the requisition.
Note: When the existing default language is selected in the View In field, the Set As Default option is disabled.
Editing Note: The default language for a requisition can be changed when editing the requisition.
Localized Languages
The Localized Language option allows you to remove all localized data for a particular language.
To remove a language from the requisition:
- Click the Localized Language option. This opens the Requisition Languages pop-up. The pop-up displays the languages that are currently present in one or more fields within the requisition. The default language displays at the top of the list and cannot be deleted.
- Click the Delete icon
 to the left of the language that you would like to delete. This opens a confirmation pop-up that indicates that deleting a language removes all translations from all fields in which the language has been translated. Click to delete the language. Click to close the pop-up without deleting the language. Note: The Delete icon only displays for users with permission to delete localized languages from job requisitions. In addition, if the Allow Minimum Qualifications modification after a Requisition is opened option is enabled in Compliance Enablement Preferences, then languages cannot be deleted. See Compliance Enablement Preferences.
 - Click . This saves the changes to the languages. Note: The language data is not removed from the requisition template, the copied job requisition, or the application workflow.
Editing Note: The languages can be deleted when editing the requisition.
Enter the following information in this section:
- Display Job Title - In this field, enter the job title that is displayed to potential applicants in the job ad. The character limit for this field is 100. If multiple languages are enabled for your portal, select the Translate icon to translate the field into other available languages.
- Use Case: Sometimes an organization has a different naming convention for its jobs that is not appropriate when publishing to an external site (e.g., a job title with a job code or job number). A job title that is less specific is more appropriate for a job ad.
- Description - In this field, enter a description for the job. This field has standard formatting options and accepts HTML. This field has no character limit. An internal and external job description is required and you can toggle between descriptions by selecting the appropriate radio button. By default, the description is set to the position OU description that is set in the system.
- Internal - The internal job description is for the purpose of posting the job requisition to an internal career board where the audience is the organization's employee base.
- External - The external job description is for the purpose of posting the job requisition to an external career board, where the audience is people outside the organization.
- Division - Click the field to select the division that is associated with the position. This is a required field.
- Primary Location - This field automatically displays the value in the Location field on the requisition template. This is a required field.
- Primary Location Address - Displays the physical address of the location indicated in the Location field. Note: Accurate address information must be provided in the Address field in order for job searches by geographical location to function properly on the career site. Requisitions that do not have valid facility location addresses will not be returned in the geolocation search on the career site.
- Additional Locations - This field allow you to add additional locations to the requisition. Adding more locations allows the requisition to appear in search results for applicants who are executing searches near the various locations.
- Email tags will only show the primary location
- JOB.AD tag will only show the primary location
- Referral email will only show the primary location
- Invitation to Apply email will only show the primary location
- Broadbean and eQuest integrations will only show the primary location
- Agency Portal will only show the primary location
- Review Applicants page will only show the primary location
- The requisition information in the mobile app will only show the primary location
- Additional Locations Address - You can add/edit the address of the additional locations. The address you enter will not change the address for the Location OU in Manage Organizational Unit Hierarchies.To edit the address, click Edit
 , and then complete the address fields in the Facility Location pop-up. Click the Delete icon to delete the location from the requisition.
 - Grade - This field enables you to limit access to the template by Grade OU. Only one Grade OU can be defined for the template. Defining a Grade OU is not required.
- Cost Center - This field allows you to select a cost center for the requisition template. This is not a required field.
- Contact Phone - In this field, enter the phone number that will be used as the internal contact for the job requisition. This phone number does not display to applicants.
- EEO Category - Note: This option is only available if the Record EEO option is selected in Requisition Preferences. From the drop-down list, select the appropriate equal employment opportunity category for the position. Note: The EEO Category field is only required if the Require EEO Job Category box is checked on the Compliance Enablement Preferences page. See Compliance Enablement Preferences.
- Employment Type - From the drop-down list, select the appropriate employment type. The available employment types are defined in Requisition Preferences. After selecting the employment type, select whether the requisition is a full time or part time position, using the radio buttons.
- Currency - From the drop-down list, select the currency in which the job is compensated. This information can be used in reporting, but not posting. If a currency is selected, entering a range in the Range fields is not required.
- Compensation - Note: This option is only available if there are active compensation types defined in Requisition Preferences.
- Compensation - From the drop-down list, select the appropriate compensation type for the job requisition (e.g., hourly, salary, contract). This information can be included when posting to an external job board as well as when reporting on the status of job requisitions. The options that are available are defined in Requisition Preferences.
- Range - The Range field is only visible for users with permission to view and edit the salary range. In the two text fields, enter the potential compensation range for the position. This indicates the potential compensation an applicant can receive if they are selected for the position. The lower range value is entered in the first field and the higher range value is entered in the second field. The lower range value must be lower than or equal to the higher range value. Note: If a range is provided, you must also select a currency in the Currency field.
- Referral Bonus - In this field, define the default value for the referral bonus by entering a positive whole number. This field does not accept commas or decimals. This is not a required field and only appears if Referral Suite is enabled in the portal. Note: The currency is determined by the value in the Currency field.
- [Custom Field Name] - Any Requisition custom fields that are created for the Position OU may be available on the job requisition. The custom fields that appear on the requisition are created in Custom Field Administration and are selected in Requisition and Applicant Preferences. The custom fields may or may not be required, depending on the Required setting in Custom Field Administration.
Note: The Location OU in the Primary Location field determines which compliance questions appear in the Compliance Questions section on the application workflow, if an application workflow is configured for the templates.
Note: If the primary location is changed to one of the locations in the Additional Location(s) field, then the location will no longer appear in the Additional Location(s) field.
Note: Modifying the facility address does not modify or define any address that is defined for the Location OU.
To add locations, click Add Location(s). This opens the Select Locations pop-up.Select one or more Location OUs from the pop-up. There is no limit to the number of locations that can be added.Click . This adds the locations to the Additional Location(s) field.
Scott, an applicant on the career site, is a sales executive who is interested in positions covering the North America region. He lives in Los Angeles but would be willing to relocate to another American city if required to do so.
Veronica, a Recruiter, is a Requisition Owner for the North America Sales Director requisition. She needs to post the requisition in several cities in the United States and Canada so that prospective applicants can find the requisition when they do a location search on the career site. Rather than spend time creating multiple parent-child requisitions and managing multiple applicant pools, she wants to post one requisition with all of the locations so that all applicants for this position are in the same applicant pool. She may later want to search this applicant pool for candidates from Los Angeles for another Los Angeles-based requisition.
To define the Grade OU, click the Select icon in the Grade field. This opens the Grade OU pop-up. Select the Grade OU. This closes the pop-up and adds the Grade OU to the Grade field.
Note: The Grade field is read-only for users who do not have permission to view Grade OUs. The field does not display for portals that do not have Grade OUs enabled.
If a field has been defined by the administrator as read-only in Requisition and Applicant Preferences, then "Read Only" displays in parentheses to the right of the field name. The value in the field can be modified on the requisition template, but it cannot be modified in job requisitions or requisition requests.
If a value for the custom field has been configured by the administrator for the Position OU in Manage Organizational Unit Hierarchy, then the value displays on the requisition template.
Language
This field displays for portals with multiple languages enabled and allows you to localize the internal and external description and the minimum qualifications. To localize the fields, select the language from the drop-down, and then enter the translated text into the fields.
To translate the fields into additional languages, select a different language from the drop-down and enter the translated text into the fields.
Note: If there is no content for the default language of the description on the Internal and External tabs of the job requisition, then a notification displays when clicking . As a best practice, the descriptions should be translated into the default language for the requisition.
Note: The Ideal Qualifications section is defined by the administrator when configuring the Position OU and is therefore not localizable from the requisition template.
Description
This section allows you to enter a description for the job for internal applicants and external applicants. The text box has standard formatting options and accepts HTML. There is no character limit for the text box. An internal and external job description is required. By default, the description is set to the position OU description that is set in the system.
- Internal - The internal job description is for the purpose of posting the job requisition to an internal career board where the audience is the organization's employee base.
- External - The external job description is for the purpose of posting the job requisition to an external career board, where the audience is people outside the organization.
If the description is edited and the requisition has an approval workflow, then the requisition must be re-approved after editing. Changes made to the field are tracked in the Requisition History pop-up.
The Clone External Description option enables you to use the external description as the internal description. The box is checked by default. When checked, the description from the External tab is added to the Internal tab.
You can modify and add to the description. The changes to the description on the Internal tab do not impact the External tab.
Important Note: If you clone the external description after entering an internal description, the internal description text will not be recoverable.
JOB.DESCRIPTION Tag
The JOB.DESCRIPTION tag displays the content that is in the Internal or External tab in the Description and Qualifications > Description section on the General tab of the requisition. If you include the JOB.DESCRIPTION tag on the job ad, then the internal or external description will display for applicants when they view the job.
If you do not want this information to appear for applicants, then be sure that the job ad does not include the JOB.DESCRIPTION tag.
Qualifications
The Qualifications section enables administrators to define the minimum qualifications necessary to be considered for the position, as well as ideal qualifications. These are not required fields.
Minimum Qualifications
Note: If the value in the Minimum Qualifications tab is edited after the requisition is submitted, the requisition requires re-approval.
Note: When the requisition is in an Open status, the value in the Minimum Qualifications tab cannot be edited unless the administrator enables editing via Compliance Enablement Preferences.
Ideal Qualifications
On the Ideal Qualifications tab, define the qualifications that you prefer an applicant has in order to be considered for the position. The contents of this field are used to determine the ideal matching criteria for job requisitions that are created with this template. However, only resume attributes that are mapped as Applicant Tracking System (ATS) resume sections will be evaluated for ideal matching criteria. See Add Resume Section - Applicant Resume for more information about mapping attributes to ATS.
The Ideal Qualifications tab displays the position's attributes and their criteria as defined in the Attributes section for the position. Each attribute can be added, edited, or deleted. Note: Changes to attributes at the requisition template level do not affect the attributes for the position in Position Management.
The Criteria table displays the following:
| Feature | Description |
|---|---|
| Add Attributes | Click the plus icon to the left of the Criteria heading to add attributes, which enables you to further define the ideal qualifications. See Position Management - Position OU for more information about adding attributes. |
| Edit | Click the Edit icon to edit the attribute. Changes to the attributes control an applicant's match percentage. |
| Delete | Click the Trash Can icon to delete the attribute. |
| Importance |
Click the Importance drop-down to change the importance for the attribute. The following Importance options are available:
|
If ideal qualifications are not configured for the requisition, then ideal matching criteria on all associated pages for the requisition is 0 of 0.
Note: If the value in the Ideal Qualifications tab is edited on the requisition after the requisition is submitted, the requisition requires re-approval.
Keywords
Enter keywords into the Keywords field, up to 1000 characters. Separate each keyword by a comma, and then a space.
The keywords can be localized by selecting the desired language from the View In drop-down. Then, enter the translated keywords in the Keywords field.
Keyword Searchability Note: The Keyword or ReqID field must be selected as a search field when configuring the Search Jobs widget settings for the career site, and the box in the Display Field column must also be checked for the Keyword or ReqID field. See Search Jobs Widget.
Refresh from Position
Clicking from the Description area replaces the current Internal and External descriptions for the template with the current description (General tab) from Position Management.
Clicking from the Ideal Qualifications tab replaces the current ideal qualifications with the current attributes (Attributes and Competencies tabs) from Position Management.
Once refreshed, the previous descriptions or attributes cannot be recovered.
Click the Toggle Full Screen Mode icon ![]() to view the Description or Qualifications section in full screen mode. Click the icon again to return to the default view.
to view the Description or Qualifications section in full screen mode. Click the icon again to return to the default view.
When viewing in full screen, you must be in the Design mode in order to exit the full screen view.
The Hiring Team panel displays all users that are associated with the requisition. There are four types of users that can be associated with a requisition: primary owner, owners, reviewers, and interviewers. In addition, a hiring manager can be selected.
Requisition Owner(s)
Primary Owner
This field displays the user who is defined as the primary owner of the requisition. This is a required field that cannot be left blank. By default, this field is populated with the requisition creator. The primary owner can be changed by selecting a different user.
Note: The approval workflow for job requisition is associated with the user defined in the Primary Owner field.
To select a different primary owner:
- Click the Remove icon
 in the Primary Owner field. This enables the Select icon
  .
. - Click the Select icon in the Primary Owner field. This opens the Select Primary Owner pop-up.
- Select a user from the list. This closes the pop-up and populates the Primary Owner field with the selected user. The user who was previously listed as the primary owner is now included as an owner in the Owner(s) field.
Owners
Default requisition owners may appear in this field if configured on the requisition template. Job requisitions are required to have at least one requisition owner. Which users are available for selection is determined by the constraints applied to the permission to manage requisitions. The user who is defined as the primary owner cannot also be defined as an owner in the Owner(s) field.
If a user who is listed as an owner in the Owner(s) field is added as the primary owner in the Primary Owner field, then the user is automatically removed from the Owner(s) field.
Requisition owners are dynamically assigned the Requisition: Owner permission for the associated requisition.
To add a requisition owner:
- Click the Add Owner(s) link. This opens the Select User pop-up.
- Select one or more users. Note: The user who is listed in the Primary Owner field will be available to select in the Select User pop-up. But, if the primary owner is selected to be an owner, then the user is moved from the Primary Owner field to the Owner field. The primary owner cannot also be an owner.
- Click . This adds the user to the Requisition Owners section.
Applicant Reviewer(s)
Hiring Manager
A default hiring manager may already appear in the Applicant Reviewers section, if configured on the requisition template. This is not a required field. Job requisitions can only have one hiring manager.
The hiring manager is considered a reviewer and is dynamically assigned the hiring manager permission and the permission to review requisitions. The hiring manager can access the Review Applicants page, which allows them to view the profiles of applicants for the job requisition. The hiring manager is also sent any emails that are configured with "Hiring Manager" as a recipient.
For more information about the Hiring Manager role, see the Recruiting Roles topic in Online Help.
To add a hiring manager:
- Click the Add Hiring Manager link. This opens the Select User pop-up.
- Select one or more users.
- Click . This adds the hiring manager to the Applicant Reviewers section.
Reviewers
Default applicant reviewers may already appear in the Applicant Reviewers section, if configured on the requisition template. Reviewers are dynamically assigned the Requisition: Reviewer permission to review applicants that apply to the associated requisition.
Reviewers can access the requisition and also past, present, and future applicants. This access level can only be granted at the Requisition Level![]() Requisition level refers to the job requisition in Manage Job Requisitions. Changes made to a job requisition are referred to as being made at the "requisition level." Applicant reviewers added to a job requisition after the requisition is created are referred to as being added at the "requisition level." An offer letter template added to a job requisition is referred to as being added at the "requisition level." This term applies to the Recruiting functionality. This is a Recruiting term. and not at the Applicant Level
Requisition level refers to the job requisition in Manage Job Requisitions. Changes made to a job requisition are referred to as being made at the "requisition level." Applicant reviewers added to a job requisition after the requisition is created are referred to as being added at the "requisition level." An offer letter template added to a job requisition is referred to as being added at the "requisition level." This term applies to the Recruiting functionality. This is a Recruiting term. and not at the Applicant Level![]() Applicant level refers to the applicant's profile. Changes made to an applicant's profile are referred to as being made at the "applicant level." Access granted to an applicant's profile is referred to as being granted at the "applicant level." This term applies to the Recruiting functionality. This is a Recruiting term.. If a reviewer is deleted at the requisition level, they can no longer access the requisition or any of the requisition's applicants.
Applicant level refers to the applicant's profile. Changes made to an applicant's profile are referred to as being made at the "applicant level." Access granted to an applicant's profile is referred to as being granted at the "applicant level." This term applies to the Recruiting functionality. This is a Recruiting term.. If a reviewer is deleted at the requisition level, they can no longer access the requisition or any of the requisition's applicants.
Note: If an applicant reviewer is added at the requisition level but the applicant has not yet begun the In Review process, the Review Applicant email is not sent until the applicant's status changes to In Review. If an applicant reviewer is added at the requisition level but the applicant has already completed the In Review process, then the Review Applicant email is not sent to reviewers that are added after the applicant has completed the In Review process. The Review Applicant email is sent to applicant reviewers that are added before the applicant has completed the In Review process and is triggered upon requisition submit or re-submit.
To add an applicant reviewer:
- Click the Add Reviewer(s) link. This opens the Select User pop-up.
- Select one or more users.
- Click . This adds the reviewer to the Applicant Reviewers section.
Applicant Interviewers
Interviewers can be configured as part of the hiring team. Interviewers selected in the Applicant Interviewer(s) section within the hiring team are in turn available for selection on the Applicant Review tab for any applicant status that is designated as a status type of Interview. The selected interviewers can review all applicants that are in the associated interview status type.
From the Applicant Interviewer(s) section, administrators can add and remove interviewers, as well as create a list of interviewers by copying the list of applicant reviewers. The Applicant Interviewer(s) section is not required.
Note: When editing a job requisition, changes made to the Applicant Interviewer(s) section are not applied to interviews that are already scheduled for the interviewers. In addition, changes to the section do not require re-approval of the requisition if an approval workflow is configured for the requisition.
Add Interviewers
To add interviewers:
- Click the Add Interviewer(s) link. This opens the Select User pop-up.
- Select one or more users. The users that are available to select are based on the constraints applied to the permission to edit interviewers.
- Click . This adds the users to the Applicant Interviewer(s) section.
Interviewers are listed in the order in which they are added.
Note: The Add Interviewer(s) link only displays for users who have permission to edit interviewers. For users who do not have permission to edit interviewers, the list of interviewers displays but cannot be modified.
Copy Applicant Reviewers
The Copy from Applicant Reviewers icon ![]() in the Applicant Interviewers section provides a one-click option to quickly create a list of interviewers by copying the applicant reviewers and hiring manager. Clicking the icon adds the applicant reviewers and hiring manager to the Applicant Interviewers section. The icon only displays for users who have permission to edit interviewers.
in the Applicant Interviewers section provides a one-click option to quickly create a list of interviewers by copying the applicant reviewers and hiring manager. Clicking the icon adds the applicant reviewers and hiring manager to the Applicant Interviewers section. The icon only displays for users who have permission to edit interviewers.
If interviewers have already been defined in the Applicant Interviewers section, then clicking the Copy from Applicant Reviewers icon overwrites the existing interviewers without warning.
Note: If there are no applicant reviewers defined, then clicking the Copy from Applicant Reviewers icon has no functionality.
Remove User
Requisition owners, the hiring manager, applicant reviewers, and interviewers can be removed by clicking the Trash Can icon to the left of the user's name. This includes default users added via the requisition template. The default requisition owner (job requisition creator) can also be deleted.
Note: Job requisitions must have at least one requisition owner.
Note: Removing an interviewer from the job requisition does not remove the interviewer from an interview that has already been scheduled.
Information Pop-Up
Additional information appears for owners, the hiring manager, reviewers, and interviewers by hovering over the user's name. An information pop-up appears, displaying the following information about the user:
- Photo; ghost image displays if no photo is available
- Name
- Position title
- Phone number
- Email address link
The Attachments section enables administrators to attach up to 10 documents to the job requisition. Note: If attachments are added to the template that is used for the job requisition, then the documents appear in the Attachments section on the job requisition and can be deleted by the user. Additional attachments can be added to the job requisition.
Users must be assigned the Requisition: Edit Attachments permission in order to add and delete attachments. It is important to note, however, that all users with permission to access the job requisition can view and download any associated attachments, regardless of whether or not they have the Requisition: Edit Attachments permission.
Add Attachment
In the Attachments panel, up to 10 documents can be added. The ability to add attachments is available to all users who have permission to edit attachments.
To add an attachment:
- Click the Add Attachment link. This opens the Upload Attachment pop-up.
- Enter a title for the attachment in the Title field, up to 99 characters. This is a required field.
- Browse for and select the file to upload. The field accepts a maximum file size of 5MB and the following file types: .doc, .docx, .xls, .xlsx, and .pdf. Once a file is selected, the button changes to .
- Click . This uploads the attachment.
- Click . This adds the attachment to the Attachments table. Or, click to cancel adding the attachment.
Once the maximum of 10 attachments has been reached, clicking the Add Attachment link opens the Attachment Limit Reached pop-up. This pop-up indicates that at least one document must be removed before additional documents can be added.
Note: Edits to the Attachments section do not require re-approval of the job requisition.
Attachments Table
The Attachments table displays all attachments that have been uploaded to the requisition. The table is sorted in order of the most recently to least recently attached document.
The following information displays for each attachment in the table:
 to open the document. Uploaded documents open in the format in which the document was attached, such as .pdf or .docx. The ability to view attachments is available for all users who have access to the requisition.
The Approvals section enables administrators to set the approval workflow for the job requisition. Administrators can determine which approval steps are included in the approval workflow as well as whether the approval steps occur at the same time or in a certain order.
View Approval Status
Clicking the View Approval Status link opens the Requisition Approval Status pop-up. When creating or copying a requisition, the pop-up is used to preview the approval workflow, since the Status, Decision, and Comments columns will be blank. When editing a requisition, the pop-up displays the details of the approval workflow, including the approvers, comments, and approval decisions. See Requisition Approval Status Pop-Up.
Add Approver
To add an approver to the approval workflow, click the plus icon to the right of the Approvals heading. The Select Approvers pop-up appears. The available approval options are:
- Manager - This is the job requisition owner's manager. This option can only be selected once as an approval requirement.
- Next Level Manager - This is the job requisition owner's indirect manager. This option can be selected multiple times, as multiple indirect managers can be included.
- Corporation Approver - This is the person defined as the approver on the Requisition Preferences page.
- Hiring Manager - This is the person defined as the Hiring Manager on the Requisition Preferences page for the job requisition owner's OU. This option can only be selected once as an approval requirement.
- User - This allows the administrator to select a specific user in the approval process. This option can be selected multiple times, as multiple users can be included.
After selecting the appropriate approvers, click in the pop-up. The selected approvers are added to the Approvals section. For dynamic roles, such as Manager and Next Level Manager, the name of the user who represents the role displays in parentheses to the right of the dynamic role. If a user is not defined for a role, then "None Defined" displays in parentheses. In addition, if a user is not defined for a role, then the step is skipped and assumed "Approved."
All approval steps are required to approve the requisition form.
Define Approval Step Order
The administrator can define the order of approvals. In the text box to the left of the approval step, enter the sequence in which the approval steps should occur. The step with the sequence number of "1" occurs first, followed by 2, 3, 4, etc. The approval process will follow the sequence defined here. For example, Approver #2 does not receive an approval request until Approver #1 has approved.
If multiple steps are given the same sequence number, then those two approval steps occur concurrently. All steps can occur sequentially, concurrently, or a combination of both where some steps occur sequentially and others occur concurrently. When there are concurrent approval steps, if one of the concurrent approvers denies the request, then the job requisition is denied even though the other approvers have not yet responded. The remaining approvers' request remains and their responses are recorded even though it has no impact.
If a User approval step is added, click the User field to select a specific user. The selected user will receive the job requisition approval request.
For User approval steps only, the administrator has the option of adding a secondary approver to the approval step by clicking the plus icon to the right of the User field. When a secondary approver is added to the approval step, a second User field appears to the right of the first User field, separated by "OR." This indicates that either of the two users can approve the job requisition. Both users specified in the approval step receive the approval request at the same time, but only one of them is required to approve the request. As soon as one of the users approve or deny the request, then the other user's response has no impact on the approval status of the job requisition. Even though only the response that is submitted first impacts the approval, both responses are recorded.
Delete Approval Step
Administrators can remove any approval step from the workflow by clicking the Delete icon to the left of the approval step.
Approver Required
If the Require Approver option is enabled by the administrator in Requisition Preferences, then at least one approver must be configured for the requisition. The approver can be the user who is submitting the requisition, but only if there is at least one other approver configured for the requisition.
Enter the following information in this section:
Next/Save/Cancel
After completing all sections, click to validate that all required information is entered on this page and proceed to the next step. Or, click to save any changes made to any of the steps. Or, click to return to the Manage Job Requisitions page without saving the requisition.
Submit Changes
When editing a requisition that has been submitted for approval, a button is available. Click this button to save the changes made on all pages of the requisition and submit the requisition for re-approval.
Submit/Submit and Manage Postings Buttons
Once all mandatory fields are completed you can use the following buttons:
- - Submits the requisition.
- - Submits the requisition and opens the Manage Posting page.