Email - Create
- Languages
- Title and Address
- Recipient and Availability
- Message
To create an email, go to . Then, click the Add Email icon ![]() in the Options column of the email action for which you would like to create an email. This opens the Create New Email page.
in the Options column of the email action for which you would like to create an email. This opens the Create New Email page.
| PERMISSION NAME | PERMISSION DESCRIPTION | CATEGORY |
| Email - Edit From Address | Grants ability to edit the "from" address when creating or modifying an email trigger. In addition, the Allow user to change email address option must be selected in Email Preferences. This permission works in conjunction with the Global Email Administration - Manage permission. This is an administrator permission. | Core Administration |

Notes Regarding Email Modification
Modifications to an email trigger will not affect any emails that have already been queued to be sent, and only Reminder type emails will enter the email queue.
- Reminder Type: Before Event - These emails are added to the email queue at the time the object is associated with the user. For example, if a Reminder type email is configured to be sent two weeks before a learning object's due date, then that email is added to the queue when the user registers for the learning object (LO).
- Reminder Type: After Event - These emails are added to the email queue when the event occurs. For example, if a Reminder type email is configured to be sent two days after a LO's due date, then that email is added to the queue when that LO's due date has passed.
If an email is not a Reminder type email, then the email will not enter the email queue, and it will inherit the email configurations that are set at the time the email is triggered. For example, a Training is Completed - Confirmation type email will automatically be sent when a user completes their LO, and the email that is sent will match the configurations that exist at the time the email is triggered.
If an object is configured to use Custom Emails, then only emails that are configured specifically for that object are utilized. For example, LOs configured via the Course Catalog to use Custom Emails will only use emails as they are configured for the LO in Course Catalog. Another example is that performance review tasks that are configured in the Review Workflow step to use Custom Emails will only use emails as they are configured for the performance review task in the Review Workflow step. In both examples, administrators must manually enable each email they want to fire in the Custom Emails section.
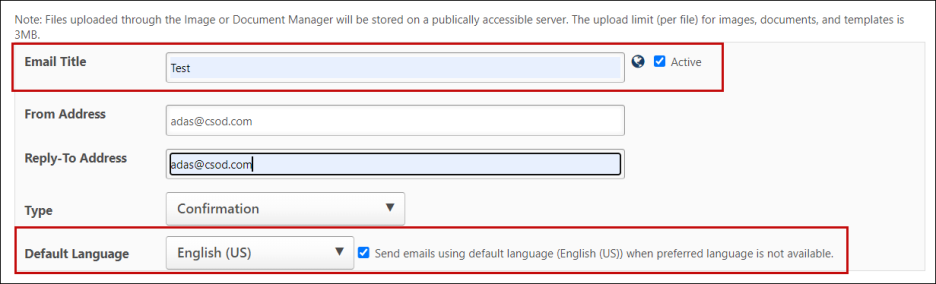
The administrators can now localize custom emails without having to set up and maintain custom email templates for every language active in a portal. Localize the email title, subject, and body or text by accessing the globe icon or through the language dropdown as in the standard or system email feature. The checkbox called which sends emails in the default language if no preferred language is set. The administrators can change the default language setting of a custom email via the language dropdown.
Language
Title and Address
Complete the following information in the Title and Address section:
| Field Name | Description |
|---|---|
| Email Title | Enter a title for the email. If multiple languages are enabled for the portal, a Translate (Globe) icon is available to the right of the Email Title field. Administrators can select this icon to translate the title into other available languages. Note: When editing or copying an email template, this field is always displayed in the email template's default language. To view the field text in a different language, select the Translate icon. |
| Active | Check the Active box to activate the email. If checked, the email becomes live upon clicking . |
| From Address | Enter the from address, or select one of the default addresses in the drop-down menu.
|
| Reply-To Address |
Enter the address to which recipients can reply to the email, or select one of the default addresses in the drop-down menu.
|
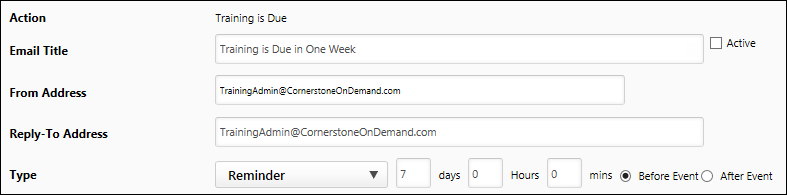
| Type |
Select an email type from the Type drop-down. Some types may not be available for the email trigger. The following types may be available:
To configure the settings for a Reminder type email:
Note: The word "Event" for reminder emails does not refer specifically to ILT events. The word refers to the action that triggers the reminder email to be sent. |
| Calendar Options |
Available for the ILT Session Register email trigger, this option allows the email creator to specify what sort of calendar invitation will be sent to users. The following options are available:
|
| Email Format |
For the ILT Session Register email trigger, Email Format options are available. The administrator can choose between the following two radio button options:
|
Recipient and Availability
Complete the following information in the Recipient and Availability section:
| Field Name | Description |
|---|---|
| Send To |
Select either a specific user to receive the email, or select from the drop-down a list of relevant job roles. Depending on what type of email you previously chose, the job role drop down may populate with different fields. Once you have selected a user or a role, you must click the button. At least one recipient must be specified. |
| Cc |
Select either a specific user or select a recipient from the drop-down list. Once you have selected a user or a role, you must click the button. Note: The users that are cc'd are not included in the email log file. Only the users in the Send To field appear in the email log file. Note: The Cc field does not observe availability rules. To enforce availability rules, recipients should be added to the Send To field.
|
| Availability |
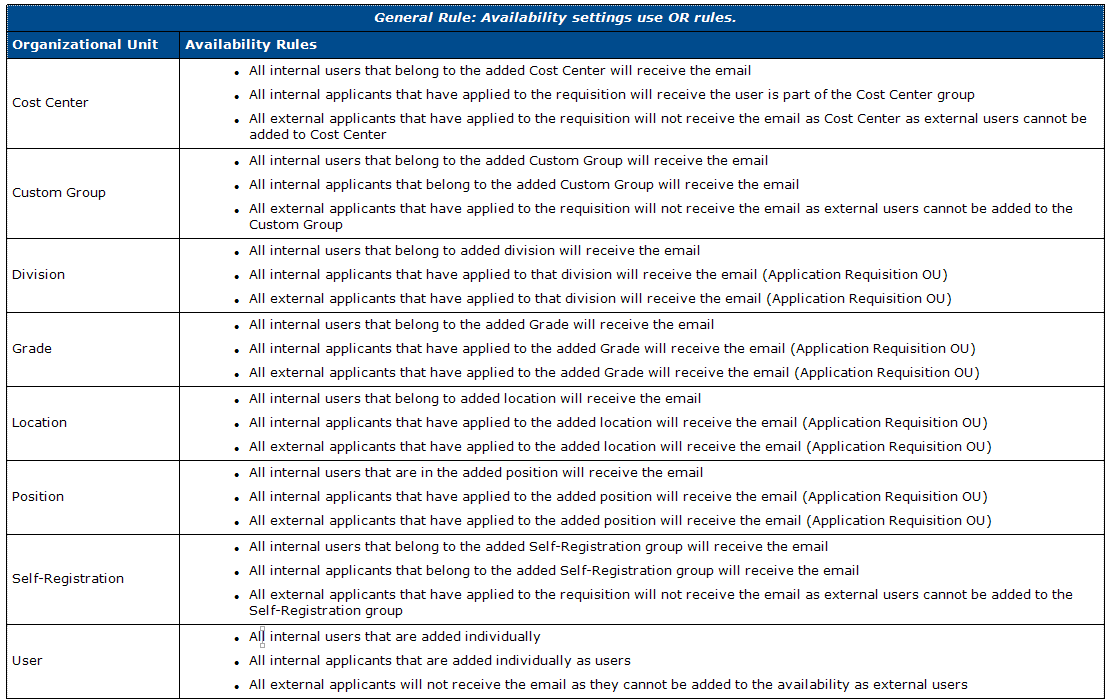
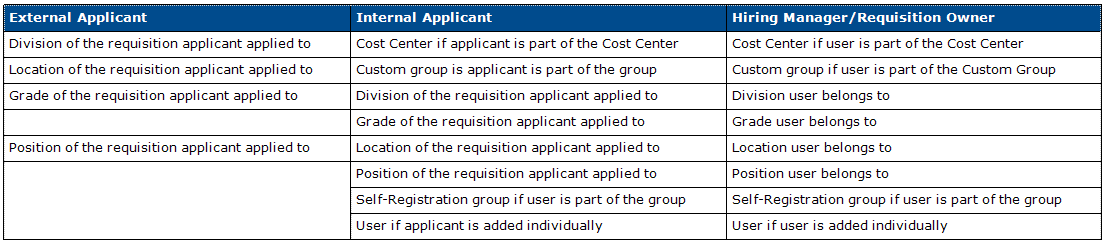
Choose to restrict the availability of the email to a specific OU. Availability makes sure that only the recipients confined within the selected OU receive emails. For Recruitment type emails that can be sent to internal applicants, the availability setting defined for emails sent to "Internal Applicant" is associated with the organizational unit (OU) defined for the job requisition to which the internal applicant applied. This is the OU/Division that is defined for the job requisition to which the internal user applies. For emails configured to be sent to internal users (not applicants), such as Hiring Manager or Requisition Owner, the availability is based on the Division OU to which the user belongs. As a best practice when configuring the Availability field, it is best to account for the role of the recipient as well as availability setting to ensure that internal applicants, external applicants, and internal users receive the appropriate emails. Click here to view the availability rules by OU. Click here to view the availability rules by recipient. Invite to Apply Email When configuring the Invite to Apply email, the Availability settings are bypassed for external users. |
Message
Complete the following information in the Message section:
| Field Name | Description |
|---|---|
| Tags | Click the Display a list of tags link to view tags available to use in the Subject or Message fields. The tags that are available to include are dependent upon the email type selected. When the email is sent, the tags are replaced with actual information. The tags must be entered exactly as they are listed, and they are case sensitive. For example, to address the email to the trainee (the person who must take the training), enter: "Dear TRAINEE.FIRST.NAME TRAINEE.LAST.NAME,". The field would be replaced with the relevant information. |
| Subject | Enter a subject for the email message. The subject is displayed to the recipient. Tags can be used in this field. If multiple languages are enabled for the portal, a Translate (Globe) icon is available to the right of the Subject field. Administrators can select this icon to translate the subject into other available languages. Note: When editing or copying an email template, this field is always displayed in the email template's default language. To view the field text in a different language, select the Translate icon. |
| Message |
Enter the message for recipient. The following options are available for configuring the message:
When configuring emails, a message appears in red at the top of the page, alerting you that files uploaded through the Image or Document Manager are stored on a publicly accessible server. The maximum file size is 3MB. If multiple languages are enabled for the portal, a Language drop-down is available above the Message field. Administrators can select a language from this drop-down to translate the email message into other available languages. Note: When editing or copying an email template, this field is always displayed in the email template's default language. To view the field text in a different language, select the appropriate language from the Language drop-down menu. |
Once all fields have been completed, click .
Modification History
A Modification History section is available when editing an email template. This section captures each time an email template is created or modified. This section displays the name of the user who created or modified the template and the date and time at which this occurred.
Conditions
Conditions can be set for an email trigger so that the email is only triggered when certain conditions are met. For example, the Session Transcript Status Changed by Roster Submission email trigger can be configured so that the email is only triggered if the student's LO is in a specific Transcript status, such as Pending Evaluation or No Show.
- STUDENT.TRANSCRIPT.STATUS==TRANSCRIPT.STATUS.[Enter the desired status here (e.g., NOSHOW, PENDINGEVALUATION)]
The Conditions section is only available if the email trigger can utilize conditions.
Impacts of Localization on Critical Emails
It is important to note that an email may not be sent to a recipient depending on the configuration and localization of the email template. The behavior of the email trigger depends on the configuration of the email template.
- If the email template is localized in the recipient's language, then the system sends the email in this language.
- If the email template is not localized in the recipient's language, then the behavior depends on whether the Send emails using default language when preferred language is not available option is selected.
- If this option is selected, then the system sends the email in the template's default language.
- If this option is not selected, then the email is not sent to the recipient.
While this is important for all emails, it is extra important to keep this in mind for the following email triggers:
- Admin Password Change
- Forget Password
- Forget Username
- Login Message Email
- User Password Change
WYSIWYG Tool Considerations
The following are important considerations when using the WYSIWYG tool:
- The Telerik editor demo website (http://demos.telerik.com/aspnet-ajax/editor/examples/default/defaultcs.aspx) is provided for reference purposes only. The editor available in Email Administration is a different version than the demo editor on the website, and there may be features that work differently or are missing. Hence, all features of the editor may not function in the same way as demonstrated in the demo editor.
- Editor Limitations:
- Microsoft Outlook does not display media files embedded in the editor.
- The paste feature may not paste some HTML content when done in the Design mode, for example "iframes." This can be done via HTML mode instead.
- Some media file codes are taken in by the editor but may not display in the emails received by the user.
- HTM files successfully uploaded via the Document Manager in the editor may not be displayed accurately in Outlook.
- Preview may not be identical to how a specific email client renders the email.
- "Paste" may not always paste the entire HTML content in design mode.
- "Select All" does not select all the content in design mode.
- Known Browser Limitations:
- Firefox
- The remove alignment button is not compatible with Firefox.
- "Select All" does not select the horizontal lines when the editor is used in Firefox.
- The Add button within Document Manager does not allow for multiple selection of documents in Internet Explorer and Firefox.
- The "Remove Alignment" feature may not work as expected in Firefox.
- Internet Explorer
- In Internet Explorer 8, the HTM file that is uploaded may show as distorted in design mode.
- In Internet Explorer, when a user uploads a HTM file using the Template Manager while setting up an email, the uploaded HTM file may have a slightly different layout and formatting.
- The Add button within Document Manager does not allow for multiple selection of documents in Internet Explorer and Firefox.
- Firefox
- CSS Limitations: Some features such as tables, CSS classes, and styles may not be displayed as expected in certain email programs. As a best practice, please avoid the use of the CSS options.
- The CSS class is not applied for the Document Manager if they are nested CSS classes.
- The following reference link provides details about which email clients support which type of CSS: http://www.campaignmonitor.com/css/. Users can view the email using a browser to show the entire contents of the email properly.
- Portal Security - If you have not requested to allow HTML tags, CSS, JavaScript, etc on your portal, you may see that some parts of the system no longer allow unsafe elements. You can opt out of this security measure by logging a case with Global Customer Support to enable bypass XSS validation. By bypassing this validation, Cornerstone will require you to agree to the security risk exposure this may cause.
Note: A detailed demo of all features in the editor is available at http://demos.telerik.com/aspnet-ajax/editor/examples/default/defaultcs.aspx. Descriptions of each option in the toolbar are provided at http://demos.telerik.com/aspnet-ajax/editor/examples/default/defaultcs.aspx.