Candidates Page
The Candidates page provides a one-stop shop where recruiters can quickly and effectively assess and manage all their candidates through the hiring process.
Prior to the Manage Candidates page, recruiters had to navigate to various pages to manage their candidates (Manage Requisitions, Manage Applicants, etc.). Further, recruiters could only view candidates for one requisition at a time.
With the Manage Candidates, recruiters will be able to view all of their candidates across their requisitions in a single screen, eliminating the need to navigate to other pages in the system. Recruiters will also be able to search and filter to find specific candidates, as well as view their candidates on a mobile device.
To access Manage Candidates, go to .
| PERMISSION NAME | PERMISSION DESCRIPTION | CATEGORY |
| Applicants: Comments - View | Grants ability to view comments for applicants. | Recruiting |
| Applicants: Status Change | Grants ability to change applicant status for any applicant to whom the user already has access. This permission cannot be constrained. | Recruiting |
| Applicants - View Candidate Matching Score | Grants ability to view a candidate's Matching Score on the Manage Candidates page. This permission is not constrained. | Recruiting |
| Offer: Manage Offers |
Grants ability to manage all functionality available in the Offer Letter Management table of an applicant's profile, as well as view offer letters on the Documents tab of the Applicant Profile page. This permission must be used in conjunction with the permission. This permission cannot be constrained. Note: Users must also be assigned the permission in order to edit offer letters that are generated from a template. Note: Users must also be assigned the permission to change the template that is used when generating offer letters.
Note: Users must also be assigned the permission to access offer letters that are defined as sensitive. |
Recruiting |
Change Status
The Change Status feature on Manage Candidates lets you change the status of one or more candidates across all your requisitions. All candidates can be changed to the same status at once, or you can select a status for each candidate individually.
See Manage Candidates - Change Status.
View Profile
You can view the resume and application information for one or more candidates at a time on the applicant carousel. You can also change a candidate's status from the applicant carousel.
See Manage Candidates - View Profile.
More Drop-Down
See the following topics in Online Help for detailed information about the actions you can take on Manage Candidates from the More drop-down:
- Add/Move to Requisition - See Manage Candidates - Add/Move to Requisition.
- Request Feedback - See Manage Candidates - Request Candidate Feedback.
- Manage Flags - See Manage Candidates - Manage Flags.
- Assign Integration - See Manage Candidates - Assign Integrations.
- Invite to Event - See Manage Candidates - Invite to Event.
- Assign Form - See Manage Candidates - Assign Forms.
- Request Reference Letter - See Manage Candidates - Request Reference Letters.
- Schedule Live Video Interview - See Manage Candidates - Schedule Live Video Interview.
- Schedule On-Demand Video Interview - See Manage Candidates - Assign On-Demand Video Interview.
- Send e-mail -See Manage Candidates - Send Email.
Configure Columns
The Customize Columns option lets you dictate which columns display on the page and the order in which they display.
Note: Edge integration packages can be displayed as unique columns. As of March 2020, non-Edge integrations such as HireRight cannot be displayed as columns on Manage Candidates.
To configure columns:
- Click the Customize Columns option
 . This opens the Customize Columns flyout.
 - Uncheck the box next to the columns you would like to hide.
- Suggested Action - This option can only be configured if the box for the Status column is checked. If the Status column is unchecked, the Suggested Action box is disabled on the Customize Columns flyout, and suggested actions will not appear on Manage Candidates.
- Click and drag columns into the order in which you would like them to appear.
- Suggested Action - This option cannot be ordered separately from the Status column.
- Check the Save As Default box to set this as your default view.
- Click .
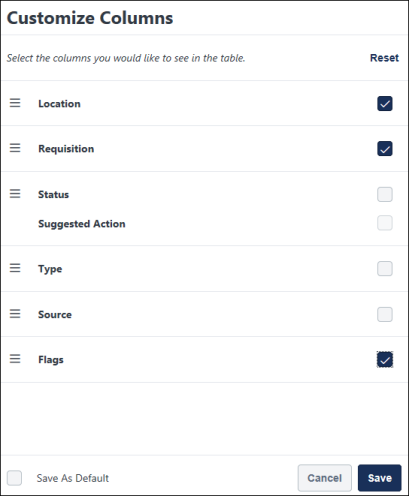
The columns you hide only appear in your view and does not impact the view for other users.
You can go back to viewing all columns on the page by clicking Reset at the top of the Customize Columns flyout.
Candidate Statuses Carousel
The total number of active candidates is displayed at the top of the page, along with the number of active candidates in each status. The statuses reflect all relevant candidates, based on the filters that have been applied.
Each status is clickable. When you click a status, the results update to show candidates who are in the selected the status.
By default, candidates in the Closed and Hired status do not display. You can view these candidates by toggling the Show only active candidates filter.
Each status has its own color bar. The color bar appears in the carousel, as well as in the Status column in the table. This can help to quickly identify a candidate's status in the table.
Search for Candidates
You can search for candidates by name, email address, phone number, and parsed resume keyword. Simply enter the search term(s) in the Search candidates and resume field and the page will update to only show candidates that match the search criteria. The search field allows a maximum of 320 characters. Therefore, you can enter up to 320 characters when searching for candidates.
Note: You cannot specify which field you are searching for (i.e., “First name = John”).
- Searches are performed using a "starts with" method. This means that a search for "Art" will yield "Arthur" but not "Martin."
- Names will be searched by first name and last name individually, meaning if I search for “John”, it will match a candidate “John Newton,” as well as “Sally Johnson”
- Exception: Japanese or Chinese characters are searched using a "contains" method. This means that a search for "Art" would yield “Arthur” and "Martin" as a match.
Note: If you entered a partial search term and do not see the desired candidate(s), please enter additional characters. When characters are entered into the search bar, the search framework identifies a list of the top 50 related terms and attempts to match candidates who have those terms in their record. As an example, a search for 'Bal' may yield terms such as 'Bal' 'Balance' 'Bali' 'Ball' etc. A candidate with the name Balto, for example, may be returned if the characters 'Bal' are entered into the search field. However, if 'Balto' is not part of the top 50 related terms, then that candidate will not be returned in the search results. Adding additional characters to the search will improve the likelihood that the appropriate term will be included in the top 50 related terms, and will help ensure the right candidate is returned.
Note: Anonymized New Submissions are not searchable by their anonymized data (name, email address, phone number). However, other data from their resume is searchable.
Search Suggestions
- Name
- Email Address
- Phone Number
- Job Title*
- Education Details*
- Skills*
*The resume fields that are available for keyword search may vary depending on which fields are mapped for the resume, as well as whether or not resume parsing is turned on in the application workflow.
When using the search box to search for data in parsed resume fields, the following types of resume fields are used in the search:
- Short Text Box
- Scrolling Text Box
- Dropdown
- Attribute List
Resume keywords are not translated. If a recruiter searches for terms in a language that the candidate did not use, their search may not result in a match. For example, if a candidate applies in French (France), and a recruiter whose language is English (UK) enters an English search term (e.g., "accounting"), then the search will not return results for candidates whose resume data is in French (France).
Filters
You can decide which requisitions and statuses you would like to view on the Manage Candidates page by configuring the filters in the Filters panel.
The following filters are available on the Manage Candidates page:
- Show only open reqs - By default, only open requisitions are shown on the page. To show requisitions in other statuses, toggle the Show only open reqs option.
- All Jobs - Click All Jobs to show candidates in all jobs you have access to, regardless of whether or not you are a requisition owner. To view all jobs, a user must have permission to manage candidates. The candidates that display are the candidates that are within your permission constraints.
- My Jobs - Click My Jobs to show candidates in jobs for which you are a requisition owner.
- Select Requisition - Check the box next to the requisitions you would like to view. To filter the list, enter keywords into the search field. The list updates automatically to match the search criteria. The most recently created jobs will appear at the top of the list. If no requisitions are selected, candidates from all of the displayed requisitions will appear.
- Show only active candidates - By default, candidates in the Closed and Hired statuses are not displayed on the Manage Candidates page. To view these candidates, toggle the Show only active candidates reqs option.
- Select Status - Check the box next to the statuses you would like to view. The candidates table updates automatically to show candidates who are in the selected statuses. Default and custom statuses are available as filters, as well as referral statuses including Suggested, Invited to Apply, and Declined.
Tip: Searching by status can help you quickly find candidates in one or more statuses across your requisitions, or within one or more particular requisitions. This can provide helpful flexibility to enable the recruiter to execute their work as they see fit.
You can filter candidates by applicant and application flags. The Flags filter displays all flags that have been added to the candidates who are in the applicant pool for the requisitions to which you have access. Application flags that apply to the applicants in your available requisitions also display.
To filter by flags, check the box next to the filter. You can also search for flags using the search box. The number of candidates that have been assigned the flag appears to the right of the flag name.
The candidate results update automatically. When more than one flag is selected, only candidates who have all of the flags display in the results.
Recruiters are only able to view, add, and delete applicant flags that are in their organizational unit (OU) and can only edit applicant flags if they have the Applicants: Manage Flags permission.
Flags that are not in a recruiter's OU will not be visible to the recruiter.
This filter lets you filter by candidate source, which is how the candidate applied. This includes candidates being added manually, referrals, career sites, etc.
To filter by candidate source, select or deselect a source option. The candidate results update automatically.
This filter lets you create pre-screening questions to filter candidates based on the answers to these questions. Pre-screen filtering supports the following question types:
- Multiples choices, single answer
- Multiple choice, multiple answer
- Date
- Numeric
- Yes/No
- True/False
To create pre-screening question filters:
- In the Prescreening Questions section, click Add question. Only questions answered by candidates currently shown on your Manage Candidates page are available.
- Search for, and select pre-screening questions.
- Provide options and answers for each question.
- Select . The pre-screening question filters operate as "and" operator, so only candidates meeting all criteria will be met.
The Manage Candidates page refreshes and displays only candidates that match the selected pre-screening criteria. The selected questions and their options now appear in the Prescreening Questions filter section.
You can select one or more Matching Score filters to identify the best matched applicants.
You can remove all filters by clicking Reset. Filters can be collapsed.
You can save your filter settings as default so that the Manage Candidates page is always filtered by the jobs, candidate statuses, and applicant flags you want to view. This is especially helpful when viewing large volumes of candidates across multiple jobs.
To save your filter settings:
- Select your desired filters in the Requisition, Candidate Status, and Applicant Flags sections.
- Click Save As Default at the bottom of the Filters panel. A pop-up message appears at the top of the page to let you know that your selections were successful.
Your filter settings will remain even when you leave Manage Candidates and return or log out of your portal and log back in. This creates a more efficient experience when viewing and comparing candidates.
You can remove your default settings by clicking Reset at the top of the Filters panel. This returns the filters to their default system settings.
Candidates Table
Manage Candidates displays candidates from all the requisitions you can access and that are within your permission constraints. By default, candidates are sorted by newest to oldest submission date. Up to 20 candidates display per page. Additional candidates can be viewed by clicking on the pagination controls at the bottom of the page.
Up to 10 pages of results can be viewed. To find candidates in groups that exceed the 10-page limit, narrow your search results by selecting specific requisitions or statuses or by doing a keyword search.
Select the number of candidates you want to view in the table. Options are 20 or 50.
You can sort the candidates table by the following:
- First Name (A-Z)
- First Name (Z-A)
- Last Name (A-Z)
- Last Name (Z-A)
- Req ID (Ascending)
- Req ID (Descending)
- Days in Status (Shortest)
- Days in Status (Longest)
- Submission Date (Oldest)
- Submission Date (Newest)
- Relevance - This setting sorts by the candidate's relevance to the search criteria you entered in the Search candidates and resume search field.
The Select All checkbox is used to quickly select all candidates that are visible on the page so that you can complete actions for all the selected candidates at once, such as changing their status.
Note: When using the Select All checkbox, only candidates on the page can be selected. If there are multiple pages of candidates, candidates on other pages are not selected.
The following columns and information is available in the candidates table:
Recruiters can view, add, and edit applicant flags for candidates in bulk or one at a time, as well as filter candidates by flags. When looking at multiple candidates across multiple requisitions, administrators can quickly select candidates and add the same flag to all of them. Administrators can even add multiple flags and delete existing ones from the same flyout for an efficient, simplified experience.
The flags are color-coded and labeled based on Applicant Flags Preferences and the system defaults for flags. Flags display in order or most to least recently added.
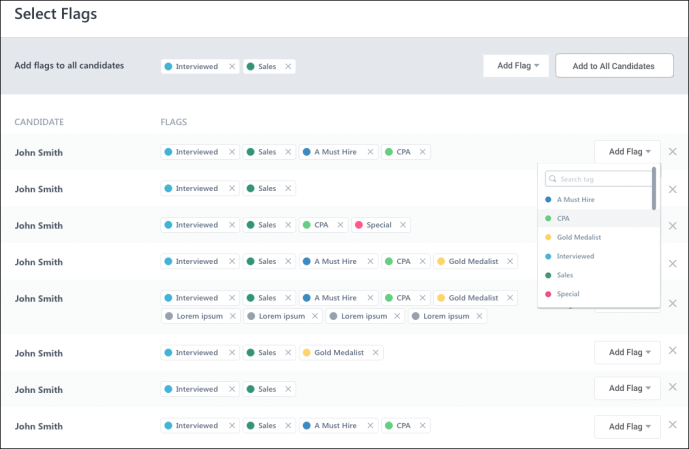
Flags can be added in bulk and individually to candidates.
To add flags:
- Select one or more candidates.
- Select Manage Flags from the More drop-down. This opens the Select Flags flyout, from which you can add and remove flags for candidates.
- Or, click a flag from the column of a specific candidate. This will also open the flyout.
Note: As with existing functionality for applicant flags, flags cannot be added for referrals. In addition, system flags cannot be added or deleted.
You can add one or more flags to all candidates at once.
To bulk-add flags:
- Select the flag from the Add Flag drop-down at the top of the flyout.
- Click .
- Click .
All flags added in bulk will appear at the top of the flyout and in each candidate's row on Manage Candidates.
You can add flags to each candidate on an individual basis.
To add flags to individual candidates:
- Select the flag from the Add Flag drop-down to the right of the candidate.
- Select the flag from the drop-down.
The flag will appear next to the candidate's name in the flyout and in their row on Manage Candidates.
To remove a flag from candidates, click the X to right of the flag name.
To remove flags from candidates, click the X to right of the flag name.
When a flag is removed, the action is shown in the candidate's history on their applicant profile.
The following information displays in the Candidate column:
- Select Candidate Checkbox - Each row displays a checkbox next to the candidate's name. The box is used to select candidates for whom you would like to process actions, such as changing the candidate's status. The box is unchecked by default. Check the box to select a candidate. Check the box again to deselect a candidate. Note: Candidates cannot be selected across multiple pages. For example, if one or more candidates are selected on the first page of candidates and the recruiter uses the pagination controls at the bottom of the screen to view another page of candidates, the selection(s) from the first page are lost.
- Name - The name displays as a link to the Applicant Profile page, from which you can view additional details about the candidate. Click your browser's "Back" option to return to Manage Candidates. All filter settings remain upon return.
- Last/Current Job and Company - This is the candidate's most recent job and employer.
- Phone Number - The candidate's phone number appears as a link. Click the phone number to call the candidate. This feature is available for both mobile and desktop.
- Email Address - Click the email address to email the candidate. This opens an email pop-up from your email provider.
- Resume/CV - To view/download the applicant's resume/CV, select the Resume icon
 . If the candidate applied with LinkedIn, a link will appear that will open the candidate's LinkedIn profile.
 - View Application - To view/download the application, select the View Application icon
 . This option only displays for internal and external candidates, as well as candidates submitted by a recruiting agency. This option does not display for candidates who are added manually. See View Application as PDF.
 - View Seek Submission - For candidates who applied using their Seek profile, a Seek icon
 displays. Click the icon to view the candidate's profile.
Note: Suggested Referrals who have applied for a requisition do not have an Applicant Profile. Clicking the name of such a candidate will result in no action.
Note: The job/company data may display as "Not Defined." This is a known issue for which a fix is planned in a post-release patch.
Note: For external candidates, this information is based on the work history information provided when completing the application. A position marked as “Current” will be used as the candidate’s current position and company. If no position is marked as current, then the role with the most recent start date will be considered the Current position. For internal candidates, “Internal” will display.
Note: If the Anonymize personal applicant data for New Submissions option is enabled in Compliance Enablement Preferences, then a New Submission’s name, email address, phone number, and location are hidden. In addition, their PDF application is disabled and their resume is hidden. Contact information for such candidates is not searchable, but these candidates may appear in searches for resume keyword.
This column displays the candidate's location, if available. The following location information displays:
- City
- State/Region/Province
- Country
This column displays the requisition display job title and the requisition ID.
For users with permission to manage requisitions or who are a requisition owner, the name appears as a link. Click the name to view and edit the requisition. Click the button to return to Manage Candidates. All filter settings remain upon return.
This column displays the result and overall score for an assessment. Each assessment displays in its own column.
Including the result and score on Manage Candidates can help recruiters interpret the score. The result is passed to Cornerstone by the assessment provider and is not defined by Cornerstone.
The columns can be hidden via the Customize Columns option.
The Status column displays the candidate's current status and includes suggested actions for the status. The number of days since the status was changed also displays.
For candidates who have been dispositioned, the disposition reason displays below the status.
Suggested Actions for Statuses
Suggested actions appear in the Status column and show recruiters exactly what action they should take next for each candidate. The action is clickable and opens right to the area of Recruiting that lets you perform the suggested action.
Types of Suggested Actions
The following are the suggested actions based on a candidate's status:
- All suggested actions are system-defined and cannot be modified, deleted, or hidden.
- Administrators and recruiters cannot create their own suggested actions.
- You cannot disable suggested actions. The suggested action will always appear in the Status column when an action is available based on the candidate's status.
- There will be no suggested action for statuses with custom assessment integrations. Examples of such integrations include WOTC, Shaker, AON, and more.
- On mobile devices, the Suggested Action button is visible, but the pages to which the Suggested Action button links (e.g., Interview Scheduler or Statuses tab of the Applicant Profile) are not responsive.
- If there are multiple interviews in a status, the earliest scheduled interview will drive the suggested action.
- If a candidate has multiple offer letters, the most recently created offer letter will drive the suggested action.
This column indicates whether a submission is Internal or External. The candidate type is not searchable.
This column displays the source with which the candidate's application was submitted, such as a career site, the internal career site, etc.
This column also displays the date on which the candidate submitted their application, was added by a recruiter or agency, or was submitted as a suggested referral. The name of the user who submitted the suggested referral also appears, as well as the user's relationship to the candidate.
For applications submitted via a mobile device, the word "Mobile" appears after the source name.
This column displays the candidate skills match score by matching a candidate's profile against the requisition's job description. Users must have the Applicants - View Candidate Matching Score permission to view these scores.
To enable this feature, administrators can go to and select Candidate Skills Match.
Once enabled, an administrator must configure location Organizational Units (OUs) where matching is required by going to and checking the Enable Candidate Skills Match option under the Applicants section.
Matching begins when a candidate submits an application with a resume attached in .doc, .docx, or .pdf format. Scoring is based on the candidate's resume /work experience matched against the job description. Scores appear in the Candidate Score column as follows:
- 76 to 100 – Excellent
- 51 to 75 – Good
- 26 to 50 – Fair
- 0 to 25 - Low
Note: If the resume is not attached to the application, the score is blank. For better scoring, it is recommended that parsing for previous work experiences is enabled. See Application Workflow - Upload Attachments.
Skills Matching Summary Flyout
Recruiters can click on any score to open the Skills Matching Summary flyout. The flyout displays the following details:
- Skills Relevance – Predicts how well the candidate's skill match the position.
- Experience Relevance – Predicts whether the candidate's experience matches the position.
- Upward Opportunity - Predicts how well the current position matches the candidates career path.
- Is the matching score relevant? question - Recruiters can submit feedback about whether the scores calculated were appropriate or needed fine tuning. Feedback goes to Beta Community Thread for Feedback and Questions page. Only one feedback can be submitted per application.
- Matching skills and Missing Skills- Displays items mapped in the customer's Capabilities Library. Note: If the skills identified are not mapped in the Capabilities library, then the Skills Graph keys display. See Capabilities Library - Create/Edit Capability.
- Work Experience - Only visible if work experience parsing is enabled for the application.
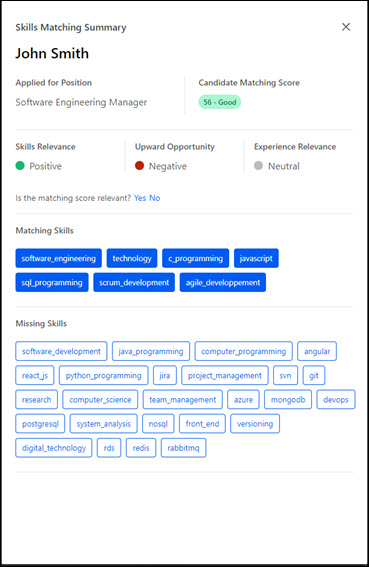
- Matching is provided only for locations where candidate skills match is enabled under .
- Matching is only supported for External Career Site, Internal Career Site, Add/ Move to Requisition, and Snapshot workflows.
- If the Capabilities Library is not configured, information in the Matching Skills and Missing Skills fields will be displayed as keys and might not be translated to the logged-in user’s language.
Note: In the Matching Skills and Missing Skills sections, to display only skills mapped in the Capabilities Library and ignore the Skills Graph skills, contact Global Customer Support (GCS).