The Upload Attachments action item enables administrators to add the ability for job applicants to upload attachments. Job applicants can upload their resume to the application and then edit the fields that it populates via the resume parser. This action item can only be used once in an application workflow template.
To create an application workflow template, go to . Then click Create Template.
| PERMISSION NAME | PERMISSION DESCRIPTION | CATEGORY |
| Application Workflow Template - View | Grants ability to access and view Application Workflow Templates. | Recruiting Administration |
Administrators can only edit templates that they created or that were created by other administrators who exist within the constraints applied to this permission.
Add Upload Attachments Action Item
To add the action item, click Upload Attachments in the Add Action Item drop-down on the Application Workflow page. This adds the Upload Attachments action item to the section. You can edit the options for this action item by clicking the Edit icon ![]() . See Edit Action Item.
. See Edit Action Item.
Once the action item is added to the section, the option is no longer available unless the action item is removed from the workflow.
Mobile Icon
The mobile icon ![]() that displays in the right column on the Application Workflow page indicates that the action item is compatible with mobile devices. When included in the application workflow, applicants filling out an application on a mobile optimized career site can access and complete this action item directly from their mobile device.
that displays in the right column on the Application Workflow page indicates that the action item is compatible with mobile devices. When included in the application workflow, applicants filling out an application on a mobile optimized career site can access and complete this action item directly from their mobile device.
Edit Action Item
Click the Edit icon ![]() to define the title, instructions, and optional resume preference for the Upload Attachments action item.
to define the title, instructions, and optional resume preference for the Upload Attachments action item.

Complete the following fields in the pop-up:
- Title - Enter a title in the Title field.
- Instructions - Enter instructions for the action item in the Instructions field. There is no character limit. This field does not accept HTML. JavaScript is not supported.
- Optional Resume - This option is unchecked by default. Selecting this option enables a No Resume/CV option to appear on the Upload Attachments page during the application process. Applicants can select the No Resume/CV option to proceed through the application workflow without adding a resume. Note: Applicants are required to include a resume if the No Resume/CV option is not checked.
- Resume Parsing - Resume parsing automatically enters the applicable values from an applicant's resume into the resume fields on the application. This is a helpful feature for applicants so that they do not have to enter information manually into the application.
- Full Resume Parsing - This option displays all resume sections to applicants (i.e. Work Experience). Once the applicant uploads a resume file, the content from the file will be parsed (populated) on the application workflow in order to help the applicant fill in the resume sections. To see more information about configuring Resume sections, See Add Resume Section - Applicant Resume. Additionally, enabling this option in an Internal applicant workflow allows internal candidates to use their Universal Profile resume rather than having to upload a separate document.
- Contact Data Parsing Only - This option only applies to the Apply as Guest functionality. When the Contact Data Parsing Only option is selected, only the data entered on the Contact Information page for applicants who apply as a guest is parsed. The resume data will not be visible to the applicant in the application workflow. Instead, they can only view and modify their contact information and will not be able to view or modify their resume data.
- Disable Resume Parsing - The Disable Resume Parsing option is unchecked by default. When unchecked, the resume parsing functionality is enabled for all applicants in the application workflow. When the option is checked, the resume parsing step of the application workflow is skipped for all applicants in the application workflow. In addition, the search by resume/CV functionality is not supported when the Disable Resume Parsing option is checked. Note: When the Disable Resume Parsing option is checked, the resume sections on the Upload and Review steps are hidden on the application workflow preview.
Note: If the Contact Data Parsing Only option is enabled when configuring the Upload Attachments action item, there will be no matching criteria with resume parsing for the applicant, since the Universal Profile resume populates upon hire.
Once all fields are defined, click . This saves the settings and closes the pop-up.
Mobile-Friendly Application Workflows
When configuring the Upload Attachments action item for a mobile-friendly application workflow, the Edit Action Item pop-up includes options to show or hide the Cover Letter section, as well as configure additional attachments.
Additional Attachments
An Additional Attachments section appears on the application by default for career sites configured via the Mobile-Friendly Candidate Experience that include an Upload Attachment action item in the workflow. The default section can be removed by the administrator when configuring the Upload Attachments section in the application workflow template and can also be made required.
Additional Attachments sections are added via the Edit Action Item pop-up for the Upload Attachments action item. This section is only available for mobile-friendly application workflows.
The Additional Attachments section allows you to create up to 10 attachment options or requirements for applicants. Attachments can be a maximum of 10 MB.
To create an attachment:
- Click the Add Additional Attachment link. This expands the Additional Attachments section.
- Enter a title in the Title field, up to 500 characters. This text will also populate the upload button that applicants see on the application.
- Enter instructions in the Instructions field. HTML is accepted. There is no character limit. JavaScript is not supported.
- Check the Required Field box to make the attachment required. If the attachment is required, applicants will not be able to submit the application unless they upload the required attachment.
- Click to save the action item. Or, click Add Additional Attachment again to create another attachment.
You can delete attachment sections by clicking the Delete Section icon ![]() to the right of the attachment section.
to the right of the attachment section.
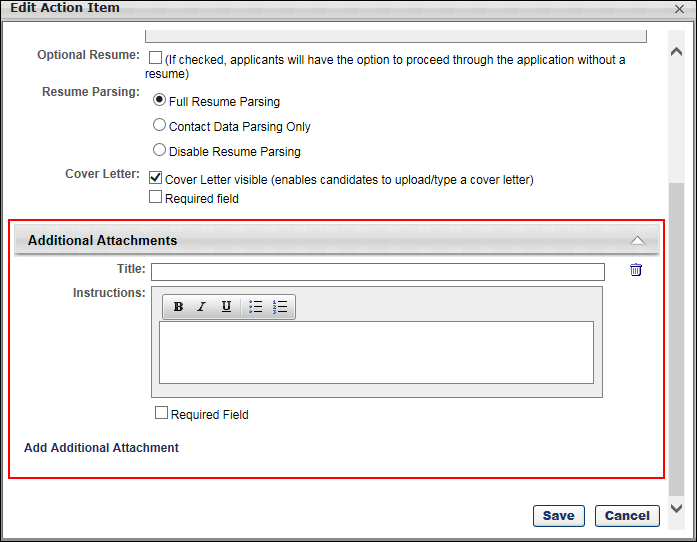
Cover Letter
The Cover Letter field lets you show or hide the Cover Letter option on the application. This option is only available for mobile-friendly application workflows.
The following options are available:
- Cover Letter visible - Check the box to make the Cover Letter option visible on the Upload Attachments section of the application. If the box is not checked, then the option will not be visible to applicants on the application.
- Required field - Check the box to make the field required. Applicants will have to include a cover letter, either by uploading the cover letter or typing it into the text box.