Manage Candidates - Change Status
The Change Status feature on Manage Candidates lets you change the status of one or more candidates across all your requisitions. All candidates can be changed to the same status at once, or you can select a status for each candidate individually.
To access Manage Candidates, go to .
Note: Suggested referrals will appear with the status of Suggested Referral. You can only change a suggested referral to Invite to Apply or Decline. Candidates in the Invite to Apply or the Decline status cannot be moved into another status. However, you can change a suggested referral from Invite to Apply to Decline.
Note: Only users with appropriate permissions can use the option. If you do not have the appropriate permission, an error message appears.
| PERMISSION NAME | PERMISSION DESCRIPTION | CATEGORY |
| Applicants: Status Change | Grants ability to change applicant status for any applicant to whom the user already has access. This permission cannot be constrained. | Recruiting |
Required Statuses
When changing a candidate's status, the status can be changed to any previous status in the status workflow or to Closed. However, statuses that are configured as Required cannot be skipped (except when changing the status to a previous status or to Closed).
- When batch changing the status, the status can be changed up to the first required status of the first applicant listed in the batch.
- When changing the status of an individual candidate, the status can be changed up to the first required status in the status workflow.
- If a candidate's status is changed back to a required status and you attempt to change the status to one that comes after a required status, then the Mark Complete option must be checked for the current status in order to change the status to a required status further in the status workflow.
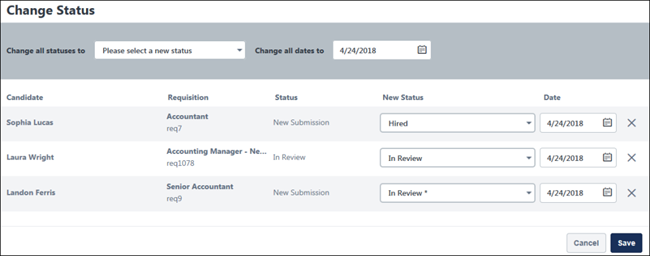
Required statuses display in the drop-down with an asterisk to the right of the status name. If the candidate's current status is a required status, the drop-down in the "Change Status to:" column is grayed out. A Mark Complete link displays below the candidate's status in the Current Status column. You must click the Mark Complete link before you can change the status in the Change Status to: column. After clicking Mark Complete, the link changes to "Complete" and is no longer selectable. The drop-down in the Change Status to: column becomes selectable and you are required to select a new status in order to submit the changes to the pop-up.
Change Individual Candidate Status
To change the status for one candidate:
- Check the box to the left of the candidate's name on the main Manage Candidates page.
- Click the button. This opens the Change Status flyout.
- Select a status from the drop-down in the New Status column. Required statuses cannot be skipped. The statuses that appear in the drop-down are common statuses that are used across requisitions. By default, each candidate's status is auto-populated as the next status in the workflow.
- Select an effective from the Date column. The date cannot be:
- A future date.
- Earlier than the start date of the current status.
- Earlier than the date the requisition was created.
- Click . This updates the status in all locations in the system.
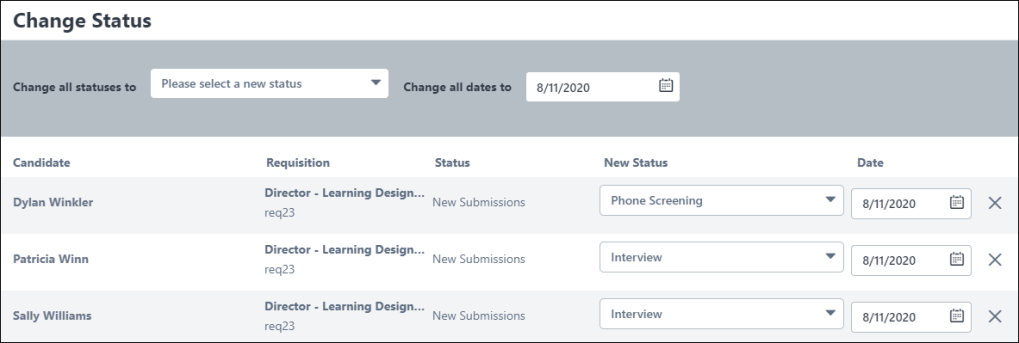
Bulk Change Candidate Status
- Check the Select All box on the main Manage Candidates page. This selects all the candidates who appear on the page.
- Click the button. This opens the Change Status flyout.
- Select a status from the Change all statuses to drop-down to change all candidates to the same status at once. Or, select a status from the drop-down in the New Status column for individual candidates.
- Select an effective date from the Date column. The date cannot be:
- A future date.
- Earlier than the start date of the current status.
- Earlier than the date the requisition was created.
- Remove candidates from the Change Status flyout by clicking the X in the last column. This option is helpful if you change your mind about wanting to change a candidate's status. This does not remove a candidate from the requisition.
- Click . This updates the status in all locations in the system. If you change a candidate from New Submission or Suggested Referral, the candidate will no longer appear on those respective pages.
Required statuses cannot be skipped. The statuses that appear in the drop-down are common statuses that are used across requisitions.
When changing the status to Closed, you can select a disposition in bulk or for each candidate individually. The Disposition option is only enabled if the Closed status is selected in the Change Status To option. The Disposition option requires recruiters to select a reason for changing the status to Closed. Disposition reasons are listed in alphabetical orderNote: Dispositions are defined in Requisition and Applicant Preferences.
A validation message will be shown for each candidate that has an error, prior to being able to save the new status.
Note: The ability to select a date is not available if the Allow applicant status change date option is unchecked in General Preferences.
When the change are saved, the status change is processed and the table is refreshed. A message appears at the top of the Manage Candidates page indicating that the table is being updated to reflect the changes. In some cases, the table may refresh moments before the status change is processed. As a result, the previous status may still be visible after the table is refreshed.
If you would like to confirm that the status change was effective, you can refresh the table manually. This can be done many ways, including changing the sorting on the table, applying or removing a filter, entering or removing search terms, or even refreshing the browser page. Alternatively, completing another action, such as adding or removing flags, adding or moving a candidate to a requisition, or completing an additional status change, will also refresh the table.
Manage Remaining Candidates
You can disposition the remaining candidates for a job requisition when you fill all openings for the requisition. This can be done when bulk changing status across one or more requisitions or when changing the status of candidates for an individual requisition.
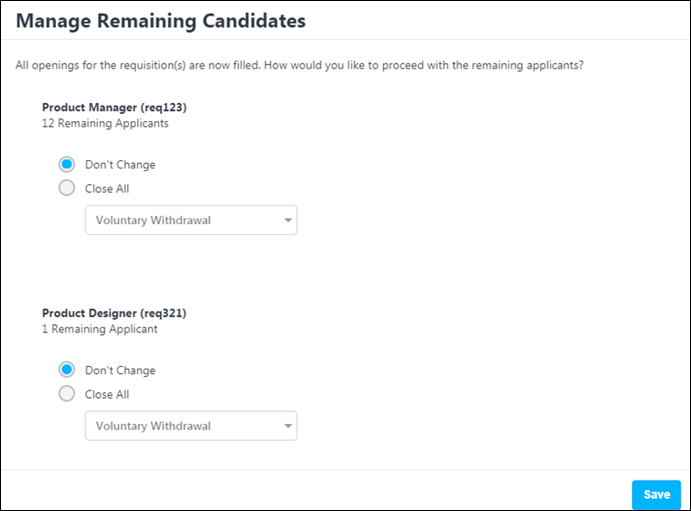
Once you have clicked to change a candidate's status to Hired and all openings for the requisition are filled, the Manage Remaining Candidates flyout appears so that you can make decisions about the remaining candidates. In the pop-up, select one of the following:
- Don't Change - This option is selected by default. When selected, the remaining candidates remain in their current status.
- Close All - Select this option to change the status of all remaining candidates to Closed. In the drop-down, select a disposition reason for closing the candidates.
Click to save the changes. The changes will not be reflected immediately and will take time to appear in the system.
Auto Progression/Disposition of Status (Early Adopter)
If auto-progression is configured for the status (via the requisition template), then candidates are automatically moved to the next status in the workflow upon receiving a Pass value for the pre-employment verification.
If auto-disposition is configured for the status (via the requisition template), then candidates are automatically dispositioned if they receive a Fail value for the pre-employment verification.