Manage Candidates - Request Candidate Feedback
The Request Feedback feature lets recruiters share candidates with hiring managers or business stakeholders at any point in the recruiting process and across all available requisitions. The request candidate feedback feature is a single workflow, allowing hiring managers to provide feedback quickly, reducing time to screen and hire the right candidates. In addition, this feature allows recruiters and hiring managers to better align on applicants and key competencies.
This feature also lets submitters provide comments about the candidate, provided that the Allow Comments When Requesting Feedback option is checked by the administrator in Requisition and Applicant Preferences. See Requisition and Applicant Preferences.
- Get feedback anytime during the hiring process. An applicant may be in any status, and feedback may be requested multiple times.
- Share candidates with any user in your organization.
- Configurable feedback options enabled you to share a candidate with or without requesting feedback.
- This feature is beneficial for a committee hiring experience as it allows you to share candidates with a group of individuals.
- Hiring managers will be able to see application comments left on the applicant by a recruiter. This way, they can get the full picture when leaving feedback.
- The new feedback experience is completely mobile friendly, so hiring managers and business stakeholders can leave feedback on the go.
- Single Sign-On support from feedback request link in email.
- Limit who can view feedback by using the privacy feature.
| PERMISSION NAME | PERMISSION DESCRIPTION | CATEGORY |
| View Private Comments |
Grants ability to read all advance/do not advance feedback when reviewing candidates in Manage Candidates. |
Recruiting |
The following emails apply to the Request Feedback feature:
| EMAIL NAME | EMAIL DESCRIPTION | ACTION TYPE |
| Feedback Submitted from Request Candidate Feedback |
This email is triggered when a business stakeholder has been shared a candidate and has submitted feedback. This email can be sent to Request Candidate Feedback Sender. This email can be configured as a Notification type email. This email is active by default and can be found in the Recruitment action type section of Email Management. |
Recruiting |
- Max is a Hiring Manager at ACME and has a new open Product Manager requisition. Max meets with Jack the recruiter at ACME to review position requirements. After their intake meeting, Jack interviews various candidates for the new position. A few candidates feel like great fits for the organization, so he would like to get Max's feedback.
- To determine if Jack should advance these candidates through the recruiting process, Jack shares these candidates with Max. From Manage Candidates, Jack selects all candidates, and then selects Request Feedback from the More drop-down.
- This opens a fly-out where Jack can write a message about the selected candidates and configure his request. Because comments have been enabled by the system administrator, Jack requests feedback from Max and allows Max to write comments.
- Jack sends the request to Max and sends himself a copy of the email.
- Not only will Max get an email letting him know feedback is being requested, but also Jack has the option to copy and paste a direct link to the application details of the group of shared candidates. Upon sharing the candidates, Jack will see a modal with the option to copy and paste a link. Because Jack and Max frequently use a chat application, Jack also copies the link and pastes it into their chat conversation. This allows Max and Jack to continue working within the tools of their daily schedule. This SSO supported link will take all recipients to the group of shared candidates.
- Max also receives an email requesting feedback on candidates for the Product Manager role. The email includes all candidate's names and the message about the cohort of candidates left by Jack.
- Both the link and email direct Max to a new page with all shared candidates. Here, Max can view the candidate's parsed resume, resume file, LinkedIn URL if the candidate applied with LinkedIn, prescreening questions, and application comments. In addition Max can see the candidate's status in a requisition, as well as their address, phone number, source, and referral details.
- Here, Max can say advance or do not advance and can add open comments about each candidate.
- Max will only see candidates that have been shared by Jack in this workflow. If Jack has shared candidates with Max from a different day, Max will have to access that group of candidates via the other email or link.
- Once Max leaves feedback, Jack receives an email letting him know feedback has been submitted. Max clicks the link and is taken to the new Applicant Carousel on Manage Candidates. Here, he reads all submitted feedback.
- Jill is an administrator at ACME and is very excited about the Request Candidate Feedback feature. However, she does not want Hiring Managers to write open comments about each candidate.
- Jill unchecks the Allow Comments When Requesting Feedback option in Requisition and Applicant Preferences, which disables the comment feature. When comments are turned off, recruiters only have the option to request a response to the question, "Do you wish to Advance or not Advance this candidate?"
- Sarah is a Hiring Manager at ACME and has a new open Account Manager requisition. Sarah meets with Jack the recruiter to review position requirements. After their intake meeting, Jack interviews various candidates for the new position. None of the candidates meet Sarah's ideal qualifications, so Jack continues vetting candidates. Two weeks pass, and Sarah requests an update from Jack on the new position.
- Jack would like to share a few candidates he has interviewed with Sarah to keep her in the loop and aware of his process. Jack selects candidates from Manage Candidates, most of whom are in the Closed status. Next, he searches for Sarah and includes a message about the cohort explaining why these candidates were not qualified. Jack does not select Request Feedback or Enable Comments because he is just giving Sarah an update.
- Sarah receives an email letting her know Jack has shared candidates for the Account Manager role. The email also includes a message from Jack about the group of candidates. This message was written when Jack selected and shared the candidates.
- Upon clicking Review Candidates, Sarah is taken to the new cohort page where she can see the candidate's resume, prescreening questions, and all application comments.
- Sarah reads the application comments left by Jack for each candidate. This allows Sarah to stay included in the recruiting process and enables Sarah and Jack to align on next steps.
Submit a Feedback Request
To request feedback:
- Navigate to the Manage Candidates page.
- Select one or more candidates.
- Select Request Feedback from the More drop-down. This opens a feedback request flyout that lets you configure your request.
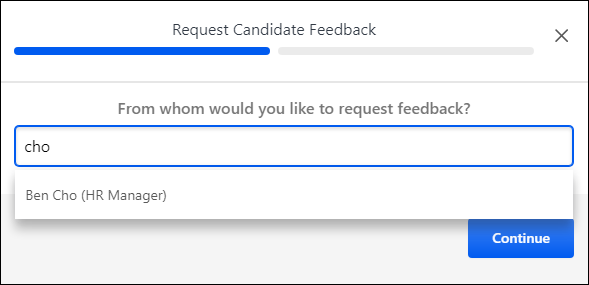
- Search for users to request feedback from. Or, select a user from the Recommended section, which is a list of the hiring manager and requisition reviewers who are already associated with the requisitions that are part of your request.
- Click .
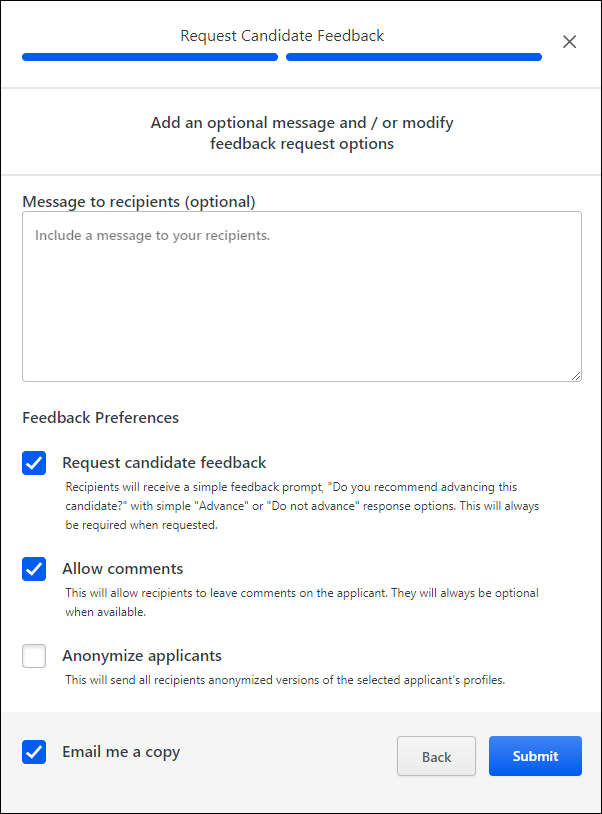
- Add a Message to recipients. This is optional. Note: If you exit the request without submitting it, your message text will not be saved. Tip: Use the <Enter> key to insert line breaks so that the full comment is visible in the comment box.
- Configure the following feedback preferences:
- Request candidate feedback - This option is checked by default. When checked, recipients are required to select an advance or pass option when submitting feedback.
- Allow comments - This option is checked by default. When checked, recipients will have the option to leave comments about the candidate. Recipients will not be required to leave comments. If you uncheck this option, then the Comment section will not appear for reviewers. Note: This option only displays if the Allow Comments When Requesting Feedback option is checked by the administrator in Requisition and Applicant Preferences. In addition, if the Allow Comments When Requesting Feedback option is not checked in Requisition and Applicant Preferences, then the users from whom you are requesting feedback will not be able to enter comments when submitting their feedback.
- Anonymize applicants - When this option is checked:
- The candidate's name is replaced with a number, and all personal information is redacted from their resume on the candidate cohort page. Note: The anonymized resume attachment may take a few minutes to generate after submitting the feedback request. If the user providing feedback sees an error on the resume attachment, they should wait a few minutes, then try again.
- The candidate cohort page displays the candidate's name as a number.
- The word "Hidden" displays in place of the candidate's email address, phone number, and location.
- The candidate's name and contact information are omitted from the resume.
- Check Email me a copy to send yourself a copy of the feedback request.
 Use Case
A recruiter at ACME is hiring an account manager. The recruiter has just interviewed five candidates and wants to share them with the hiring manager. Each candidate is in a First Phone Interview status. To reduce the chance that the hiring manager's unconscious bias impacts their feedback, the recruiter decides to anonymize all candidates before requesting feedback. When the hiring manager clicks the link to review the shared candidates, each candidate's name is replaced with a number and all personal information is redacted from their resumes.
- Click . This submits your requests and opens a pop-up with an SSO link you can copy and include in other applications, such as a chat.

Once your request is submitted, reviewers receive an email with a link to the feedback page. If you entered a message in your request, the email will include your message. See Manage Candidates - Give Candidate Feedback.
Troubleshooting
Error When Clicking Shareable Feedback Link
If users experience an error when trying to open the feedback page using the link in the feedback request email, it is possible that the error is occurring due to an issue with the deep links in your portal, so you will want to confirm that the deep links are configured properly. For example, after a Production copy down to Stage, the deep links for the Stage portal will point to the Production portal, since those were the copied down values.
To fix this, navigate to Admin > Tools > Learning > Catalog Management > Deep Links. Then, click the Edit icon ![]() for the deep link and set the base URL as desired.
for the deep link and set the base URL as desired.