Session Roster - Roster Tab
The Roster tab displays all of the users registered for the session along with the session schedule. This tab also contains links to view users that are on the waitlist or exception requested list for the session, as well as any users that have reserved a registration spot for the session. Instructors perform actions on the roster, including printing the sign-in sheet, email registered users, add users, and withdraw users.
Design Note: This page has an updated interface (UI) that is automatically enabled. However, administrators can still revert to legacy UI via Feature Activation Preferences. The page's functionality is unchanged with the new design. With the July 26, 2024 Release, the new UI will be permanently enabled in all production, stage, and pilot portals, and the legacy UI pages will no longer be available. The new UIs disabled in March will be auto-enabled in July.
Note: If the title of the Roster page is Parent Roster, then your portal has enabled the ability to configure multiple providers for a session. See Multiple Providers - Parent Roster Page.
| PERMISSION NAME | PERMISSION DESCRIPTION | CATEGORY |
| Attachments in Transcript - View | Grants ability to view attachments that have been uploaded for LOs on a user's transcript. This permission can be constrained by OU, User's OU, User Self and Subordinates, User, User's self, User's ILT Provider, ILT Provider, and Instructor. | Learning |
| Exceptions - View | Grants view-only access to instructor led training exception requests, via the ILT Events and Session screen. This permission works in conjunction with the Events - View permission. This is an administrator permission. | Learning - Administration |
| Roster - Add Attachments | Grant user the ability to upload files to the Roster page. User must also have Manage Roster or View Roster permission. This is an administrator permission. | Learning - Administration |
| Roster - Add Pending Users | Grant ability to add pending users to the ILT session roster. The administrator must also have the Roster - Manage or Roster - View permission. This permission cannot be constrained. This is an administrator permission. | Learning - Administration |
| Roster - Add Users | Grants ability to add named users to class rosters for instructor led training sessions. This permission works in conjunction with the Roster - View permission. This permission can be constrained by OU, User's OU, ILT Provider, and User's ILT Provider. This is an administrator permission. | Learning - Administration |
| Roster - Batch Withdrawal or Move Users | Grants ability to withdraw multiple users for an instructor led training session class roster, or to move them from one class roster to another. This permission works in conjunction with the Roster- View permission. | Learning - Administration |
| Roster - Increase Seats | Grant user the ability to increase the session's available seats when adding users to the session roster if the added users exceed the number of available or reserved seats. User must also have Manage Roster or View Roster permission. This permission cannot be constrained. This is an administrator permission. | Learning - Administration |
| Roster - Manage | Grants ability to manage instructor led training session rosters, including updating attendance, and marking the ILT session complete to update student transcripts. A variety of other features are available depending upon additional roster permissions. This permission works in conjunction with Events - View, Sessions - View, and Roster - View permissions. This permission can be constrained by Instructor, User as Instructor, ILT Provider, and User's ILT Provider. This is an administrator permission. | Learning - Administration |
| Roster - View | Grants view-only access to instructor led training session rosters. This permission works in conjunction with Events - View and Sessions - View permissions. This permission can be constrained by Instructor, ILT Provider, User's ILT Provider, and User as Instructor. This is an administrator permission. | Learning - Administration |
| Roster - Withdrawal Penalty Override | Grants ability to override the withdrawal penalty when withdrawing a student from an ILT session. This permission works in conjunction with the Events - View, Sessions - View, Roster - View and Roster - Manage permissions. This is an administrator permission. | Learning - Administration |
| Session Details - View Student Roster | Allows user to view student roster for a given ILT session via a link on ILT session details screen when searching for training, and from transcript details screen after a session has been added to the user's transcript. This is an end user permission. | Learning |
| Waitlists - Manage | Grants ability to approve or deny instructor led training waitlist requests. This permission works in conjunction with the Events - View and Waitlists - View permissions. This is an administrator permission. | Learning - Administration |
| Waitlists - View | Grants view-only access to instructor led training session waitlists, via the ILT Events and Sessions screen, enabling the user to view the waitlists for various ILT sessions. This permission works in conjunction with Events - View and Sessions - View permissions. | Learning - Administration |
View new roster pages/View default roster pages
- Click the View new roster pages link to view the newly-designed roster page. All of the information on the page remains the same.
- Click the View default roster pages to return to the default roster pages.
Note: Clicking the View new roster page link opens the page in view-only mode at this time.
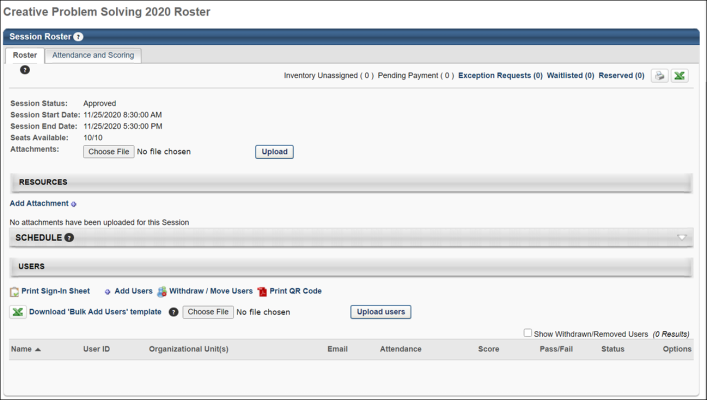
General Information
At the top of the page, the status of the session is displayed. Note: If the status is Completed, the Re-Submit link no longer appears.
Anytime "All Locator Numbers" is selected from the Locator Number drop-down menu, the Session Start Date and Session End Date fields are not displayed because multiple sessions are displayed.
Seats Available
The Seats Available field displays the number of seats available and the maximum number of possible users. For example, if a session can have a maximum of 15 users and 5 have registered thus far, the Registration value displays 10/15, indicating there are 10 remaining open seats. Users on the Reserved list do count towards the number of available seats. For example, if a session can have a maximum of 15 users, 5 have registered, and 5 are on the reservation list, the session has 5 available seats.
If the seat reservation option is enabled in ILT Preferences, then the Seats Available field displays as a link. Clicking the link opens the Seats Available pop-up, which displays the seat allocation details. See Session Roster - Roster - Seats Available Pop-up.
Attachments
The Attachments feature below the Seats Available field allows administrators and instructors to add attachments to the roster. Attachments display below the Attachments field. This feature is only available to administrators and instructors with permission to add attachments to a roster. Acceptable file types are pdf, jpeg, gif, Microsoft Excel, Microsoft PowerPoint and word documents. There is no limit to the number of files that can be uploaded to the page. The upload maximum size is 25 MB per item.
Once you have selected your attachment, click to upload it to the roster. Note: The option does not refer to uploading users to the session. Refer to the Download 'Bulk add Users' template feature in the bottom-left of the roster page to upload users.
Additional Session Actions
In the upper-right corner, the following session action links may appear (see below for the Reserved option):
- Inventory Unassigned - This value represents the quantity of inventory that is purchased as inventory but has not yet been assigned to a user. With regards to the roster Availability, an inventory assignment reserves a seat, but an inventory purchase that is not yet assigned does not affect the availability.
- Pending Payment - This indicates the session has a cost and has not yet been paid for.
- Exception Requested - This link displays the number of users that have a pending exception request. If no exception requests have been made for the session, the link does not appear. After the administrator responds to all exception requests, the link remains visible with zero as the number of users. Click the link to go to the Exception Request page. This option is only available to users with permission to view or manage exception requests.
- Waitlisted - This link displays the number of users that are on the waitlist for the session. If waitlists are not enabled for the event or if there are no users on the waitlist, the link does not appear. After the administrator responds to all waitlisted users, the link remains visible with zero as the number of users. Click the link to go to the Manage Waitlist page. This option is only available to users with permission to view or manage the waitlist.

Reserved
The following only displays if the related backend setting is enabled (please contact Global Customer Support if you wish to enable this setting):
Reserved - This link displays the number of users on the reservation list for the session. Users on the Reserved list do count towards the attendance, decreasing the number of available seats, though they do not appear on the roster until they are registered. If no users are on the reservation list for the session, the link does not appear. After the administrator responds to all reserved users, the link remains visible with zero as the number of users. Click the link to go to the Manage Reservation page.
- Users are reserved a seat in the session when they are assigned to and approved for the session, but are not automatically enrolled until they either select Register or the administrator grants them access to the session.
- Users are reserved a seat in the session when they are assigned to and approved for the session, but are not automatically enrolled until they either select Register or the administrator grants them access to the session.
![]()
Resources
This section enables administrators to view and manage attachments for the session. The visibility of each attachment can be determined by the administrator. For example, some attachments may be visible to only administrators, while other attachments may be visible to all users. In addition, attachments can be made visible to users only if they are registered for the corresponding session. This section is only available for users that have permission to view or manage LO attachments.
When the session is first created, this section contains any attachments that were added on the Session Defaults page for the event.
See Session Roster - Roster - Resources.
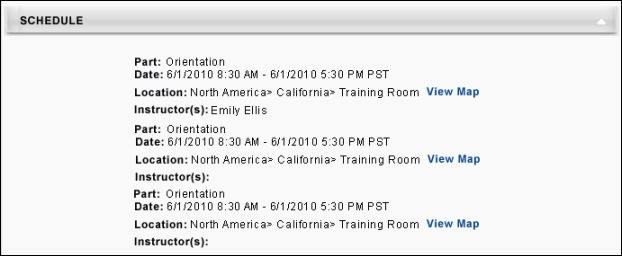
Schedule
The Schedule section appears collapsed by default, but when expanded displays the schedule of the session. Click the View Map to view a map of the location if available.
Add Pending Users to Roster
The button is only available if there are users who have been selected to be added to the session, but have not yet been enrolled in the session. Also, this button is only available to users who have permission to add pending users to the roster. See Session Roster - Add Users to a Session.
Roster Table
Above the roster table, the following user action links may appear:
- Administrators may choose whether to use the old versions of the sign-in sheets or the new versions with signature columns for each session part:
- Print Sign-In Sheet - Click this option to use the old version of the sign-in sheet, which does NOT include a signature column for each session part.
- Print Multi-Part Sign-In Sheet - Click this option to use the new version of the sign-in sheet, which includes a signature column for each session part.
- Selecting one of the above options opens another window displaying the printable sign-in sheet. There are two types of each sign-in sheet version:
- Simplified sign-in sheet
- Expanded sign-in sheet (this version includes the attendee's name, user ID, OU, work phone, email, address, city, and state)
- Email Registered Users - This link navigates you to the existing email functionality. This option is only available to users who have permission to email registered users on the roster. See Session Roster - Email Registered Users.
- Add Users - When an instructor or administrator clicks the Add Users link, this opens the Select User pop-up, in which the instructor or administrator can search for and select multiple users to be added to the session roster. Users who are already registered for the session or are pending registration cannot be selected from the pop-up. Note: This option is only available to instructors or administrators with permission to add users to a roster. In addition, the constraints on this permission determine which users can be viewed and selected. See Session Roster - Add Users to a Session.
- Withdraw or Move Users - This option opens the Batch Withdraws or Move Users pop-up window. The administrator can then withdraw a user from the session. If the user is withdrawn, they no longer appear on the active roster. This option is only available to users that have permission to batch withdraw or move users from a roster.
- Print QR Code - Administrators and instructors with permission to access the roster for a session can print the QR code for the session via the Session Roster page. To print the QR code from the roster, click the Print QR Code link, located in the Users section of the Session Roster page. A printable version of the session's QR code downloads from the browser, allowing the administrator to open the download and print the QR code. The printable QR code displays with the following information:
- Event name
- Locator number
- Session part
- Dates of session part
- Location - Note: A Location must be provided when creating the session to be able to generate a session QR code.
Instructors can display the printed or digital version of the session part QR code to users at the session part. Users attending the session part can scan the session part QR code using the Learn app to mark themselves as attended.

- Download Bulk Add Users Template - Administrators and instructors can add users to a roster in bulk via an Excel spreadsheet. For more information about this process: See Session Roster - Bulk Add Users.
Roster Table
If the Show Withdrawn/Removed Users option is selected, users who were previously registered, but are withdrawn also display in the table.
- Name - This column displays the name of the user.
- User ID - This column displays the user's user ID.
- Organizational Unit(s) - Displays any OUs for the user.
- Email - Displays the user's email address if one is defined in their user record. Click the email address to create an email to that user in your default email application. This feature does not require permission.
- Attendance - Displays the number of total session parts attended.
- Score - Displays the user's score for the session, which is entered by the instructor on the Attendance and Scoring page. If no score is entered, the value is blank.
- Pass/Fail - Displays if the user passed or failed the session, based on the session settings. If no value is determined, the value is blank.
- Status - Displays the user's status for the session.
Roster Options
In the Options column, next to each user, the following options are available:
- Edit Transcript - Click this icon to open the Edit Transcript pop-up, where you can edit the transcript of the user. See Session Roster - Edit Transcript Details.
- Attachments
 - Click this icon to navigate to the user's Transcript Details page for the corresponding instructor-led training (ILT) session. From this page, the user can view previously uploaded attachments, upload attachments, and delete attachments, depending on the user's permissions. This option is only available to users with permission to view or manage attachments and to view transcript items. In addition, the permission constraints determine the users for which this option is available. See Session Roster - Roster - Resources.
 - Comments - Click this icon to open the Comments pop-up, where you can view all of the comments for that user and leave a comment for that user for the session. The author and date stamp is displayed for each comment. You must have permission to manage the roster to view and add comments. Users that have permission to view the roster can view comments, but cannot add comments. Users can delete comments they have left using the Delete icon. Comments are limited to 3000 characters. The comment field accepts HTML code.
- History - Click this icon to open the History pop-up, where you can view the history of the user with regards to the session.
- Withdraw/Remove
 - Click this icon to navigate to the Withdraw Registration page.
Comments Panel
The comments section appears below the roster table and displays all of the comments left for the session. The author and date stamp is displayed for each comment. This table is collapsed by default. If the user has permission to manage the roster, they also have the ability to leave a comment. Users can delete comments they have left using the Delete icon. Comments are limited to 3000 characters. The comment field accepts HTML code.
Export Roster Table
The roster table can be exported to Printable Version and Excel using the icons in the upper-right corner of the Roster tab. The exported roster includes the details from the roster table, but none of the information on the Assignments or Attendance and Score tab.
There are two display options for the roster table export. By default, the table displays the following information:
- User last name
- User first name
- User ID
- Division
- Training status
If needed, the table can be updated to a list format that displays the following information:
- User full name
- User ID
- Position
- Division
- Training status.
Unassigned Inventory Purchase
The Unassigned Inventory Purchase section may appear at the bottom of the Roster tab of the Session Roster. This section displays all inventory purchases that are made for the session that have not yet been assigned. In this section there is a link to email the Inventory Owner. Click this link to create an email that is sent to the inventory owner to alert them that they have not yet assigned the inventory for the session. See Session Roster - Roster - Unassigned Inventory Purchase.