Manage Mobile-Friendly Career Site
Mobile-friendly career sites enable job seekers to search for and apply to jobs on desktop or mobile devices. Applicants will have the same experience on your career site regardless of the device they are using. Google Analytics is also supported on mobile-friendly career sites. You can create a mobile-friendly career site, and create a customized job alert template to send email alerts.
To manage the mobile-friendly career site, go to .
Job Postings Note: When posting a job requisition to a mobile-friendly career site, the posting can take up to 15 minutes to appear.
| PERMISSION NAME | PERMISSION DESCRIPTION | CATEGORY |
| Career Site - Manage | Grants ability to access and manage Career Site Management. This permission can be constrained by OU and User's OU. This is an administrator permission. | Recruiting Administration |
| Career Site - View | Grants ability to access and view Career Site Management. This permission can be constrained by OU and User's OU. This is an administrator permission. | Recruiting Administration |
| Corporate Preferences - Manage | Grants the ability to manage Corporate Preferences, which includes several portal-wide settings. This is an administrator permission. | Core Administration |
Create Mobile-Friendly Career Sites
- Go to .
- Click the Add Mobile-Friendly Career Site link. Use the information below to complete the fields.
For information about creating mobile-friendly candidate experience application workflows, see the Create Mobile-Friendly Application Workflow (Early Adopter) topic in Online Help.
Edit Mobile-Friendly Career Sites
-
In the Career Site Title column, select a mobile-friendly career site.
-
Click the edit icon. The Settings page opens.
-
Make any necessary changes.
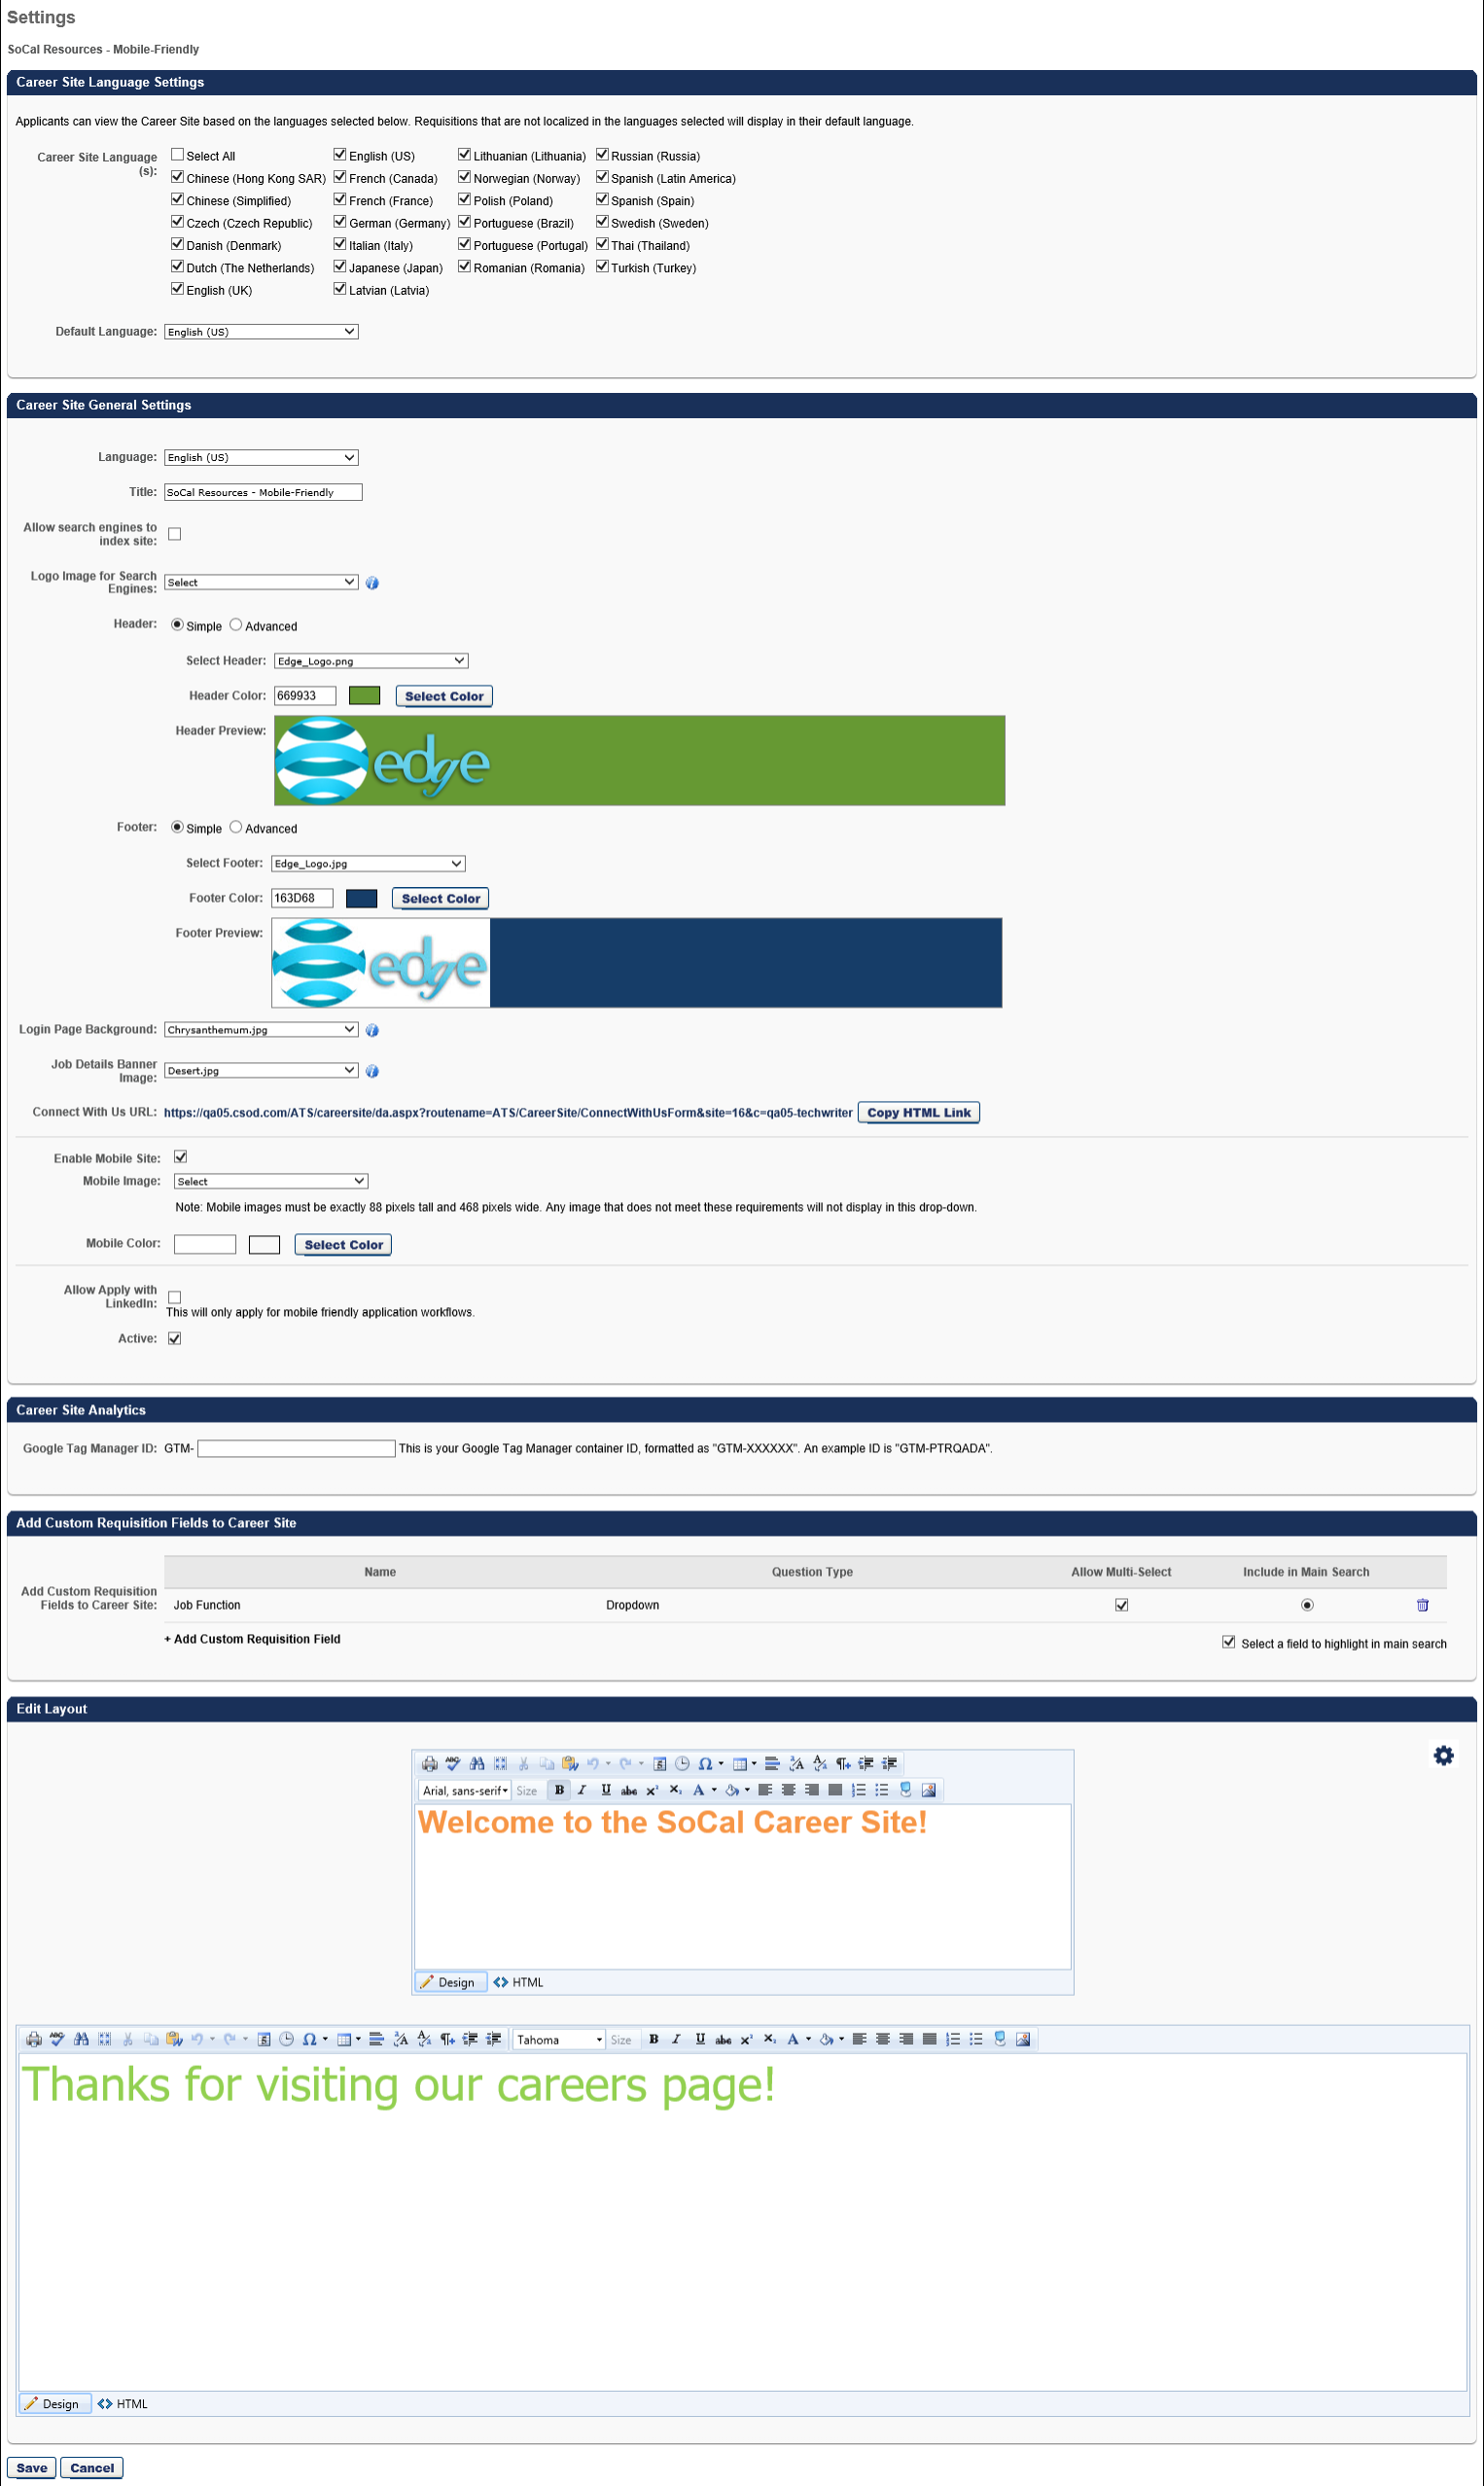
Career Site Language Settings
As with functionality for standard career sites, you can select the languages in which applicants can view the career site. In the Career Site Language(s) field, you can check Select All to select all available languages. Or, check the individual boxes for the languages you would like to include. The languages that are available to select are the languages enabled for the portal.
When applicants view the career site, the languages that you selected will appear in the language drop-down. The career site will then update to display in the selected language.
Title
Enter a title in the Title field, up to 250 characters. The title displays on the Career Site Management page.
Allow Search Engines to Index Site
The Allow search engines to index site option lets you enable or disable the ability for search engines to index the site. When you allow search engines to index your career site, more candidates can find and apply to your jobs. They can use job search methods they are familiar with and see all of your available jobs that match their skills.
This option is checked by default for newly created mobile-friendly career sites. The option is disabled by default for existing career sites that were created before implementation of this enhancement.
Check the box to enable search engine indexing. Jobs that are posted to this career site via the Job Postings page will be searchable on search engines.
When the option is unchecked, candidates will not be able to find the jobs that are posted to this career site on search engines.
For Google Jobs, jobs can take up to several weeks to appear. This is due to the crawling functionality that Google uses to pick up the jobs and the timing of the next crawl after your requisition is posted to the career site.
For Indeed, your jobs will be eligible to appear as long as their eligibility guidelines are followed. Their eligibility guidelines are available on their help page to ensure that your jobs are eligible to appear.
No. Your jobs can still be posted to job boards. However, even if you post your jobs to job boards, you may still want them to appear on Google Jobs and Indeed because some job seekers will not visit the job boards.
This option only applies to mobile-friendly career sites. Standard career sites are not impacted.
Google Jobs works like any other search in Google. Candidates enter search terms in the Google search bar, and a Jobs section appears in the search results. Your jobs will appear in those results that are targeted by candidates.
Logo Image for Search Engines
Pre-Step Note: There must at least one image added to Corporate Preferences in order to select a logo for your jobs.
With the Logo Image for Search Engines option, you can add a corporate logo, which will appear right next to each job on the search engine. A logo provides immediate recognition for your brand. This can also help candidates identify your jobs more quickly in the future.
To select a logo:
- Click the drop-down to view the list of images. The images that display are the images that were configured in Corporate Preferences.
- Select an image from the drop-down.
If you opt not to define a logo, Google will attribute a default logo to the job posting based on the first letter of your organization's name.
This image will also be used when sharing a job on Facebook and LinkedIn. To see how the shared job will appear, you can copy and paste the URL of a job details page into the post inspector for Facebook and LinkedIn:
- Facebook: https://developers.facebook.com/tools/debug/
- LinkedIn: https://www.linkedin.com/post-inspector/
Career Site General Settings
Mobile-friendly career sites allow you to configure a header and footer, as well as a background image. Also, a Connect With Us URL is automatically generated.
When configuring the header, you can configure either a simple or advanced header. Note: JavaScript is not accepted by default when creating the header. To enable JavaScript for the header, contact Global Customer Support.
- Simple - The Simple option enables you to select a header image and color.
- Select Header - From the drop-down list, select a header image for the career site. The selected header is displayed for all career site pages, including Job Search, Job Details, Create a Profile, My Profile, and Application Experience. The available images are taken from the Corporate Preferences images. A preview of the header image is displayed in the Header Preview field. The header is optional.
- Header Color - Select the header color, which is the color that fills the header in areas that the header image does not fill. You may enter a hex value for the color or select a color by clicking the button.
- Header Preview - This displays a preview of what the header will look like on the career site. The selected image is always aligned in the upper-left portion of the header. Any empty space in the header is filled with the selected header color. The selected logo is not resized.
- Advanced - The Advanced career site header option includes HTML configuration options. Selecting the Advanced option opens the WYSIWYG editor. The WYSIWYG (What You See Is What You Get) tool provides configuration tools, such as images, fonts, colors, formatting, and tables. There is also a Copy from Word feature that enables administrators to import from Microsoft Word, preserving the formatting used in the Word document. HTML code can also be used. For more information about the WYSIWYG tool, see the WYSIWYG Tool Considerations section in the Create New Email topic in Online Help.The system only accepts certain customizable HTML elements in the WYSIWYG Editor. Elements that are not acceptable display as text. See Safe Listed Customizable Elements.
The header will adjust to the width of the device's screen. However, if the width of an item in the header, such as an image, is defined using HTML in the Advanced settings, then those size settings will be respected.
When configuring the footer, you can configure either a simple or advanced footer.
- Simple - The Simple option enables you to select a footer image and color. Note: JavaScript is not accepted by default when creating the footer. To enable JavaScript for the footer, contact Global Customer Support.
- Select Footer - From the drop-down list, select a footer image for the career site. The selected footer is displayed for all career site pages, including Job Search, Job Details, Create a Profile, My Profile, and Application Experience. The available images are taken from the Corporate Preferences images. A preview of the footer image is displayed in the Footer Preview field.
- Footer Color - Select the footer color, which is the color that fills the footer in areas that the footer image does not fill. You may enter a hex value for the color or select a color by clicking the button.
- Footer Preview - This displays a preview of what the footer will look like on the career site. The selected image is always aligned in the lower-left portion of the footer. Any empty space in the footer is filled with the selected footer color. The selected logo is not resized.
- Advanced - The Advanced career site footer option includes HTML configuration options. Selecting the Advanced option opens the WYSIWYG editor. The WYSIWYG (What You See Is What You Get) tool provides configuration tools, such as images, fonts, colors, formatting, and tables. There is also a Copy from Word feature that enables administrators to import from Microsoft Word, preserving the formatting used in the Word document. HTML code can also be used. For more information about the WYSIWYG tool, see the WYSIWYG Tool Considerations section in the Create New Email topic in Online Help.The system only accepts certain customizable HTML elements in the WYSIWYG Editor. Elements that are not acceptable display as text. See Safe Listed Customizable Elements.
The footer will adjust to the width of the device's screen. However, if the width of an item in the footer, such as an image, is defined using HTML in the Advanced settings, then those size settings will be respected.
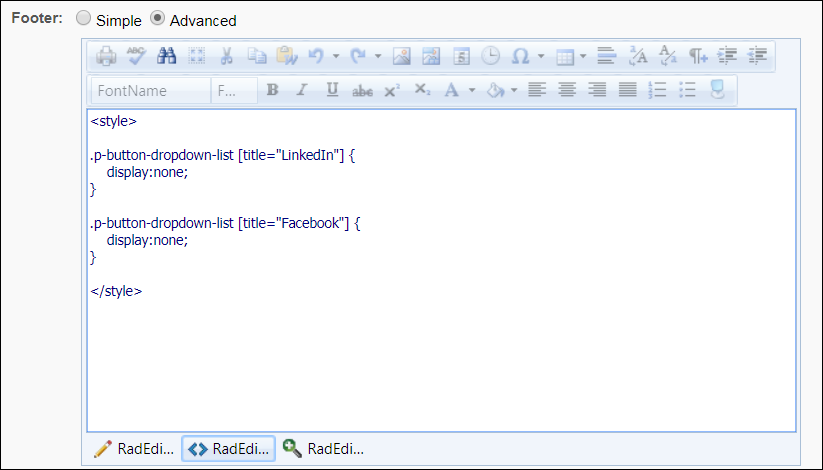
The social sharing options can be hidden by adding additional code to the HTML tab on either the Advanced Header or Advanced Footer. After clicking the HTML tab, enter <style> </style> with one or more of the following lines of code in-between:
Hide “LinkedIn” option on Share Button
.p-button-dropdown-list [title="LinkedIn"] {
display:none;
}
Hide “Facebook” option on Share Button
.p-button-dropdown-list [title="Facebook"] {
display:none;
}
The Login Page Background field allows you to select an image that will appear as the background on the login page and the Create a Profile page for applicants. This helps to further brand the career site for the organization.
To select an image, click the drop-down and select from available images. The recommended image size is 1920 x 1200 pixels.
Note: If an image is not selected, then the background is white.
Administrators with permission to manage Corporate Preferences can upload new images from the Corporate Preferences page. Once the image is uploaded and the preferences are saved, the image can be selected from the Login Page Background field.
Note: You can still also add a header and footer by using the Header/Footer options.
The Job Details Banner Image field lets you add a banner image that will appear as a bar behind the job details section on career sites.
To select an image, click the Job Details Banner Image drop-down and select from the available images. The images in the drop-down are pulled from Corporate Preferences. There must be at least one image available in Corporate Preferences in order to add a banner image. Images cannot be uploaded from the Career Site Settings page.
While there is no required image resolution, we recommend that a high resolution image be used, and that the image is wider than it is tall.
Note: If an image is not selected, then the background is gray.
Permission to Manage Corporate Preferences: Administrators with permission to manage Corporate Preferences can upload new images from the Corporate Preferences page. Once the image is uploaded and the preferences are saved, the image can be selected from the Job Details Banner Image field.
A Connect With Us URL is automatically generated for mobile-friendly career sites after the career site is saved. Once the career site is saved, the link allows you to copy a hyperlink configured in HTML <a href = …>.
The following are the two ways that you can use this link:
- You can copy the hyperlink by clicking , and then you can paste the link directly into the “HTML” view in the header, footer, banner text, or custom information section to add a "Connect With Us” link to the career site.
- You can also copy the hyperlink by clicking , and then use it in emails or other media to help potential applicants apply to your organization.
Check the Enable Job Alerts box to allow candidates to create and receive job alerts on a mobile-friendly site job search page. Administrators must enable Job Alerts for each mobile-friendly career site that requires it.
Administrators can also select a customized email template from the Job Alert Notification Template drop-down. Note: To create custom email templates, go to ADMIN > TOOLS > RECRUIT > EMAIL TEMPLATES.
Check the Allow Apply withSEEK box to allow candidates to apply with SEEK.
Check the Allow Apply with LinkedIn box to allow applicants to apply with LinkedIn. For more information about the Apply with LinkedIn (with Apply Starters) plugin, see the Apply with LinkedIn (with Apply Starters) Overview topic in Online Help.
Select this option to make the career site active. When a career site is active, it can be accessed by applicants and job requisitions can be posted to it.
This section lets you add Google Tag Manager to your career site. Google Tag Manager is a tag management system that allows you to edit and add tracking pixels to web pages without constantly editing HTML code. You can use Google Tag Manager with other tools and marketing vendors to attract and maintain candidates, measure engagement on career sites, identify drop-off points, and much more.
Click here to download the Google Tag Manager starter guide.
Enter your Google Tag Manager ID in the Google Tag Manager ID field. Upon saving the career site settings, the ID will automatically get applied to the job search page and the job details pages in career sites, as well as application workflow pages.

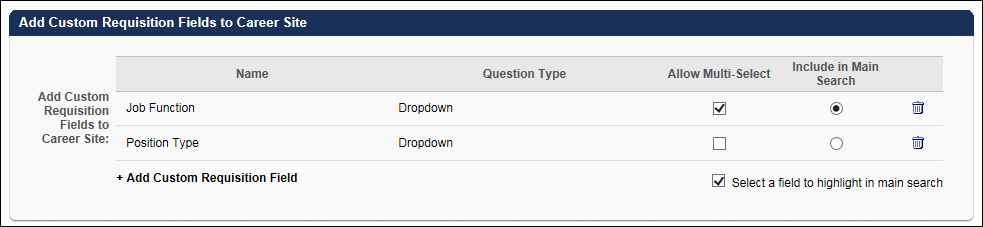
This section lets you add custom requisition fields as filters on the career site. Adding custom fields provides candidates with the filters they need to find jobs that specifically match their job function, compensation type, experience level, etc. Candidates will not need to look through a long list of jobs to find the right fit. The custom field filters will help them to quickly narrow down their search so that they can start applying.
The following field types are available:
- Dropdown
- Radio Button
- Checkbox
To add custom requisition fields:
- Click Add Custom Requisition Field. This opens the Select Custom Requisition Field pop-up.
- Select a field from the list. The field types are Dropdown, Radio Button, and Check Box. Only one field can be selected at a time.
- Selecting a field closes the pop-up and adds the field to the page.
When more than one field is added, you can reorder them by dragging and dropping them into the desired order.
Once a field has been added, the following information and options are available in the panel.:
- Name - This column displays the name of the custom field.
- Question Type - This column display the type of custom field: Dropdown, Radio Button, or Check Box.
- Allow Multi-Select - Check the box to let applicants select more than one option from a drop-down custom field when it appears on the career site. This option is unchecked by default. When this is select, a dropdown field will appear as check boxes on the left rail of a career site.
- Select a field to highlight in main search - Check the box to enable the Include in Main Search option. Having a field highlighted in the main search means that the field will appear in the search bar at the top of the career site. The field will also appear in the Filters section on the left side of the page, but having it at the top helps candidates find the filter quickly and start searching for jobs. This is only available for drop-down fields.
- Include in Main Search - Select this option to display the custom field in the main search. Only one field can be selected.
- Delete - Click the trash can
 icon to remove the field from the career site.
Note: When candidates search for jobs on the career site, if no posted requisitions match a custom filter's values, then that custom filter will not display. This can happen when a new custom field is configured, but no requisitions have populated values for that field.
Custom Requisition Fields are created as Organizational Unit (OU) type custom fields in Custom Field Administration. You must have permission to create OU custom fields.
Not with this release. You will need to edit the career site and add the custom requisition fields again.
Yes. Historical requisitions will still have this field specified. You can edit the career site at any time to remove the filter if desired.
Similar to current functionality, anyone who has the permission to create career sites will have the ability to add custom requisition fields to the career site. This is true even if an administrator does not have the permission to see the custom requisition field at the requisition level.
Edit Layout
In this section, you can add a banner image and banner text. You can also add additional content that will appear above the Filters and Current Openings sections on the career site.
The banner image will appear behind the job search bar and is optional to include.
To add an image:
- Click the Edit Banner Image icon
 in the upper-right corner of the Edit Layout section. This opens the Edit Banner Image pop-up.
 - Click to search for and select an image from your computer. Note: It is recommended to use a high resolution image with a size ratio of 4.16:1, width to height. Otherwise, the height should be at least 150 pixels, and the width should be greater than the height. The image cannot exceed 5 MB.
- Click on the pop-up to load the image.
- Click on the pop-up to confirm.
-
Click on the preferences page to save the banner image to the career site's preferences.
The top text box allows you to use the WYSIWYG editor to add optional banner text that will appear above the job search bar within the career site banner.
The bottom text box allows you to use the WYSIWYG editor to add custom content, such as videos, that will appear above the Filters and Current Openings sections on the Job Details page in the career site.
The WYSIWYG (What You See Is What You Get) tool provides configuration tools, such as images, fonts, colors, formatting, and tables. There is also a Copy from Word feature that enables administrators to import from Microsoft Word, preserving the formatting used in the Word document. HTML code can also be used. For more information about the WYSIWYG tool, see the WYSIWYG Tool Considerations section in the Create New Email topic in Online Help.
The system only accepts certain customizable HTML elements in the WYSIWYG Editor. Elements that are not acceptable display as text. See Safe Listed Customizable Elements.
JavaScript is not supported for banner text and custom content.
Hide Links and Buttons on Job Details Page
The Back to Search link, button, and button on the Job Details page can be hidden by adding code to the HTML tab for the Advanced Header or Advanced Footer. After clicking the HTML tab in the Advanced Header section, enter <style> </style> with one or more of the following lines of code in between:

Hide “Back to Search” Link
.p-view-jobdetailsnavigation {
display:none;
}
Hide “Share” Button on Job Details Banner
[data-tag="shareButtonBanner"] {
display:none;
}
Hide “Share” Button at Bottom of Page
[title="Share"] {
display:none;
}
Hide “Email” Option on Share Button
[title="Email"] {
display:none;
}
Hide “LinkedIn” Option on Share Button
[title="LinkedIn"] {
display:none;
}
Hide “Facebook” Option on Share Button
[title="Facebook"] {
display:none;
}
Hide “Save” Button on Job Details Banner
[data-tag="save-job-button"] {
display:none
}
Hide “Save” Button at Bottom of Page
[title="Save Job"] {
display:none;
}
Non-Configurable Options
Mobile-friendly career sites have different configuration settings than standard career sites. The following options are not configured on mobile-friendly career sites:
- Allow Search Engines to Index Site
- Meta Page Title
- Meta Page Description
- Enable Mobile Site
- Mobile Image
- Mobile Color
- Allow Apply with LinkedIn
- Allow Connect with Facebook
- Referrals
- Apply as Guest - Note: The Apply as Guest feature is available for responsive career sites but does not have the ability to be enabled or disabled. It is always enabled. For information about how mobile-friendly applicants claim an account and the importance of configuring the Application Confirmation - As Guest email, see the Application - Apply as Guest topic in Online Help.
Widget Settings
Widgets cannot be added to mobile-friendly career sites. Instead, applicants search for jobs using the job/keyword and location search bar. Images are added using the banner image option and the text box options.
The following search options, which on standard career sites are configured on the Search Jobs Widget Settings pop-up, cannot be configured for mobile-friendly career sites:
- Naming the search page
- Search fields, such as Division, Compensation Type, Employment Type, etc.
- Custom search fields
- Allow advanced search
- Number of results to display (Note: Mobile-friendly career sites display an infinite number of results. As applicants scroll down, more search results appear.)
- Job alerts (Note: Job alerts are not available on mobile-friendly career sites.)
- Allow results sharing
- Results view - List or Table