Corporate Preferences contains the corporate logo, support information, and additional corporate settings.
To manage Corporate Preferences, go to .
| PERMISSION NAME | PERMISSION DESCRIPTION | CATEGORY |
| Corporate Preferences - Manage | Grants the ability to manage Corporate Preferences, which includes several portal-wide settings. This is an administrator permission. | Core Administration |
| Corporate Preferences: Lockout Preferences - Manage | Grants ability to configure the Lockout Preferences on the Corporate Preferences page. This permission cannot be constrained. This is an administrator permission. | Core Administration |
| Support Information - Manage | Grants ability to manage Support Information, which includes specifying an email address and phone number for end users to contact for portal support. This permission works in conjunction with the Corporate Preferences permission. This is an administrator permission. | Core Administration |
Header Logo
This section enables you to configure a header logo for your portal.
From the Select Logo drop-down list, select a previously uploaded corporate logo. When a logo is selected, the selected image is displayed in the Logo field.
To remove the selected logo, click the button below the logo image.
To upload a new logo, in the Upload New Header Logo section, click the button. After browsing to and selecting the new image, click the button. After uploading the image, you can select the image from the Select Logo drop-down list. The maximum file size for logo images is 1 MB, and must be of type .png, .gif, .jpg, or .bmp.
After modifying the header logo, click to save the modifications.
![]()
Support Information
The Support Information is accessible from the Feedback link at the bottom of each screen. This information allows users to send feedback via email and displays a central contact number for support.
To modify the support contact information, in the Support Email and Support Phone fields, enter the appropriate support email address and phone number.

Preferences
In the Preferences section, you can view the current compensation currency for the system. You can also customize the Absent Status display. The Absent Status display can also be localized into different languages if multiple languages are available for the portal.
In the Compensation Currency field, the currency that is used to manage compensation is displayed.
In the Absent Status field, enter a new display name for the Absent Status. This display name appears on the My Account page for a user that is absent and unable to access the system. When a user is set as Absent, any approval requests they receive is deferred to the absent user's manager. By default, this is set to On Vacation. This field accepts Unicode characters and the character limit for this field is 100.
- If multiple languages are enabled for your portal, select the Translate icon to translate the field into other available languages.

Default Email Address Settings
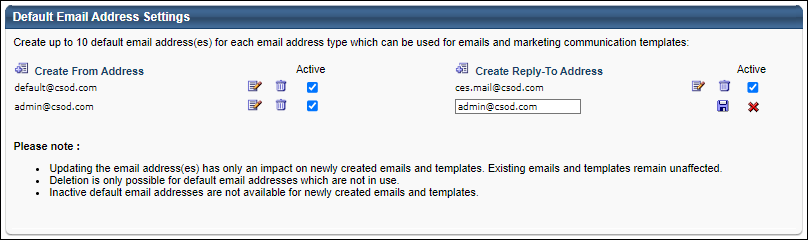
The following settings are available in the Default Email Address Settings section:
- Create From Address - Select this link to enter a default From Address for the portal. Default From Addresses are automatically populated in the From Address field when creating a new email in Email Management or Marketing Communications. The From Address is the email address that appears as the sender's email address when the email is sent. Note: It may take a few minutes for this value to update.
- Create Reply-To Address - Select this link to enter a default Reply-To Address for the portal. Default Reply-To Addresses are populated in the Reply-To Address field when creating a new email in Email Management or Marketing Communications. The Reply-To Address is the email address that any reply messages are sent to if someone replies to the email.
An Active setting is available for each email address.
- When a default email address is active, the email address can be selected when creating or updating an email in Email Administration and in Marketing Communications. The email addresses can be modified.
- When a default email address is inactive, the email address is not available when creating or updating an email address in Email Administration and in Marketing Communications. The email address cannot be modified or deleted. However, the email address remains associated with any existing emails and templates for which they have been selected. This ensures the email address is not used for new emails and templates but does not impact any existing emails.
Up to 10 default From and Reply-To addresses can be added.
Only active email addresses can be deleted.
Updating or removing email addresses from these setting only impact newly created emails and templates. Existing emails and templates are unaffected. In order to update an existing email or template, they must be updated manually within the email or template.
A Modification History is available for auditing purposes or to aid in troubleshooting.
Portal Name Configuration
The portal name is displayed in the browser header or browser tab. For example, "Realize Your Potential: [Portal Name]" appears in the browser header or browser tab when accessing the system.
The Portal Name field determines what portal name is displayed in the browser header or browser tab.

Goals General Settings
This section is only available for organizations that are using the Performance or Careers solution.
This section enables you to configure general settings related to the Goals functionality. The following options are available:
- Goals preferences and configuration respect the goal owner's OU. - When this option is selected, the goal owner or goal assignee's Goal Preferences and Goal Configurations are applied in Universal Profile Snapshot, Goals, and Goal Rating steps within performance reviews. Shared goals respect the goal owner's preferences and configurations. When this option is selected or deselected, the new setting is applied to all goals. This option is enabled by default.
Lockout Preferences
An account becomes locked if a user unsuccessfully attempts to log in to their account a certain number of times within a certain amount of time. When an account is locked, the user cannot access their account for a certain duration of time.
Organizations should be cautious when making lockout preferences less restrictive. If portal lockout preferences are configured to be less restrictive, this increases the threat of malicious users accessing the portal. Cornerstone is not responsible for the risk to client portals when lockout preferences are less restrictive.
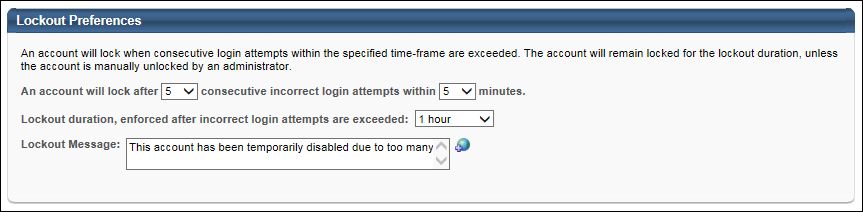
This section enables administrators to configure lockout characteristics for user accounts. The following options are available:
- Login Attempt Restrictions - Set the login attempt restrictions for the portal. A user's account will become locked if they exceed the selected restrictions.
- Number of Attempts Allowed - From the first drop-down, select the number of unsuccessful login attempts a user is able to submit within the selected time frame. The default value is 5.
- Time Frame - From the second drop-down, select the time frame during which a user is able to attempt to selected number of login attempts. The default value is 5.
- Lockout Duration - From the drop-down, select the amount of time for which a user is locked out of their account if they exceed the selected restrictions.
- Lockout Message - Enter the message that is displayed on a user's login page when their account is locked. The character limit is 200. This is required. If multiple languages are enabled for your portal, select the Translate icon to translate the field into other available languages.
Use Case:
The Number of Attempts Allowed is 5, the Time Frame is 5 minutes, and the Lockout Duration is 60 minutes. A user unsuccessfully attempts to log in to their account 4 times within 2 minutes.
- If the user waits for 5 minutes, then the time frame and the number of attempts are reset. The user is able to attempt 4 more incorrect logins without a lockout.
- If the user waits for 2 minutes and incorrectly enters their login information, then they are locked out of their account.
- If the user successfully logs in on their fifth attempt, then the time frame and the number of attempts are reset.