Note for New Client Portals Created After May '19 Release: New Recruiting clients whose portals were created after the May '19 release will only be able to create Mobile Friendly Application Workflows and Career Sites. The Standard career site experience for such clients was deprecated as part of the May '19 release.
Standard career sites enable you to create a general career site that you can post jobs to but that has more limited mobile capabilities. Applicants will not be able to complete some parts of the application using a mobile device.
On the Career Site Settings page for standard career sites, you can configure settings such as the header image, header color, LinkedIn application settings, and Facebook connection settings. You can preview the career site and launch the career site editor from this page, as well.
To create a career site, go to . Then click the Add Career Site link.
| PERMISSION NAME | PERMISSION DESCRIPTION | CATEGORY |
| Career Site - Manage | Grants ability to access and manage Career Site Management. This permission can be constrained by OU and User's OU. This is an administrator permission. | Recruiting Administration |
| Career Site - View | Grants ability to access and view Career Site Management. This permission can be constrained by OU and User's OU. This is an administrator permission. | Recruiting Administration |
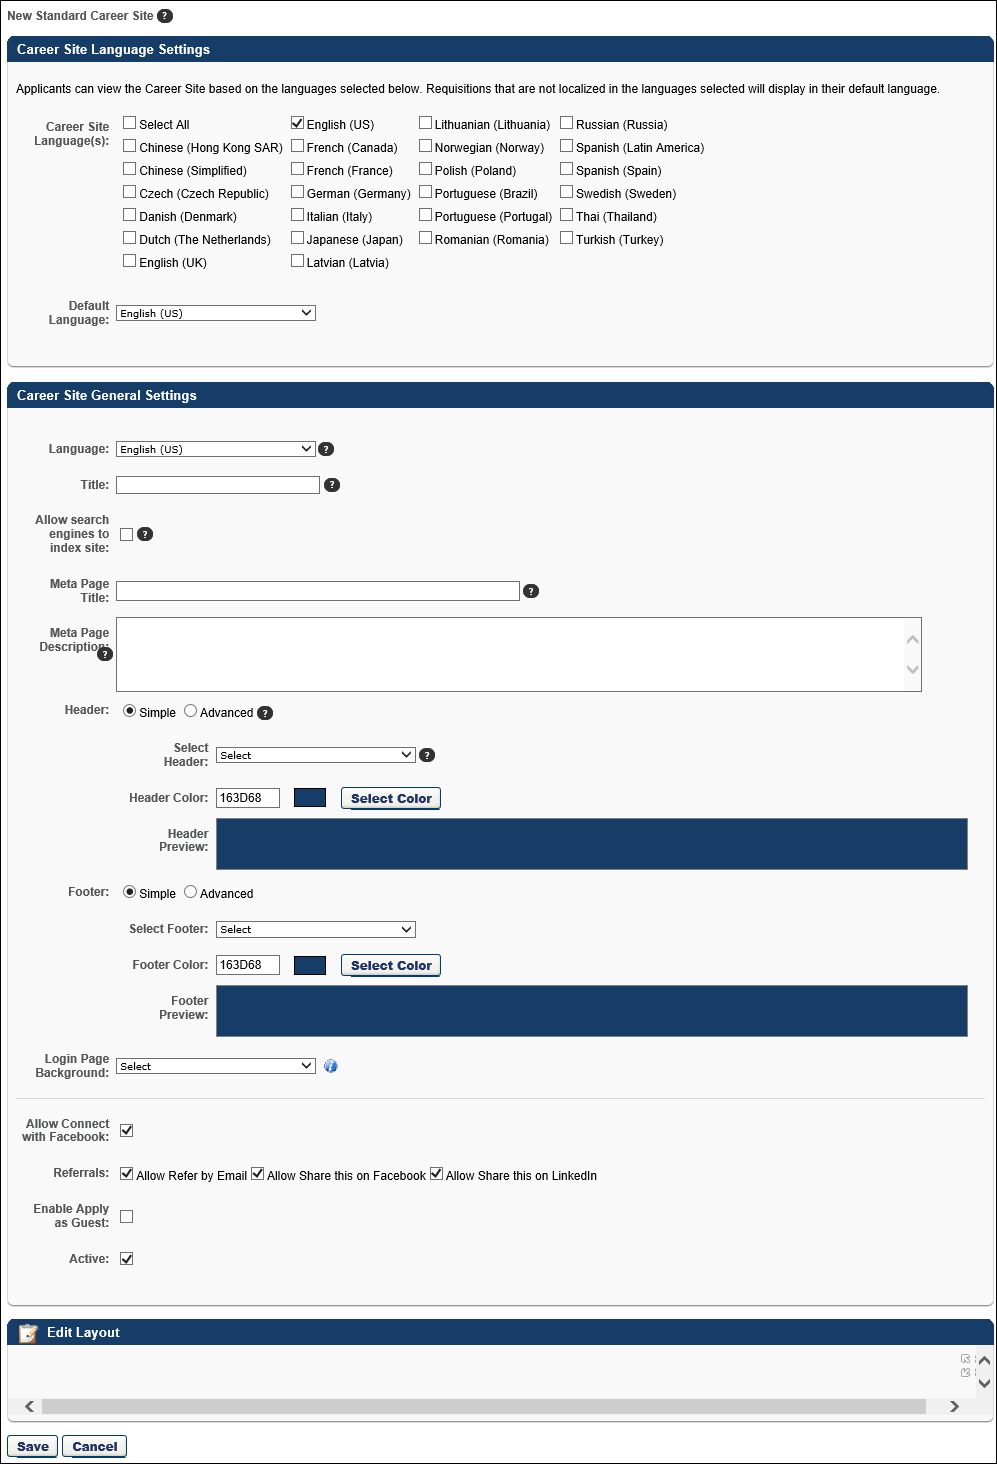
Career Site Language Settings
This section only displays for portals with multiple languages enabled.

This section allows administrators to select the languages in which applicants can view the career site. In the Career Site Language(s) field, you can check the Select All option to select all available languages, or check the individual boxes for the languages you would like to include. The languages that are available to select are the languages enabled for the portal.
When applicants view the career site, they can select the language from the language drop-down. The career site will then update to display in the selected language.
Note: The default language cannot be deselected from the Career Site Language(s) field.
Language Considerations
When unchecking a language that already has translated text in the Career Site General Settings section, a confirmation pop-up opens to indicate that the language contains translated information. Selecting in the pop-up deletes any existing translated text in the career site settings for the deleted language.
When including multiple languages for a career site, it is a best practice to select the Display Field option in the Selected Search Fields section for all search criteria that you are including on the Search Jobs widget. This ensures that applicants have search features available to find jobs in other languages.
Job requisitions that are not translated into the applicant's preferred language that they select on the career site will see the translatable values in the default language of the requisition. The application will not display the translatable values in the applicant's preferred language.
Note: System fields on the application, such as the field names on the Upload Attachments section of the application, display in the language the applicant selects on their My Profile page in the career site.
Career Site General Settings
This section displays for all portals. The following options are available In the Career Site General Settings section:
Select the language from the drop-down for the header/footer. The languages that display in the drop-down are the languages selected in the Career Site Language(s) field in the Career Site Language Settings section. Based on the language selected in the drop-down, administrators can configure header/footer information that applies to the selected language so that applicants see the translated content on the career site when they select to view the career site in the associated language.
Enter a title for the career site. This title is displayed on the Career Site Management page. The character limit for this field is 250. For portals with multiple languages enabled, you can enter a translated value for the title.
This field is unchecked by the default and allows administrators to select whether or not to allow search engines to index the career site. When unchecked, a meta tag is added to the page meta that prevents search engines from crawling the pages and subpages. When checked, a meta tag is updated to allow search engines to crawl the page.
Enter a meta page title, up to 50 characters. The title can be translated into the languages available for the portal by selecting a different language in the Language field and entering the translated meta page title in the field. When applicants search for the job in search engines, the search results will display the job in the applicant's language, if available.
Enter a meta page description, up to 150 characters. The description can be translated into the languages available for the portal by selecting a different language in the Language field and entering the translated meta page description in the field. When applicants search for the job in search engines, the search results will display the job in the applicant's language, if available.
When configuring the header, you can configure either a simple or advanced header. Note: JavaScript is not accepted by default when creating the header. To enable JavaScript for the header, contact Global Customer Support.
- Simple - The Simple option enables you to select a header image and color.
- Select Header - From the drop-down list, select a header image for the career site. The selected header is displayed for all career site pages, including Job Search, Job Details, Login/Self Register, My Profile, and Application Experience. The available images are taken from the Corporate Preferences images. A preview of the header image is displayed in the Header Preview field. The header is optional.
- Header Color - Select the header color, which is the color that fills the header in areas that the header image does not fill. You may enter a hex value for the color or select a color by clicking the button.
- Header Preview - This displays a preview of what the header will look like on the career site. The selected image is always aligned in the upper-left portion of the header. Any empty space in the header is filled with the selected header color. The selected logo is not resized.
- Advanced - The Advanced career site header option includes HTML configuration options. Selecting the Advanced option opens the WYSIWYG editor. The WYSIWYG (What You See Is What You Get) tool provides configuration tools, such as images, fonts, colors, formatting, and tables. There is also a Copy from Word feature that enables administrators to import from Microsoft Word, preserving the formatting used in the Word document. HTML code can also be used. For more information about the WYSIWYG tool, see the WYSIWYG Tool Considerations section in the Create New Email topic in Online Help. The system only accepts certain customizable HTML elements in the WYSIWYG Editor. Elements that are not acceptable display as text. See Safe Listed Customizable Elements.
When configuring the footer, you can configure either a simple or advanced footer.
- Simple - The Simple option enables you to select a footer image and color. Note: JavaScript is not accepted by default when creating the footer. To enable JavaScript for the footer, contact Global Customer Support.
- Select Footer - From the drop-down list, select a footer image for the career site. The selected footer is displayed for all career site pages, including Job Search, Job Details, Login/Self Register, My Profile, and Application Experience. The available images are taken from the Corporate Preferences images. A preview of the footer image is displayed in the Footer Preview field.
- Footer Color - Select the footer color, which is the color that fills the footer in areas that the footer image does not fill. You may enter a hex value for the color or select a color by clicking the button.
- Footer Preview - This displays a preview of what the footer will look like on the career site. The selected image is always aligned in the lower-left portion of the footer. Any empty space in the footer is filled with the selected footer color. The selected logo is not resized.
- Advanced - The Advanced career site footer option includes HTML configuration options. Selecting the Advanced option opens the WYSIWYG editor. The WYSIWYG (What You See Is What You Get) tool provides configuration tools, such as images, fonts, colors, formatting, and tables. There is also a Copy from Word feature that enables administrators to import from Microsoft Word, preserving the formatting used in the Word document. HTML code can also be used. For more information about the WYSIWYG tool, see the WYSIWYG Tool Considerations section in the Create New Email topic in Online Help. The system only accepts certain customizable HTML elements in the WYSIWYG Editor. Elements that are not acceptable display as text. See Safe Listed Customizable Elements.
Note: When clicking between the Simple and Advanced options when configuring headers and footers, any settings that you have configured in either option are maintained.
The Login Page Background field allows you to select an image that will appear as the background on the login page and the Create a Profile page for applicants. This helps to further brand the career site for the organization.
To select an image, click the drop-down and select from available images. The recommended image size is 1920 x 1200 pixels.
Note: If an image is not selected, then the background is white.
Administrators with permission to manage Corporate Preferences can upload new images from the Corporate Preferences page. Once the image is uploaded and the preferences are saved, the image can be selected from the Login Page Background field.
Note: You can still also add a header and footer by using the Header/Footer options.
The Enable Mobile Site option was retired as part of the October '18 release.
As part of the August '19 release, this option is deprecated for all qualifying career sites. A qualifying career site is a Standard career site that has the Enable Mobile Site option checked. This is being done because all action items that were supported in the old mobile optimized experience are supported in the mobile-friendly experience. In addition, performance has been enhanced, and new features are supported that were once not supported for mobile users, such as resume parsing, Apply with LinkedIn, and localization. Existing Standard career sites will no longer use the old mobile optimized experience so that all candidates can benefit from the new experience. If a mobile-friendly qualifying workflow is published to a Standard career site, the career site will display in the Standard format, but the application workflow will automatically become mobile-friendly. A qualifying application workflow is one that does not contain Forms, Training, or Assessment action items.
The function of the Enable Mobile Site option is to allow a mobile optimized career site to display for applicants accessing the career site from a mobile device.
For more information about the deprecation of the Standard career site experience, see the Frequently Asked Questions - Deprecate Standard Experience page in Online Help.
This option enables administrators to select a header image for the site. The images that are available in the Mobile Image drop-down are the images defined in Corporate Preferences.
This option enables administrators to define the color that fills the areas that the header image does not fill. Enter a hex value for the color or select a color by clicking the button.
Select this option to allow LinkedIn Apply/Sign-In functionality. This includes:
- Apply with LinkedIn from Job Details page.
- Sign in or Register with Linked in from the Sign In/Registration page.
- Use LinkedIn resume/CV from Application/Experience page.
Note: LinkedIn is sun-setting their current version of Apply with LinkedIn by the end of 2018. Once this occurs, the Allow Apply with LinkedIn /Sign-In option will no longer be available for standard career sites, and no LinkedIn options will be available to candidates when applying to a job on a standard career site. Clients who have a LinkedIn Recruiter contract, or a LinkedIn corporate account with active LinkedIn job slots, can leverage the new Apply with LinkedIn (With Apply Starters). The new Apply with LinkedIn (With Apply Starters) will only be supported on mobile friendly workflows. See Apply with LinkedIn (with Apply Starters) - Overview.
When this option is checked, an button displays on the career site for applicants and allows them to apply to the job using their Seek profile. This option is unchecked by default. This option only displays for portals with the Apply with Seek integration enabled. Note: To enable the Seek functionality, contact Global Customer Support. Then, you can purchase Seek from the Edge Marketplace for $0.
Select this option to allow applicants to connect their applicant profile with Facebook. This connection enables the system to access their basic information and email address from Facebook. The system also compares your friends list against people that work at the company to find common connections.
The Referrals section includes settings to enable or disable the referral options that appear on the career site. If an option is disabled, it does not appear for applicants on the career site.
| field | description |
|---|---|
| Allow Refer by Email | This option is checked by default and enables the Send to a Friend email icon |
| Allow Share this on Facebook | This option is checked by default and enables the Share this on Facebook icon |
| Allow Share this on LinkedIn | This option is checked by default and enables the Share this on LinkedIn icon |
This option is disabled by default. Check the Enable Apply as Guest box to enable applicants to apply as a guest to a job on the career site. Applying as a guest means that new applicants do not need to create a profile before applying to a job, and existing applicants to not need to log in to their profile before applying to the job. Leave the box unchecked to disable the Apply as Guest functionality.
Enabling the Enable Apply as Guest option could help to make the application process quicker and easier for applicants and reduce the possibility of applicants choosing not to apply because they do not wish to create a profile on the career site.
The Enable Apply as Guest option only applies to Standard career sites. The Apply as Guest functionality is enabled by default for mobile-friendly career sites.
The Apply as Guest feature is not supported on mobile optimized sites.
- Terrance is the Recruiting BPO for Acme Corporation. Acme is a Retail Restaurant Chain.
- Acme is expanding and will be opening new restaurant locations in the early Fall. Acme needs the new locations to be fully staffed in time for targeted opening dates.
- To accomplish the aggressive hiring goals, Terrance knows that the application experience has to be straightforward and simple to complete.
- To provide an experience with the least amount of friction, Terrance configures his requisition to allow applicants to apply within having to log in or create a profile. With the Apply as Guest functionality, Acme career sites can see application completion rates increase as a result of simplified workflows.
- Additionally, Terrance configures contact information-only parsing, which allows applicants to upload their resume and have the system parse and pre-populate contact information fields ( phone, email, etc.) within the application.
- Finally, Terrance wants to make sure he provides a path to account creation for interested applicants. With this requirement in mind, Terrance configures the "Submit" step to allow applicants to create a profile at the time of application submission.
- Terrance applied the following Settings to align with his goals to hire a lot of people very quickly:
- Apply as Guest Functionality - Allows applicants to apply to open positions without creating an account or logging in to their existing profile.
- Contact Information-Only Parsing - Resume upload parses and pre-populates contact fields. This setting is ideal for organizations that would like to further streamline the applicant experience.
- Create Profile in Submit Step - The applicant user can submit their application at the same time as they create an account. This action provides a path to profile creation that can benefit hiring related communication and tracking.
- Adler recently finished secondary school and is looking for a summer job before he attends university.
- Adler wants to quickly and easily apply to local front-line positions in his hometown. Adler plans to apply to many positions at many companies and will accept the first best offer he receives.
- Adler knows that if he has to log in and set-up a profile on a career site, he will not apply to those jobs.
- Adler looks for opportunities in food service on the Acme Careers page.
- Adler clicks for a position he likes.
- He enters contact information and adds his resume to the Contact Information page. Then, he clicks . Without having to create a profile, Adler is taken to the first page of the application.
- On this page, he sees his contact details and resume data pre-populate the corresponding fields on the application.
- He proceeds to the Submit Application step of the application.
- Adler notices optional fields on the Submit Application step that he can complete to create an account.
- Adler is in a hurry, but it is not a hassle to enter a password since he is almost done with the application anyway.
- After completing the Submit Application step, Adler's application is complete.
- Since he entered a password on the Submit Application step, Adler can review his career site profile or search for and apply to other jobs.
Select this option to make the career site active. When a career site is active, it can be accessed by applicants and job requisitions can be posted to it.
Edit Layout
The Edit Layout section displays a preview of the career site layout.
To edit the career site layout, click the Edit Layout heading link in the upper-left corner of the Edit Layout section. This opens the custom page builder in a pop-up window. When this link is clicked, the career site settings are saved. See Custom Page Builder. See Search Jobs Widget.
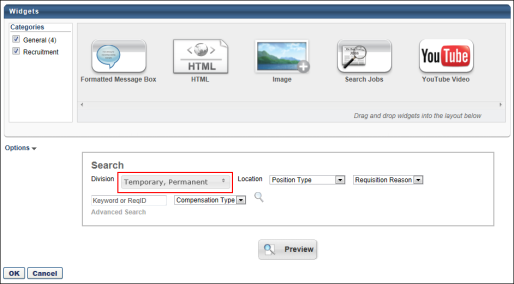
Multi-Select Fields - Default Settings
From the Edit Layout section, administrators can view and configure the default values for drop-down fields that are defined as multi-select fields. Fields are defined as multi-select when configuring the Search Jobs widget.
To view and modify the default settings, open the drop-down for the field. The values that are currently defined as default are checked. Check additional values or uncheck existing values to modify the default settings. Click anywhere outside the drop-down to close the drop-down.
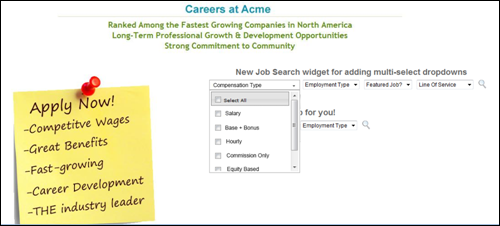
Preview
To view a full screen preview of the career site, click the Full Screen Preview icon  in the upper-right corner of the Edit Layout section. This opens a new browser window and displays a full screen preview of the career site, including the header and application settings. If fields are defined as multi-select when configuring the Search Jobs widget, then the drop-down field configurations can be viewed when previewing the career site.
For portals with multiple languages enabled, the career site preview displays in the language selected in the Language field.
Save
Click at the bottom of the page to save the career site settings and return to the Career Site Management page.
Connect With Us
For information about how to add the Connect With Us link to a career site, see the Add Connect With Us Link to a Career Site topic in Online Help.
Career Site Password for Applicants
The password rules that are configured in Password Preferences at the top level Division Organizational Unit (OU) are respected and displayed to applicants when they create an account on the career site. This ensures that applicants meet the minimum password requirements that are defined for users in your organization.