Goals - Create/Edit
Goals are used to identify and formalize the achievements that you want to accomplish during a specific period of time. Goals help you to maintain focus on the correct priorities, and they allow you to track your progress towards the completion of those priorities.
The instructions at the top of the page are configured by the administrator in Goals Configuration Preferences.
- To create a goal, go to . Then click the button.
- To edit a goal, go to . Click the Actions menu icon
 to the right of the appropriate goal and select Edit.
| PERMISSION NAME | PERMISSION DESCRIPTION | CATEGORY |
|
Snapshot Goals - Manage |
Enables user to manage their own goals, and others public goals, using the Goals widget and subpage within the Universal Profile - Snapshot page, for users within their permission constraints. This permission can be constrained by Employee Relationship, OU, User's OU, User Self and Subordinates, User, User's Self, User's Manager, User's Superiors, User's Subordinates, and User's Direct Reports. Best Practice: For most users, this permission should be constrained by User Self and Subordinates. |
Universal Profile |
| EMAIL NAME | EMAIL DESCRIPTION | ACTION TYPE |
Troubleshooting Information
See Troubleshooting Guide - Creating and Editing Goals.
See QUICK START GUIDE - Goal Creation.
Considerations
- When creating or editing a goal that is imported from a data feed, created from the Goals Library, or assigned as a non-shared goal, if a field is set as read-only, the field cannot be modified by the user.
- Text and date fields such as Title and Due Date cannot be modified.
- Tasks and Targets cannot be added.
- The Alignment section cannot be modified.
- If the Start or Due Date is set as read-only, the goal cannot be advanced and the Advance option is not available on the My Goals page.
- If the Goals Library is not enabled, the Library button not visible.
- If Start Date, Due Date, Perspective, Categories, Weight, or Visibility are not enabled, these options are not visible. If Start Date is not enabled, it defaults to the creation date.
- If Success Descriptors are not enabled, the Success Descriptors section is not visible.
- If Tasks, Targets, or Attachments are not enabled, these sections are not visible.
- If an administrator set a maximum goal limit, and you attempt to create more than the set maximum, an error message appears.
Wizard
When creating a goal, the SMART Wizard guides users through the goal creation process, helping them to create specific, measurable, actionable, relevant, and timely goals.
If the SMART Wizard is enabled, you can click the button in the upper-right corner of the page to create a goal using the SMART Wizard. See Goals Create/Edit - SMART Wizard.
Library
If the Goals Library is enabled, you can click the button in the upper-right corner of the page to create a goal using a predefined goal template. See Goals Create/Edit - Goal Library.
When editing a goal, the button is not available.
Note: When a goal is imported from the Goal Library, some fields may be locked, and you cannot edit these fields. If this occurs, the field is disabled on the Create/Edit Goal page.
Options
When editing a goal, the following options are available in the Options drop-down menu:
- View History - View the history of the goal. The name of the user who updated the goal is included with the type of update and the date and time of the update. Also shows the modification history for goals created in a goal planning task. See View Goals - History.
Alignment
If goal alignment is enabled, the Alignment widget is available in the upper-right corner of the page.
Aligning your goal with another goal indicates that your goal directly supports and contributes towards the success of the parent goal. Goal alignment ensures that all employees in a team, division, or company are working to achieve similar goals, and allows employees to see how their efforts contribute to the overall success of the company by creating a hierarchy of goals.
When you align to a goal, tasks and targets may be copied to your goal depending on the preferences set by your system administrator. You can modify these details to be appropriate for each user.
To align your goal with another goal, click the button within the Alignment widget. See Goals Create/Edit - Align with Another Goal.
If your goal is aligned with another goal, the Alignment widget displays the alignment hierarchy of the goal. For example, if my goal is aligned to my manager's goal, then my manager's goal is displayed above my goal with a connecting line to my goal.
- The goal's title is displayed, and the color bar on the left of the goal card indicates the goal's status at the time the page is loaded. Users can hover the computer cursor over the goal card to view the goal title and status.
- Up to three goals are displayed in the widget. For example, if my goal is aligned with my manager's goal, and my manager's goal is aligned with my indirect manager's goal, then these three goals are all displayed in the widget.
To edit the goal alignment, click the Edit link above the Alignment widget. This opens the Alignment pop-up. See Goals Create/Edit - Align with Another Goal.
Note: Any modifications to a goal's alignment are not saved until the goal is saved.
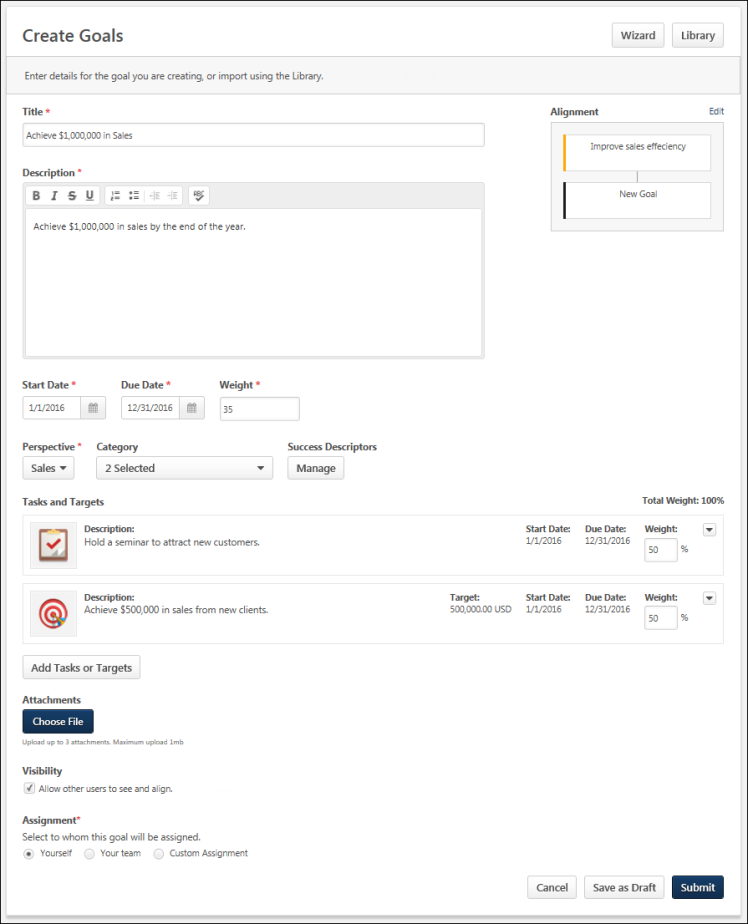
General Details
Enter the following general information for the goal:
- Title - Enter the title for your goal that will appear on the My Goals page as well as anywhere else your goal is visible. This field is limited to 1,000 characters.
- Description - Enter an overview of the goal, including any objectives or parameters. This field can be formatted using the text formatting buttons and is limited to 10,000 characters.
- Start Date and Due Date - Click the Calendar icon
 to select the date on which the goal should be started and the date by which the goal should be completed. The Start Date must be before the goal Due Date. If this goal is being aligned to another goal, these dates must be within the Start and Due Date of the parent goal. When you view your goals or run goal related reports, the Start Date and Due Date are used to determine which goals are included. If any part of a goal falls within the specified time frame, the goal will display.
 - Weight - Enter a weight for your goal between 0 and 100. Weighting allows you to place a greater value on certain goals. For example, if you have four goals for a review period and they are valued equally, you should assign them each a weight of 25%. Similarly, if one goal is more important than the others, you may give that goal a weight of 40% and assign the other three a weight of 20%. The heavier weighted goal will count more towards your overall goal progress than the other three.
- Depending on the portal configuration, the total weight of all of your goals may be required to be less than or equal to 100%. If your total goal weight is at or above 100% and you create a new goal, you are able to create the goal if the goal weight is set to 0%. This enables you to save the goal and then adjust the weights of all necessary goals.
- Depending on a backend setting, the weight percentage field may accept up to two decimal places. Note: This backend setting controls the decimals of precision for Goal Weight, Goal Progress, Task Weight, Task Progress, Target Weight, Target Progress, Performance Review Section Weight, and Performance Review Step Weight.
- Perspective - From the drop-down menu, select a perspective. The perspective is used to specify to which aspect of the organization your goal relates. A goal can only be associated with one perspective. Perspectives are defined by system administrators.
- Category - From the drop-down menu, select all categories that are appropriate for your goal. Categories are used to further define the type of goal you are creating. A goal can have multiple categories. Categories are defined by system administrators.
- Success Descriptors - Success descriptors allow you to define how you judge success in relation to the goal. Click the button to customize the success descriptors for the goal. Note: The term "Success Descriptors" can be customized by the administrator, so the link may appear differently in your portal.See Goals - Create/Edit - Success Descriptors.
Task and Targets
Tasks and targets enable users to break down the different steps needed to accomplish the goal and to make the goal more clear to the user's performance manager.
To add a task or target to the goal, click the button. See Goals - Create/Edit - Add Task or Target.
Once tasks and targets are added to a goal, they are displayed in the Tasks and Targets section.
The Weight field displays the weight that was entered when the task or target was created. However, you can continue to update the weight of each task and target until the goal is saved. The total weight of all tasks and targets is displayed in the upper-right corner of the Tasks and Targets section. When the goal is saved, the total weight must be equal to 100%.
To edit a task or target, click Actions menu icon ![]() to the right of the appropriate task or target and select Edit.
to the right of the appropriate task or target and select Edit.
To delete a task or target, click Actions menu icon ![]() to the right of the appropriate task or target and select Delete. A task or target is not permanently deleted until the goal is saved.
to the right of the appropriate task or target and select Delete. A task or target is not permanently deleted until the goal is saved.
Attachments
You can attach up to three documents that are relevant to the goal. This enables you to include more details or references that support the goal so that anyone viewing the goal can view the resources if they are evaluating or aligning to the goal.
- The maximum file size is 1 MB.
- Attachments can be avi, bmp, csv, doc, docx, gif, jpg, jpeg, jpe, mov, pdf, png, ppt, pptx, txt, xls, xlsx, and zip.
You can attach a file by dragging and dropping a file into the Attachment area. You can also attach a file by clicking the button and select a file from your computer. Note: The drag-and-drop functionality is not supported by Internet Explorer browsers.
After the file is attached, the attachment appears in the Attachments section.
An attachment can be removed by clicking the Cancel icon ![]() to the right of the attachment name.
to the right of the attachment name.
Visibility
Select the Allow other users to see and align option to allow other users to see your goals and align with your goals, for example, users can decide which goals are public vs. private. This is often used by managers to allow their direct reports to view manager goals and align their individual goals with them. If alignment is disabled, this option is not available. Note: If a user or manager unchecks the “Allow other users to see and align” option, the user will see the goals in snapshot goals but the manager will not.
Assignment
Managers and administrators with the appropriate permissions can create goals and assign them to members of their team, the entire organization, an organizational unit (OU) or group, or specific users. If the Assignment section is not available when creating a goal, then the goal is automatically assigned to the user who created it.
When editing an individual goal, the Assignment section is unavailable, but users can edit the goal manager for goals they created.
-
- Your Team - Select this option to assign the goal to members of your team. See Goals - Create/Edit - Assign to Your Team .
- Custom Assignment - Select this option to assign the goal to the entire organization, to an OU or group, or to specific users. See Goals - Create/Edit - Assign to Custom Assignment.
The instructions at the top of this section are configured by the administrator in Goals Configuration Preferences.
Comments
When editing a goal, the Comments section may be available. This section is not available when creating a goal.
If the Comments section is enabled, you and your manager can add comments related to all aspects of your goal. For example, you may add a comment to explain your recent efforts toward this goal. You manager can then reply to your comments or they can add an unrelated comment.
Comments are displayed with the user's profile picture and a timestamp. The three most recent comments are displayed by default, including replies to those comments. In order to view any additional comments, click the Show previous link.
Comment Actions
You can add, reply, delete, delete, or edit comments.
- To add a new comment, click the Add Comment link. This adds a field in which you can add your comment. After entering your comment, click to add the comment to the goal. There is no limit to the number of comments that can be added to a goal.
- To reply to a comment, click the Reply icon
 below the comment. This adds a field in which you can add your reply. After entering your reply, click to add the reply to the comment.
 - To delete a comment you have added, select Delete from the Options drop-down menu . You can delete any comments that you have added.
- To edit a comment you have added, select Edit from the Options drop-down menu .
Approve/Deny
Users with the appropriate permissions can approve or deny a goal on the Edit Goals page.
- Click the button to approve a goal.
- Click the button to deny a goal.
Submit/Save as Draft/Cancel
Click to create the goal or to submit any modifications. When a goal is submitted, the goal status is Pending Approval, and you must click the button on the My Goals or Snapshot Goals page to send an email to the approver (if the corresponding email is active). If goal approval is not required or if a goal approver is not set, your goal is automatically approved.
Click to save the goal without submitting it. The goal will be saved for you to continue creating later, but the goal will not be submitted and will not be visible to anyone but yourself. If the goal is configured to be assigned to another user, the goal is not yet assigned. The goal is only assigned once it is submitted.
- When saving a goal as a draft, the Title and Weight fields are required.
Click to cancel the goal creation process. When editing a goal, this discards any unsaved changes.
Send Approval Request
The button is available in the upper-right corner of the page if you have goals that are pending approval. Click this button to send an email to your goal approver if the Request Goal Approval email is enabled. Once the request is sent, the button text is updated to "Request Sent" until the page is refreshed.
If goal approval is not required or if a goal approver is not set, then goals are automatically approved when they are created, edited, or cancelled.
Contents
The following information is available within this folder. Click a link to navigate directly to the appropriate topic: