The Actions drop-down on the Search Results page for Candidate Search Query enables you to perform a series of actions on all candidates at once or on individual candidates. The drop-down displays only actions for which you have permission to perform and that are relevant to the functionality in your portal.
The results for a search on Candidate Search are accessed by clicking on the Quick Search or Advanced Search tabs. You can also access search results via saved searches.
| PERMISSION NAME | PERMISSION DESCRIPTION | CATEGORY |
From the Actions drop-down, you can do the following:
- Invite candidates to apply to a requisition.
- Add candidates to a requisition.
- Add candidates to the Talent Pool.
- Compare the criteria of up to five candidates.
- Export candidate data to Excel.
- Send candidates an email.
Invite to Apply
The Invite to Apply action sends an email invitation to all applicants that are selected from the search results to apply to the requisition. When Invite to Apply is clicked, the Invite to Apply pop-up opens. Select one or more requisitions to which to invite applicants to apply, and then click . This triggers the Invitation to Apply email, if configured. The History tab on the applicant's profile page is updated with the event.
If multiple requisitions are selected in the pop-up, a separate email is sent for each requisition.
Note: If the applicant applies via the link in the email, the applicant's source for the requisition is Other - Invited to Apply.
Compare Candidates (up to 5)
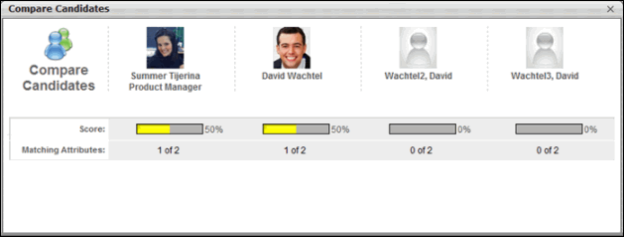
Compare Candidates enables you to view the Matching Criteria score and number of matching attributes for up to five candidates at once.
To compare candidates:
- Select up to five candidates by checking the box to the left of the candidate's name.
- Click Compare Candidates in the Actions drop-down. This opens the Compare Candidates pop-up, displaying the following for each candidate:
- Photo, if available; ghost image displays if no photo is available
- Full name
- Current position (for internal applicants only)
- Matching criteria score
- Number of matching attributes
Add to Requisition
You can add candidates to requisitions for which they did not apply by using the Add to Requisition feature. All candidates can be added as a batch or individually. Adding a candidate to another requisition does not affect the existing requisition. The candidate appears on the new requisition as though they applied for the job themselves.
In addition, all applicant documents and attachments on the Applicant Profile page for the source requisition move with the applicant to the new requisition. The documents and attachments display on the Documents tab of the Applicant Profile page for the new requisition. For all attachments in the Attachments table, the status in the Applicant Status column is New Submission.
Note: Only candidates who checked the Consider me for other positions field when completing their application can be added to a requisition.
To add a candidate to a requisition:
- Check the Select All box to add all candidates to a requisition at once. Or, select individual candidates by checking the box to the left of the candidate's name.
- Click the Add to Requisition link in the Actions drop-down. This opens the Add to Requisition pop-up.
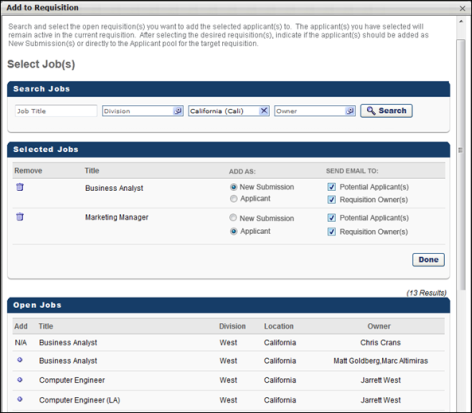
- Enter search terms in the Job Title, Division, Location, and Owner fields.
- Click .
- The search results display in the Open Jobs table in alphabetical order. The title, division, location, and requisition owner display. All columns in the Open Jobs table are sortable. Note: The results that display are dependent upon your permission constraints.
- Click the plus icon in the Add column to select a job. This opens the Selected Jobs table and places the job in the table. The plus icon in the Add column in the Open Jobs table changes to "N/A." You can delete jobs added to the Selected Jobs table by clicking the Remove icon to the left of the job title. Jobs display in Selected Jobs table in the order in which they are added.
- The Add As column enables you to add the submission as a new submission or an applicant. Select New Submission to add the applicant as a new submission. Select Applicant to add the applicant into the first status in the status workflow for the requisition, in which case the date for the Current Status is the date on which the applicant was manually added to the requisition.
- In the Send Email To column in the Selected Jobs table, check the box to send an email to potential applicants and/or requisition owners, notifying them that the candidate has been added to the requisition. Both boxes are unchecked by default. Note: If the new requisition requires applicants to complete certain steps prior to submitting their application, the email can be configured in Email Management to include a link for the applicant to apply directly to the requisition. Further, the application materials for the new job are pre-populated with the applicant's existing information.
- Click to save the changes.
Note: If Skip New Submission Status is enabled by the administrator in Requisition and Applicant Preferences, then the option to add an applicant as a new submission is disabled for the Add to Requisition action item. The New Submission option in the Add to Requisition pop-up is grayed out and cannot be selected. The Applicant option is then selected by default.
Mobile-Friendly Candidate Experience Considerations
When an applicant is added or moved to a new requisition and some but not all answers have been answered from the first requisition, the applicant will continue with the second application using the mobile-friendly candidate workflow. In addition, the applicant's previously answered questions will populate in the new mobile-friendly workflow.
- Scott is a recruiter for IMEC. Scott has self-enabled the new mobile-friendly candidate experience in his Production portal.
- Alex is interested in a position at IMEC and applies for the Senior Project Manager role. Alex completes the application in the mobile-friendly workflow.
- Scott really likes Alex but thinks she is more qualified for the Junior Project Manager role. Scott moves Alex to the Junior Project Manager role. There are a few additional questions in the Junior Project Manager role that were not in the original Senior Project Manager Application workflow. Scott invites Alex to apply to the new requisition.
- Alex receives an email to apply to the Junior Project Manager role. Alex clicks the link to apply and is prompted to sign in. For security reasons, Alex will have to claim her account or log in to continue the new application with her previously answered questions populated.
- When the application workflow loads, it is in the new mobile-friendly application workflow, not the standard workflow. Alex is taken to page 1 of the application. All previously answered questions from the Senior Project Manager role populate the new application.
- On page 2, the pre-screening questions are exactly the same on the Senior and Junior Project Manager requisition, so her previously answered questions are populated. On page 3, only some of the pre-screening questions are the same. Because some and not all of the pre-screening questions are the same on page 3, Alex's previously answered pre-screening questions do not populate.
- The questions in the two requisitions (source and new requisition) have to be exactly the same in order for an applicant's answers to pre-populate.
- If some but not all pre-screening questions in a specific section are the same, then none of the previously answered pre-screening questions will populate.
- The applicant will be taken to the first page of the application workflow, regardless of how many questions are complete.
- Applicants will have to log in or claim their account in order to continue on the new application and have their previously answered questions populate populate on the new application.
Add To Talent Pool
For portals using EPM, the Talent Pool functionality enables you to organize your search results into candidate pools. See Talent Pool - Manage.
To add users to a talent pool:
- Check the Select All box to add all candidates to a talent pool at once. Or, select individual candidates by checking the box to the left of the candidate's name.
- Click Add To Talent Pool in the Actions drop-down. This opens the Add to Talent Pool pop-up.
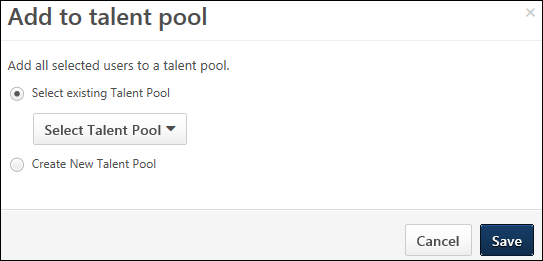
- Both radio buttons are deselected by default. To create a new talent pool, select Create New Talent Pool for users. Enter a name for the talent pool in the Title field. To add candidates to an existing talent pool, select Select an existing Talent Pool for users. Click the drop-down in the Select field to choose a talent pool.
- Click to add the candidates to the talent pool.
To view and manage the talent pool, go to .
Export to Excel
This action allows recruiters to export the data for the selected candidates to Excel. The Excel file includes the search criteria and the candidate data.
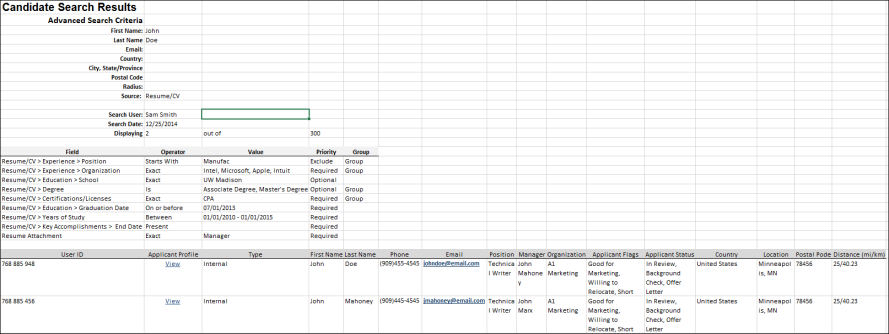
The Excel output for searches conducted from the Quick Search tab includes a Search Criteria section and the table that lists the search results.
The Search Criteria section displays the following information:
- Resume/CV Keywords - This field displays the search terms defined in the quick search field.
- First Name
- Last Name
- Country
- City, State/Province
- Postal Code
- Radius
- Source
- Search User - This field displays the name of the user who conducted the search.
- Search Date - This field displays the date of the search.
- Displaying - This field displays the number of candidates selected to export out of the number of candidates available to select.
The information that displays in the table is the information that displays for candidates on the search results page.
- User ID
- Applicant Profile - Click the View link to open the applicant's profile page.
- User Type - This field displays the option selected in the User Type drop-down, either Internal or External or both.
- Phone
- Email - The candidate's email displays as a link. Click the link to email the applicant from your email provider.
- Position
- Manager
- Organization
- Applicant Flags
- Country
- Location
- Postal Code - This column only displays if an applicable country is selected in the Country field when configuring the search criteria.
- Distance
The Excel output for searches conducted from the Advanced Search tab displays the equality and Boolean operators, as well as the resume keywords defined for the search.
In addition, a table displays above the search results, showing the criteria defined in the Advanced Search Query Builder. The table shows the field name, equality operator, field value, priority (required, optional, exclude), and grouping (if the criteria are grouped).
The search results display below the criteria.
Best Practices for Exporting to Excel
When exporting candidate search data to Excel, it is a best practice to consider candidate data privacy and level of security when sharing Excel files with other users within the organization. For portals that have the archive applicant data functionality enabled in Compliance Enablement Preferences, the following best practices should be considered when using the Export to Excel action:
- Grant candidate search permissions to a limited number of users.
- Destroy exported candidate search results after a certain period of time.
Send Email
The Send Email feature enables you to email all candidates at once or individual candidates, using your default email application. Clicking Send Email opens an email in a pop-up window. Each checked candidate's email address displays in the blind carbon copy (bcc) field. Email addresses are pulled from a candidate's user record.
To send an email:
- Check the Select All box to send an email to all candidates at once. Or, select individual candidates by checking the box to the left of the candidate's name.
- Click Send Email in the Actions drop-down. This opens an email from your default email application. Each checked candidate's email address displays in the bcc field. No other fields are auto-populated.
- Enter a subject, email text, etc., and then send the email. The email is distributed to all included candidates whose email addresses are active.