Session Roster - Attendance and Scoring Tab
Note: If a locator number drop-down appears in the upper-left corner of the tab, then your portal has enabled the ability to configure multiple providers for a session. See Multiple Providers - Parent Roster - Attendance and Scoring.
| PERMISSION NAME | PERMISSION DESCRIPTION | CATEGORY |
| Roster - Manage | Grants ability to manage instructor led training session rosters, including updating attendance, and marking the ILT session complete to update student transcripts. A variety of other features are available depending upon additional roster permissions. This permission works in conjunction with Events - View, Sessions - View, and Roster - View permissions. This permission can be constrained by Instructor, User as Instructor, ILT Provider, and User's ILT Provider. This is an administrator permission. | Learning - Administration |
| Roster - View | Grants view-only access to instructor led training session rosters. This permission works in conjunction with Events - View and Sessions - View permissions. This permission can be constrained by Instructor, ILT Provider, User's ILT Provider, and User as Instructor. This is an administrator permission. | Learning - Administration |
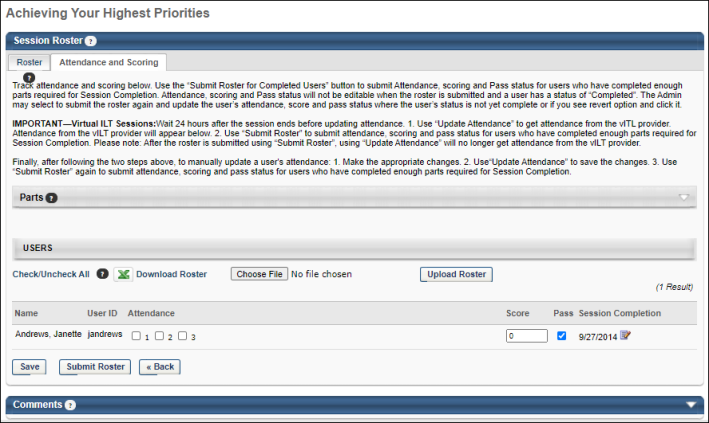
Parts
In the Parts section, each part within the session displays along with the part date and time. Each part is listed with a part number. The part numbers correspond with the Attendance option boxes in the Attendance and Scoring table. The Parts section is collapsed by default.
Users
In the Users section, you can update attendance in bulk or individually. To update attendance in bulk, download the roster, make updates to the spreadsheet, and upload the completed roster.
To update attendance individually, click the Check/Uncheck All Attendance link to mark each user as attended for each part of the session. All Attendance option boxes that are unchecked will be selected. Click the link a second time to clear all selected Attendance option boxes. The Check/Uncheck All Attendance link is only visible before the administrator or instructor submits the final roster.
Download Roster
To download an Excel spreadsheet of the roster, click the Download Roster link. The roster will download to your computer in .xlsx format. Once you have downloaded and opened the spreadsheet, you can make updates to the following fields:
- Part Attendance
- Score
- Pass
Do not modify any other fields in the spreadsheet. Once you have made any necessary updates to the above fields, save the roster in .xlsx format.
Download Roster Exclusions
The following changes to the roster spreadsheet are NOT supported:
- Adding or removing attendees
- Renaming any column name
- Modifying the file format to any format other than .xlsx
- Roster submission (the roster must still be submitted using the button on the Session Roster page)
- Any user identification other than username or user ID
Upload Roster
After saving the roster spreadsheet to your computer with updates to attendance:
- Click the button in the Users section of the Session Roster page.
- Search for and select your saved roster spreadsheet from your computer.
- Click the button to finish uploading your spreadsheet to the Session Roster page.
- If you are finished making updates to the roster, click the button. Note: After the roster has been submitted, the only modifiable field is the Score field. No other roster information may be modified after the roster has been submitted.
A maximum of 1,000 users can be uploaded, and a maximum of 10,000 updates can be uploaded. Each session part is treated as an independent record for every user. For example, if a session is comprised of two parts, and you are updating records for 100 users, the total count for updates is 200 records. If the total update count exceeds 10,000, the Download and Upload roster button will become unavailable. Note: This differs from the maximum while using the Bulk Add Users feature. See Session Roster - Bulk Add Users.
Attendance and Scoring Table
The Attendance and Scoring table displays the following information for each user that is registered for the session:
- Name - This field displays the name of the user.
- User ID - Displays the user ID defined in the user's system record.
- Attendance - An Attendance box appears for each part within the session. These parts are listed in the Parts section above the table. For each part, select whether or not the user was in attendance. For example, if a user attended part 1 and 3 for a session, but missed part 2, select the Attendance box for 1 and 3, but not 2. Attendance can only be edited before the final roster is submitted. Once the final roster is submitted, all attendance is final. Select the Check/Uncheck All link to select or deselect all attendance boxes.
- If a user has none of the Attendance checkboxes selected for a session, their training status is No Show when the roster is submitted and their cost center is charged for the No Show penalty if applicable.
- If a user is not marked as attending the minimum number of required parts, their training status is Incomplete when the roster is submitted.
- Score - In this field, enter the user's score for the session. This value must be an integer. These scores appear on the Roster tab in the Score column. Scores can be edited before and after the final roster is submitted. Scores are visible to users on their training details page.
- Pass - Select this option to indicate the user has achieved a passing score for the session. When the final roster is submitted, if this option is selected, the Pass/Fail column on the Roster tab displays Pass, otherwise it displays Fail. The Pass option can only be edited before the final roster is submitted. Once the final roster submitted, the Pass option is final. If the Pass checkbox is not selected for a user, their training status is Incomplete when the roster is submitted.
If more than twenty users are registered for an instructor-led training (ILT) session, the Attendance and Scoring page of the session roster paginates, and users with permission to manage the roster can navigate through pages of registered users, with up to twenty users displaying per page.
Session Completion
The Session Completion column displays the date on which the user completed the session. In ILT Preferences, administrators are able to configure the logic that determines the completion date for sessions. This column is visible to all users who have permission to view or manage the session roster.
- When the administrator has configured the session completion date to be the date on which the session roster is submitted, then the Session Completion column displays "Pending" until the roster is submitted.
- Administrators who have permission to manage the roster have access to an Edit icon
 to the right of the session completion date. See Session Completion - Edit.
Session Completion - Edit
To edit the session completion date for a user, click the Edit icon ![]() to the right of the user's session completion date. The session completion date can be set to any date, even if the date is before the session start date or after the session end date.
to the right of the user's session completion date. The session completion date can be set to any date, even if the date is before the session start date or after the session end date.
After selecting the appropriate date, click the Save icon ![]() to the right of the Session Completion date. Then, click the button at the bottom of the page to save the entire roster. Important: The updated session completion date is not saved until the entire roster is saved. In addition, the user's transcript is not updated until the roster is submitted.
to the right of the Session Completion date. Then, click the button at the bottom of the page to save the entire roster. Important: The updated session completion date is not saved until the entire roster is saved. In addition, the user's transcript is not updated until the roster is submitted.
Once the session roster is submitted, the user's transcript is updated with the new session completion date. However, administrators may edit the user's session completion date and submit the roster multiple times, if necessary.
Save or Update
Click Save or Update Attendance to save any changes made to the attendance and scoring. The button is available as soon as at least one user is registered for the session, and it remains available even after the final roster is submitted. No Show penalties are not charged at this time.
Submit Roster
Click to finalize the roster attendance and scores. The Submit Roster button is available once the last session part has started (this is only applicable to traditional classroom sessions and is not applicable to vILT sessions) or immediately after the last part of the session is concluded, depending on the settings in ILT Preferences:
- The roster can be submitted after the start time of the last part of the session for traditional classroom sessions if the Allow to submit roster after start time of the last part of the session option is enabled in ILT Preferences.
- The roster cannot be submitted until after the last part of the session has ended for traditional classroom sessions and vILT sessions if the Allow to submit roster after start time of the last part of the session option is not enabled in ILT Preferences.
Once is clicked, all user statuses for the session are updated and appear on the user's transcript record. No Show penalties are charged at this time if the user did not attend any parts.
- If the administrator adds a part after the roster is submitted, those parts appear for the user, but shows that the user has not completed the additional part. The administrator cannot mark the user as attended for the additional part if the user is complete. The attendance status for the new part after the roster is submitted does not change the status for users who already have a Completed status, but does affect the status for users who do not have a Completed status.
- For WebCasts, the button displays before session completion but only after enough parts have been completed for the session to have a status of Complete on a user's transcript. For example, a weekly training session has 52 parts, and 26 parts are required for completion of the session. After the first 26 parts have occurred, the button displays and continues to display until the completion of all 52 parts. Upon completion, the button name changes to .
Submit Roster for Completed Users
For WebCasts, the button displays before session completion but only after enough parts have been completed for the session to have a status of Complete on a user's transcript. For example, a weekly training session has 52 parts, and 26 parts are required for completion of the session. After the first 26 parts have occurred, the button displays and continues to display until the completion of all 52 parts. Upon completion, the button name changes to .
- To update the status of users who have completed all required parts before session completion, click . This changes the status of the learning object in the user's transcript to Completed.
- Once a session is completed and the Submit Roster for Completed Users button changes to Submit Roster, you can submit the roster and update user status based on attendance by clicking .
Mark Users as Attended without being Registered
To mark a user as having attended a session for which they were not registered, create a new learning assignment and on the Options step, select the Completed option. Use caution when assigning a user as completed, because this cannot be changed.
Revert Completed Status
Once the roster is submitted and processed, a user's Completed status can be reversed from the Attendance and Scoring tab. See Session Roster - Attendance and Scoring - Revert Completed Status.
Penalties
- Withdrawal penalties are billed to the user (or their cost center) at the session start date. See Session Withdraw Penalties for additional information on when session withdraw penalties are charged.
- No Show penalties are billed to the user (or their cost center) when the Submit Roster button is clicked.
Webex, Live Meeting, Adobe Connect, Training Center
To retrieve the most up-to-date attendance on demand, click the button. This attendance retrieval also updates the user's transcripts accordingly once the instructor submits the roster. See Webex Attendance Troubleshooting.
Citrix Sessions
To retrieve the most up-to-date attendance and scoring information, click the button. This functionality is only available if Citrix is configured for your portal.
Resubmit Stuck Roster
Occasionally, an instructor-led training (ILT) roster submitted by an administrator or instructor can get stuck while processing. Administrators and instructors can unstick a roster that has been stuck processing for more than 24 hours, via a pop-up available on the Submit Roster page.
If a session roster has been stuck processing for over 24 hours, a pop-up will appear to the administrator on the Roster page, alerting them that their roster is stuck. The administrator can click the button to refresh the Roster page, and after the page has refreshed, the administrator can resubmit the session roster using the button.
Note: If the roster remains stuck even after refreshing the page and resubmitting the roster, it may be necessary to open a case with Global Customer Support.