Reporting 2.0 Homepage
Click here to download the list of Reporting 2.0 report types and field descriptions, updated May 17, 2024. This Excel spreadsheet provides descriptions for the report types and fields in Reporting 2.0. This list is updated when there are changes to existing fields or new fields are added. Currently, the list is in English only. Note that it may be necessary to scroll through the sheets on the Excel spreadsheet in order to access the first sheet.
Click here to download the Reporting 2.0 Feature Focus Playlist.
To access Reporting 2.0, go to
For more information about Reporting 2.0 permissions, see the following:
- Permissions in Reporting 2.0 - This provides detailed information about Reporting 2.0 permissions.
- Permissions List - This provides the list of permissions and their relationships so that you know which permissions users need to have to create and view reports.
Create Report
You can create new reports by clicking the button. For more information about creating reports, See Reporting 2.0 - Create Report.
Quick Filters
The Quick Filters section lets you access your recently viewed reports, favorites, and system templates. To view any of these areas, expand the Quick Filters drop-down and select the desired option.
- Select Recently Viewed to sort your list of reports in order from most to least recently viewed.
- Select Favorites to view only reports you have favorited.
My Reports
This section is for your own folder hierarchy. You can customize the organization of reports you have created as you wish, and you can move reports into your folders to create the organization that best fits your needs. See Folders in Reporting 2.0. See Folders in Reporting 2.0.
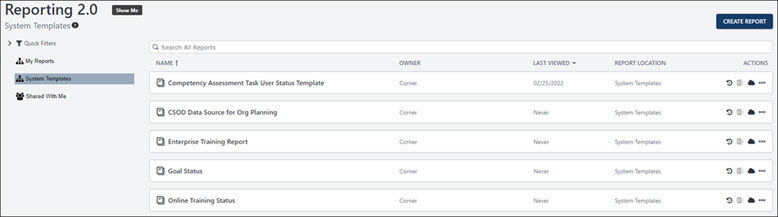
System Templates
Reporting 2.0 includes system report templates that are modeled after the most commonly-generated reports so that you can quickly and easily create reports that contain essential
Shared With Me
Click Shared With Me to update the list of reports to show only reports that have been shared with you.
- If the user edits the report, you automatically receive the updates.
- If the user deletes the report, then the report is automatically removed for you.
- If a folder is shared with you, then any changes the user makes to the reports or the folder automatically appear for you.
- If the user deletes the folder, then the folder and any reports in the folder are removed for you.
Note: This option does not filter by reports you have shared with others.
Note: Users who select Reporting 2.0 to access the Reporting 2.0 homepage, and have view only permissions, are directed to the Shared with me folder on the Reporting 2.0 Homepage. If no reports are available, users will see the following message: No reports have been shared with you yet. You may have reports available in other report folders, shown on the left side of this page.
Search Reports
The search bar lets you filter the list of reports by keywords or by report ID so that you can find specific reports within a long list. To search by keyword, enter search terms in the search bar, up to 200 characters. The results update as you type. The search is limited to the report name. To search by report ID, enter the ID in the search bar. The report ID must have an exact match to return search results. To locate the report ID you can hover over the report title and see the ID in brackets after the report name. You can also see the report ID under the report title on the individual report page. A benefit of searching by report ID is the ability to quickly locate the report you want since multiple reports may have the same or similar titles, searching by keyword may return multiple results.
List of Reports
The main section on the homepage lists all of the reports that you have created or that have been shared with you. You can search for reports using the search bar.
The following information displays for each report:
- Name - This column displays the name of the report. Hover over the report name to see the Report ID. Click the name to open the report viewer.
- Owner - This column displays the owner of the report. An icon will appear if the report has been shared.
- Last Viewed - This column displays the date that you last viewed the report. You can sort this column by Last Viewed or Last Updated.
- Report Location - This column displays the folder in which the report is located. If "My Reports" displays, then the report has not been placed into a specific folder.
- Actions - The following options are available in the Actions column:
- Schedule for Now - Extract reports with user's preferences. When ready, the report is downloaded in the preferred format.
- Edit
 - Click Edit icon to edit the report. This option is only available for users with permission to manage reports.
 - Export to Excel
 - Click the Export report to Excel file icon to generate a new report snapshot. The maximum number of records that can be returned in the report is one million. If more than one million rows match your criteria, the rows included will be randomly selected.
- Upon completion, the newly generated snapshot is automatically downloaded in excel format.
- The newly generated snapshot is also available through the snapshot pop-up behind the cloud icon.
- If a user navigates away from or closes the window while the process is still in progress, the snapshot is completed and available in the snapshot pop-up behind the cloud icon. The Excel output is delivered as the session has been closed, but the user can still download the snapshot to excel through the snapshot pop-up.
- Download/schedule your report (cloud icon) - Click the cloud icon or Download option in options menu to open a snapshot pop-up to:
- View/download your previously scheduled snapshots (if any). A maximum three snapshots are available per user per report. If cloud icon is solid, no snapshots are available for the report. If cloud icon contains an arrow, snapshots are available.
- Schedule and generate a new snapshot by clicking the button available in a snapshot pop-up.
- Activate / deactivate the email notification a user receives when the snapshot is ready for download. The email notification is enabled by default.
- Select the maximum number of records to include in the snapshot. The range is from one to one million. By default, the number is set to 200K.
Download snapshots in the following formats when the number of records in the snapshot is 10,000 or less:
Each report that appears in the snapshot pop-up has one of the following icons next to it:
- Hand icon
 - Indicates the report was generated manually.
 - Calendar icon
 - Indicates the report was generated on a schedule
- Copy - Click this option in the More Options dotted line drop-down to copy the report.
- Move - This option in the More Options dotted line drop-down lets you move the report to a different folder. Clicking Move opens a Move Report pop-up. In the pop-up, select the folder to which you would like to move the report. Then, click to the move the report.
- Delete - Click this option in the More Options dotted line drop-down to delete the report in the My Reports section and all folders.
- Share - Click this option in the More Options dotted line drop-down to share the report. For more information about sharing reports, see the Share Report topic in Online Help.
- Favorite - Click this option in the More Options dotted line drop-down to favorite the report. You can un-favorite a report by clicking Unfavorite from the actions drop-down.
- Viewer - Click this option in the More Options dotted line drop-down to go to the Report Viewer page. See Reporting 2.0 - Report Viewer.
- Download - Click this option in the More Options dotted line drop-down to open the snapshot pop-up.
Note: When exporting to Excel, report details appear in the top section of cells and include the report title, date/time generated, record count, etc. These details cross several columns at the top of the Excel spreadsheet. Report filters are also included, based on the filter settings in report builder and report viewer.. Because of this, it may be necessary to delete the report details in order to take actions in the report data columns, such as if you would like to sort the report.
If more records exist than the maximum number of row count for the selected report output, the records included will be randomly selected.
Note that formats CSV, TXT (Pipe), and TXT (Tab) do not support all Reporting 2.0 features. If you did include features such as column summary in your report and extract this report as CSV, the not-supported feature will be ignored for your report output.
Note: The following actions are disabled when a report query is in progress:
- Schedule for Now
- Export report to Excel file
- Download your report
Note: The Excel, Schedule for Now, and Download your report options will refresh the report.