Folders in Reporting 2.0 lets you organize and manage the distribution of your reports, and you can share the folders with others. Also, you can group reports together based on your own criteria or themes, enabling you to easily find the reports you need.
Folders are created and managed in the My Reports section of the Reporting 2.0 homepage. This section is for your own folder hierarchy. You can customize the organization of your reports as you wish, and you can move reports into your folders to create the organization that best fits your needs.
As a user, I would like a way to organize reports available to me to create a more personalized experience for myself. Creating folders also enables me to decrease the steps/effort in my current workflow when navigating reports.
As an Administrator, I need a space to collaborate with other administrators in order to organize and maintain a single repository of reports. Currently, I have to share each report individually. By using folders, I can put all the reports into one folder and simply share the folder. All my shared users will be able to view all the reports and sub-folders within that parent folder, given they have the appropriate permissions to access Reporting 2.0 turned on within the system. When I add or remove reports from the folder, my shared users will automatically get the changes so that I do not need to re-share the folder with the updates.
This same behavior applies with folders that reside within the parent folder. Users will receive viewing capabilities for all sub-folders and the reports within those sub-folders.
As a Talent Manager, I need to organize, maintain, and update multiple sets of reports on a daily basis to ensure employees have finished compliance tasks/training. If an employee is not compliant, they may not be allowed to do their job. I need to share these reports with multiple managers across different organizational units (OUs). By putting the reports into folders and sharing the folder, all my shared users will automatically get the reports and any daily updates to the reports.
To access Reporting 2.0, go to
For more information about Reporting 2.0 permissions, see the following:
- Permissions in Reporting 2.0 - This provides detailed information about Reporting 2.0 permissions.
- Permissions List - This provides the list of permissions and their relationships so that you know which permissions users need to have to create and view reports.
Create Folders
To create a folder:
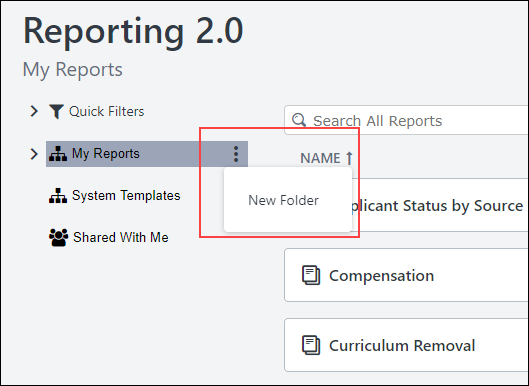
- Click the My Reports three-dot options menu icon, and select New Folder. A text box appears below My Reports.
- Enter a title for your folder.
- Press / on your keyboard, or click anywhere on the page outside the text box to save the folder.
You can view the reports in a folder by clicking the folder name. To return to your full list of reports, click My Reports.

Create Subfolders
You can add subfolders to existing folders by clicking New Folder from the 3-dot options drop-down to the right of the folder name. This opens the text box that lets you enter a name for the subfolder. Save the folder by pressing / on your keyboard or by clicking anywhere on the page outside the text box.
Add Report to Folder
You can add reports to folders by using the option on the homepage or from within the Report Builder.
To add a report to a folder from the Reporting 2.0 homepage:
- Click Move from the three-dot options icon for the report on the Reporting 2.0 homepage. A Move Report pop-up opens.
- Select the folder to which you would like to move the report.
- Click .
Pre-Step Note: You must have at least one folder created on the homepage in order to add the report to a specific folder other than adding it to the My Reports area. Folders cannot be created from within the Report Builder.
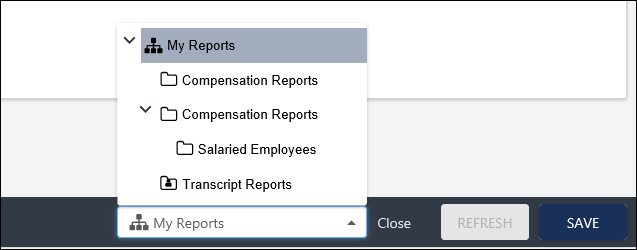
In the Report Builder, you can determine the folder you want the report to be stored in when creating or editing a report. Within the report builder, a reports drop-down has been added to the bottom of the page. Select the desired folder from the drop-down, then click when you are ready to save the report.
After the report has been saved, it will save to the selected folder as long as you own the folder. If the folder is one that has been shared with you, the system will save the report to My Reports by default.
Rename a Folder
To change the name of a folder:
- Hover over the three-dot options menu icon for the folder.
- Click Rename from the drop-down.
- Enter a different title for your folder in the text box.
- Press / on your keyboard, or click anywhere on the page outside the text box to save the change.
Share Folders
Sharing folders lets you share a folder with other users. Any reports and sub-folders within the folder are also shared.
When users share folders, the sharing recipient can view all reports within that folder
To share a folder:
- Click Share from the three-dot options menu icon to the right of My Reports. The Select Org Units flyout opens.
- Search for and select the users with whom you would like to share the report.
- Click .
Once you have shared a folder with someone, you can view the shared users by clicking the Selected tab on the Select Org Units flyout. From here, you can remove shared users by clicking the X to the right of their name.
Note: Users who select Reporting 2.0 to access the Reporting 2.0 homepage, and have view only permissions, are directed to the Shared with me folder on the Reporting 2.0 Homepage. If no reports are available, users will see the following message: No reports have been shared with you yet. You may have reports available in other report folders, shown on the left side of this page.
Editing Reports in Shared Folders
When you edit a report that has been shared, your shared users will automatically get the updates. You will not need to re-share the report or the folder for the report.
Move Folders
You can move a folder into another folder by clicking Move from the three-dot options menu icon for the folder. This opens a Move Folder pop-up. Select the folder to which you would like to move the folder, and then click .
Delete Folders
To delete a folder or subfolder, click Delete from the three-dot options menu icon for the folder.