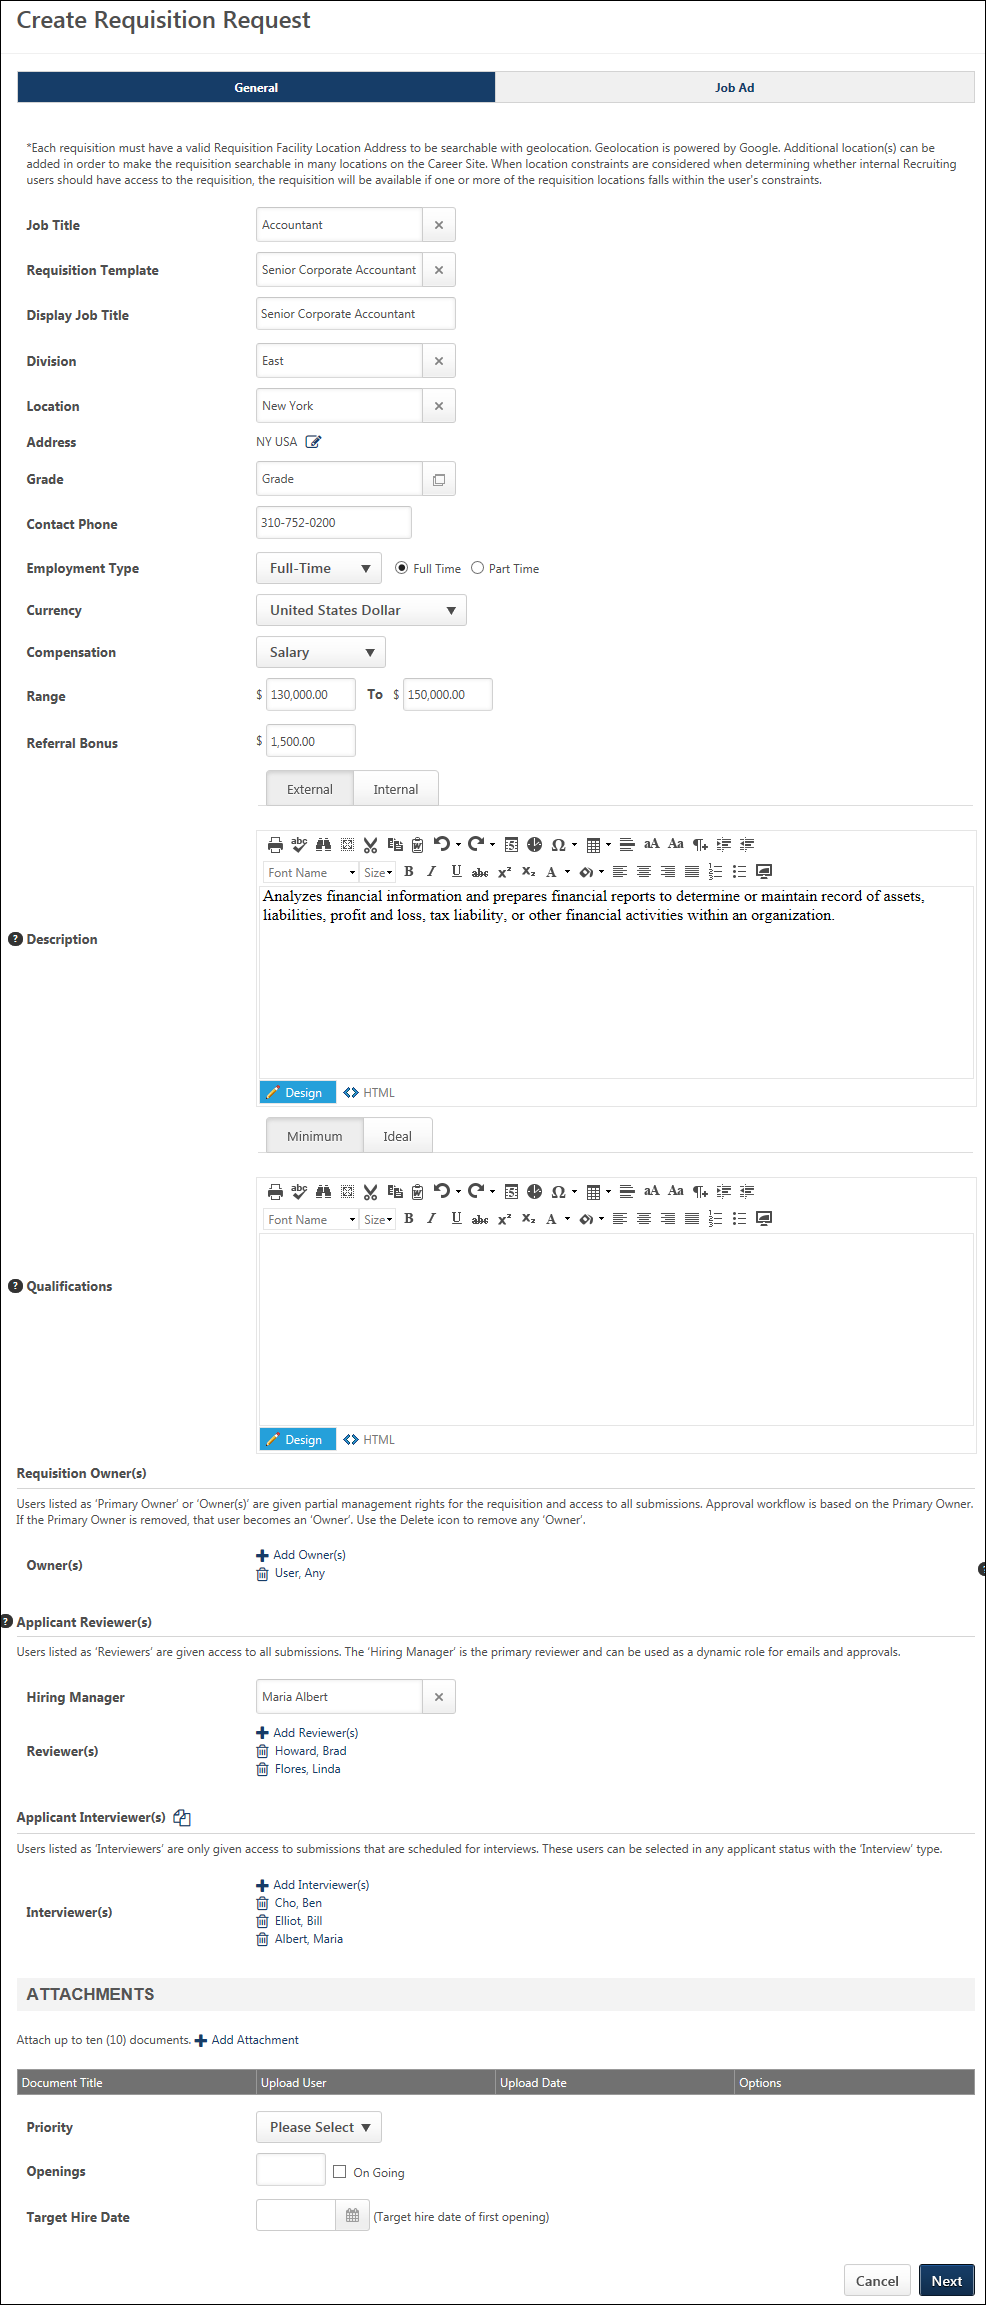
When creating or copying a requisition request, the General tab enables hiring managers to complete the general information for the request.
See Create/Copy Requisition Request - Job Ad.
To access the Create New Request page, click Create New Request from the Requisition Requests page.
| PERMISSION NAME | PERMISSION DESCRIPTION | CATEGORY |
| Requisition: Submit Request | Grants ability to create requisition requests. This permission can be constrained by OU and User's OU. | Recruiting |
Instructions
If the administrator defined instructions for requisition requests in Requisition Request Preferences, then the instructions display above the general information fields. If there are no instructions, then the administrator did not define them in preferences.
If a translation is available for the user's language, then the instructions display in the user's language. If the user's language is not available, then the instructions display in the creator's language.
Job Title
The Job Title field always displays on the General tab. This field is used to define the position for which you are requesting the requisition.
To define the position:
- Click the Select icon in the Job Title field. This opens a pop-up from which to select the position.
- Select the position from the pop-up.
Once the position is selected, the pop-up closes, and the position displays in the Job Title field. Note: Hiring managers can only view the Position organizational units (OU) that are within the constraints of the permission to submit requisition requests.
Additional Fields
All additional fields that display on the General tab are determined by the administrator in Requisition Request Preferences. The fields that are available to display are the standard and custom fields that display on the General tab for job requisitions.
See Create Job Requisition - General.
Requisition Template Field
If the Requisition Template field displays, then selecting a template populates all fields on the request with the template values. It is important to note that the template values replace any existing values that have been entered in the fields, and the existing values cannot be recovered.
As with current functionality for job requisitions, the Requisition Template field, if included by the administrator, is disabled until the Job Title field is completed. In addition, the templates that are available to select are the templates defined for the Position OU that is selected in the Job Title field.
If a default requisition template is available, then the default template can be selected. Note: A default template must be defined for the user's OU in order for a default template to be available to select. In addition, the Default Requisition Template link only displays in the Select Requisition Template pop-up if the Default Requisition Template option is selected by the administrator in Requisition and Applicant Preferences.
OU Selection Fields
If the Division, Location, Grade, and Cost Center fields display, then the organizational units (OU) available to select are dependent upon the constraints placed on the permission to submit requisition requests.
Note: The Address field must be set to active in Requisition Request Preferences for the address information to populate automatically when creating a requisition from a requisition request. See Requisition Request Preferences.
Select User Fields
If the Owners, Reviewers, and Hiring Manager fields display, then users can only be added to the fields if the hiring manager has permission to select users for requisition requests. In addition, the users that are available to select are dependent upon the constraints placed on the permission to select users for requisition requests.
Required Fields
One or more fields that display on the request may be required, if indicated by the administrator in Requisition Request Preferences. Required fields must be completed in order to submit the request. The required fields must also be completed prior to navigating from the General tab to the Job Ad tab, if the Job Ad tab is included by the administrator.
Custom Fields
For custom fields included by the administrator for requisition requests, hiring managers can only view the custom fields for which they meet the availability criteria.
If the administrator has configured requisition custom fields as read-only in Requisition and Applicant Preferences, then the value in the field cannot be modified on requisition requests. The field will display as read-only.
Next/Submit Buttons
The button displays if the Job Ad tab is activated by the administrator for requisition requests. The request can only be submitted by clicking to submit the request from the Job Ad tab. If required fields have not yet been completed on the General tab, then the fields must be completed prior to navigating to the Job Ad tab.
The button displays if the Job Ad tab is not activated by the administrator for requisition requests. In this case, the request is submitted from the General tab.
Submit Request
To submit the requisition request, click the button. This triggers the Requisition Request Submitted email, if configured by the administrator. Once submitted, the request status is Pending. The request is reviewed by one or more reviewers, who are defined by the administrator in Requisition Request Preferences. The reviewers determine whether to accept or decline the request.
Accepted Requests
If the request is accepted, then the status of the request changes to Accepted. A requisition ID is automatically generated for the request. The ID displays in the Requisition ID column on the Requisition Requests page.
In addition, accepted requests indicate that a job requisition has been created for the position. However, the creation of a job requisition does not automatically indicate that a job requisition has been submitted for the request. When the reviewer creates the requisition, the requisition can be saved without being submitted. The Requisition Requests page does not indicate whether or not a job requisition has been submitted for requests that are in an Accepted status.
Declined Requests
If the request is declined, then the status of the request changes to Declined. A requisition ID is not generated for declined requests. The reviewer may have entered comments to explain their decision. The comments can be reviewed by clicking the View Comments icon in the Options column on the Requisition Requests page.
Cancel
Click to cancel the creation of the request.