Standard assignments process one time only, and they are based on the user list that was generated when the assignment was created. This means users must be in the availability at the time the assignment is submitted in order to be assigned the selected training. If they are not, they will not receive the assignment.
Note: This also applies to standard assignments that are scheduled to process at a future time. If the users are added to the assignment availability criteria (such as a group) after the assignment is submitted but before the assignment is scheduled to process, they still will NOT be included in the assignment. If the assignment should process daily and assign the training to users who newly meet the criteria, you must create a dynamic learning assignment instead.
To create a new standard learning assignment, go to and click the Learning Assignment Tool link. Then, click the button.
| PERMISSION NAME | PERMISSION DESCRIPTION | CATEGORY |
| Assignment Tool - Training Start Date |
Grants ability to configure a Training Start Date when creating a Standard Learning Assignment. The Training Start Date is the date that users will be able to start the training. This permission is dependent on the Assignment Tool - Standard, Assignment Tool - Standard and Dynamic, and Assignment Tool - Standard and Dynamic - Recurrence permissions. This permission cannot be constrained. This is an administrator permission. |
Learning - Administration |
| Assignment Tool - Email Settings - View | Grants ability to view and select email settings when creating a Learning Assignment. This includes the ability to select Training Specific Emails, Custom Emails, or No Emails but does not grant ability to manage the actual Email Settings (cannot configure Custom Emails or Ad-Hoc Email and cannot enable/disable Assign Training and Register Training email triggers when Training Specific Emails is selected). This permission is dependent on the Assignment Tool - Standard, Assignment Tool - Standard and Dynamic, and Assignment Tool - Standard and Dynamic - Recurrence permissions. This permission can be constrained by OU, User, User Self and Subordinates, and User's OU. If this permission is constrained, then only users within the constraints will receive the emails. This is an administrator permission. | Learning - Administration |
Setup
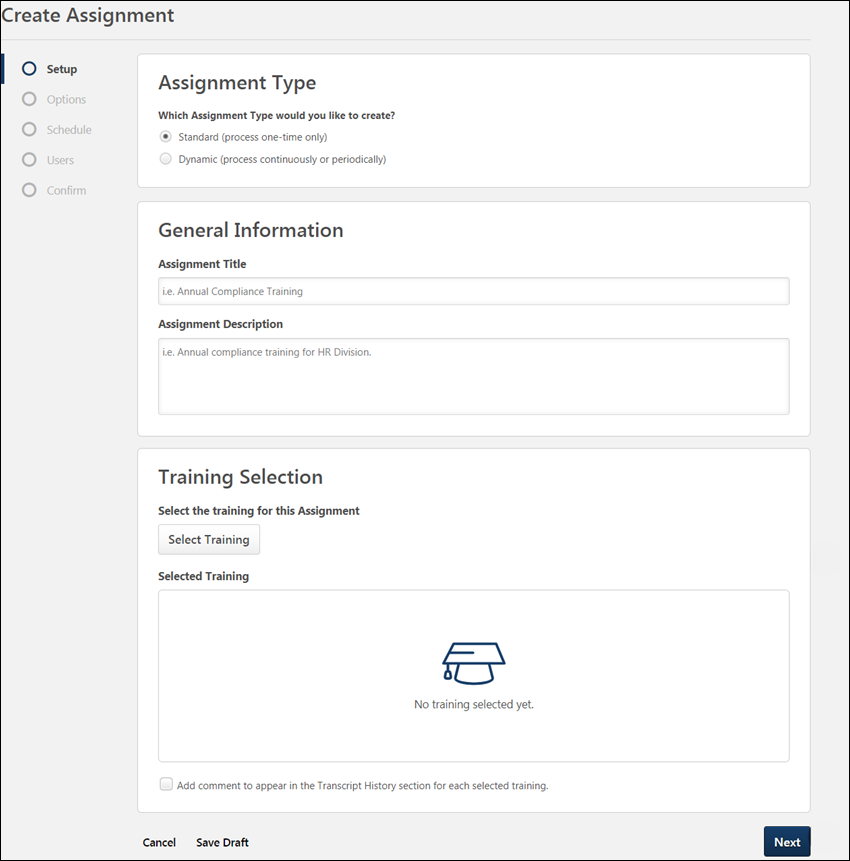
The first step for creating a standard learning assignment is providing some basic information about the assignment and selecting the training that will be assigned. In this example, an administrator is assigning all users in their organization a course called "Harassment in the Workplace." On the Setup page:
- Select the assignment type. For a standard assignment, select the Standard option. This means the assignment will process only one time, and training will only be assigned to users who meet the availability criteria for the assignment at the time it processes.
- Enter a descriptive title for the standard learning assignment. In this example, the assignment title will be "Harassment in the Workplace - May 2021."
- Enter a description for the assignment which will help other administrators understand the purpose of the assignment.
- Click the button to add training to the assignment.
- In the flyout, search for and select the course, and then click the button at the bottom of the flyout. The training is added to the assignment.
- Click the button to advance to the Options step of the learning assignment creation process.
For more details about all the options available on the Setup page, See Create Learning Assignment - Setup.
Options
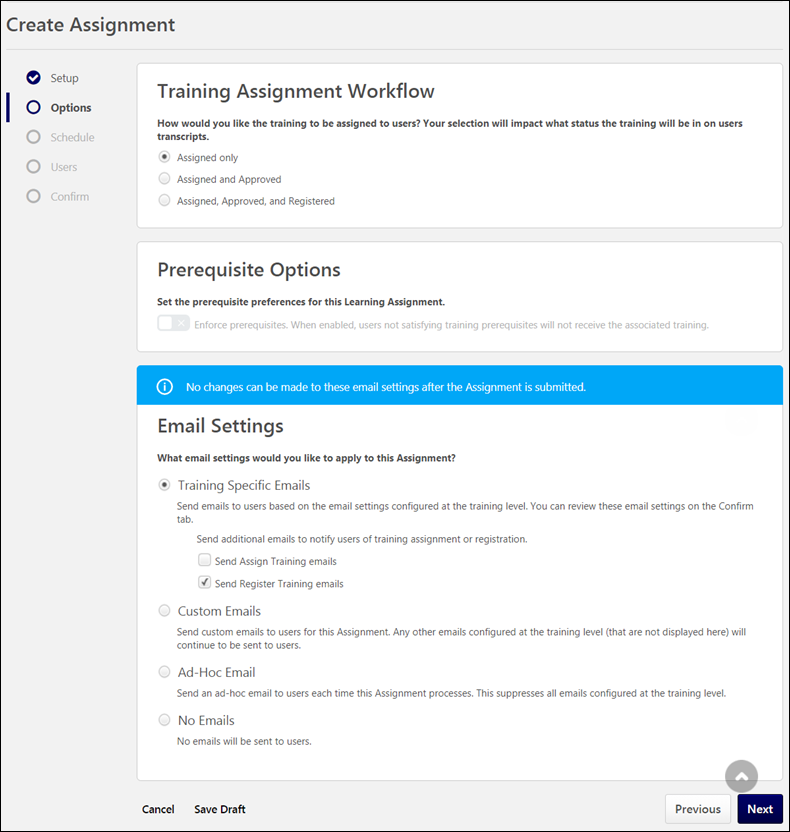
On the Options step, configure the assignment workflow and email options. For a standard assignment:
- Decide what status the training will display in on the user's transcript after it is assigned. Be aware that availability settings for the learning object itself may also affect the transcript status following assignment. For example, if the LO availability is configured as pre-approved with register upon approval, the user’s transcript status will be Registered upon assignment, even if one of the first two below options is selected in the learning assignment. Available options include:
- Assigned Only - This option places the learning objects onto the user's transcript, but will still require the standard approvals. Once approved, the user must still click the Register link on their transcript.
- Assigned and Approved - This option places the learning objects in an Approved status on the user's transcript, bypassing the normal approval process. The user must still click the Register link on their Transcript.
- Assigned, Approved, and Registered - This option assigns, approves, and registers users directly into the training. This bypasses both the approval and registration process as long as the user is not required to pay for the training. The user is only required to launch or complete the training.
- Bypass User Payment - If the Bypass User Payment option is selected and the training has a cost that is payable by the user, the enrolled users no longer go to the payment page and are automatically enrolled in training item. This option is only available if the Assigned, Approved, and Registered option is selected above.
If the user has already paid for a previous version of the training, the user will not pay for the newly assigned version.
If Assign New Occurrence is enabled, it does not override the registration workflow for previous versions of the same training; it only applies to the current version of the training. If a user already paid for training and is assigned the same version of that training with this setting, they will need to pay for the training again if Bypass User Payment is not checked.
- Bypass User Payment - If the Bypass User Payment option is selected and the training has a cost that is payable by the user, the enrolled users no longer go to the payment page and are automatically enrolled in training item. This option is only available if the Assigned, Approved, and Registered option is selected above.
- Set prerequisite options for the assignment, if needed.
- Select email options for the learning assignment. You can choose to use the default training-specific email templates configured in the Course Catalog, create a custom set of emails for the assignment, send a one-time email, or use no emails at all. All the learning assignment email options are suitable for a standard learning assignment.
- Once all options have been configured for the standard learning assignment, click the button to advance to the Schedule step.
For more details about all the options available on the Options page,See Create Learning Assignment - Options.
Schedule
On the Schedule page, determine when the standard learning assignment will process, and when training will be due for users who are assigned the training. For standard assignments:
- Select a Processing Start Date. Standard assignments can either process immediately upon submission of the assignment or on a selected future date. When the assignment processes, training will be assigned to users.
- Specify a Training Start Date, if applicable. Users can either be allowed to start the training as soon as it is assigned or on a specific date selected by the administrator.
- Specify a Training Due Date, if applicable. Standard assignments can be created with no due date, a relative date (such as 30 day from the date assigned), or a specific due date. All three due date options are suitable for standard learning assignments.
- Click the button at the bottom of the page to advance to the Users step.

For more details about all the options available on the Schedule page, See Create Learning Assignment - Schedule.
Users
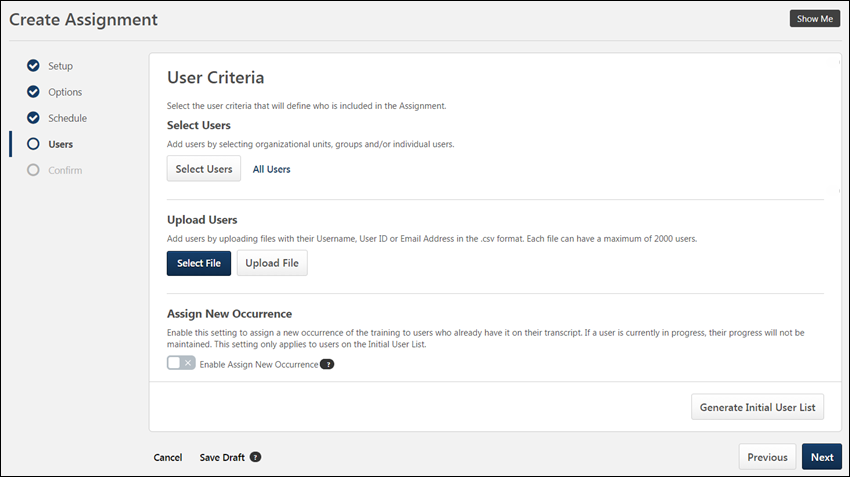
On the Users step, determine which system users will receive the training in the assignment.
- To add users to the assignment, you can select user criteria (such as a division, location, etc.), you can add all system users to the assignment, or you can upload a .csv file of usernames or user IDs. Any of these options are suitable for standard learning assignments, because standard assignments process only once. In this example, the administrator will assign the course to all users in the system by clicking the All Users link.
- Decide whether or not to enable the Assign New Occurrence feature. Switching the Enable Assign New Occurrence toggle to the On position will include users who meet the defined user criteria and already have the training selected for the assignment on their transcript. When enabled, users who have already completed the training will receive a new occurrence of the training and need to take it again.
- Click the button to view a list of users who will be assigned the training, based on your user criteria selections. Using the check boxes in each user's tile, you can opt to not include certain users or certain training items for users if needed.
- After configuring the correct user criteria, click the button at the bottom of the page to advance to the Confirm step.
For more details about all the options available on the Users page, See Create Learning Assignment - Users.
Confirm
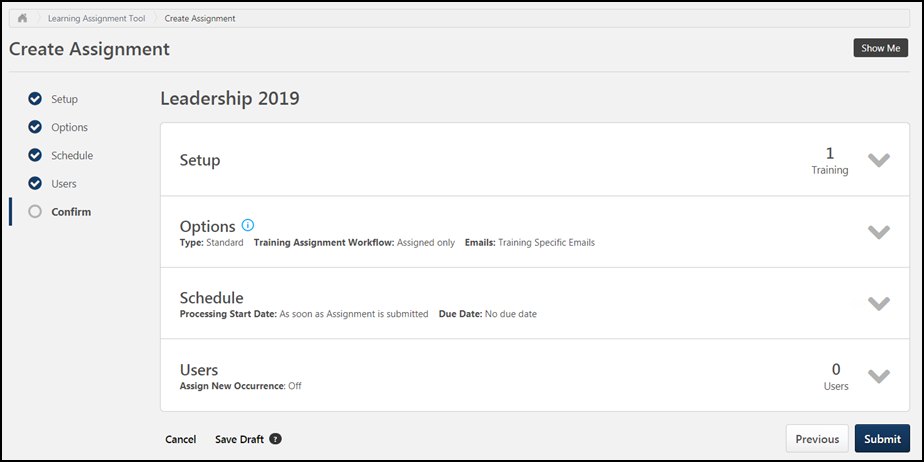
On the Confirm page, review your learning assignment selections by expanding the tiles for each section of the process. You can return to previous pages by clicking the name of a section in the navigation panel on the left side of the page.
After reviewing all your learning assignment configurations and ensuring all selections are correct, you can click the button to submit the new learning assignment. The learning assignment will process and assign training according to your scheduling selections. Note: Once submitted, the learning assignment cannot be stopped or reversed.
For more details about all the options available on the Confirm page,See Create Learning Assignment - Confirm.