On the Confirm step, review your selections from previous steps to ensure all configurations are correct, and then submit the assignment for processing.
To begin creating a new learning assignment, go to and click the Assignment Tool link. From the Manage Learning Assignments page, click the button.
| PERMISSION NAME | PERMISSION DESCRIPTION | CATEGORY |
| Assignment Tool - Standard and Dynamic |
Grants ability to create Standard (one-time) and Dynamic (continuous) Learning Assignments to directly assign training to users. This permission can be constrained by OU, Provider, Training Item, Training Type, User, User Self and Subordinates, and User's OU. If this permission is constrained by Location, Provider, Training Type, or Training Item, then they can only assign training within the constraints. If this permission is constrained by OU, User, User Self and Subordinates, or User's OU, then they can only assign to and view assignments created by users within the constraints. This is an administrator permission. |
Learning - Administration |
| Assignment Tool - Standard |
Grants ability to create Standard (one-time) Learning Assignments to directly assign training to users. This permission can be constrained by OU, Provider, Training Item, Training Type, User, User Self and Subordinates, and User's OU. If this permission is constrained by Location, Provider, Training Type, or Training Item, then they can only assign training within the constraints. If this permission is constrained by OU, User, User Self and Subordinates, or User's OU, then they can only assign to and view assignments created by users within the constraints. This is an administrator permission. |
Learning - Administration |
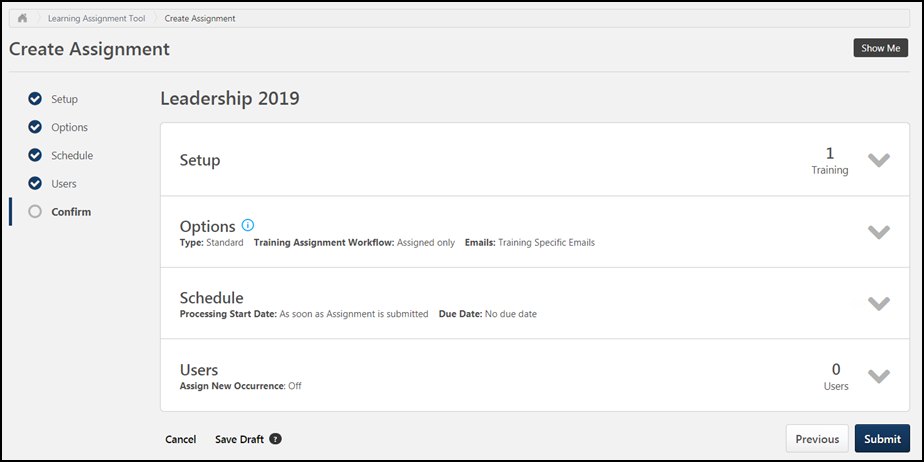
Details for each of the creation steps appear in separate expandable tiles on the Confirm page. Each tile provides a basic overview of its corresponding section's settings. To expand a tile and show more settings details, click the drop-down arrow on the right side of the tile. To collapse the panel, click the drop-down arrow again.
Note: All information displayed is read-only. To make changes, navigate back to the section you wish to edit.
Setup
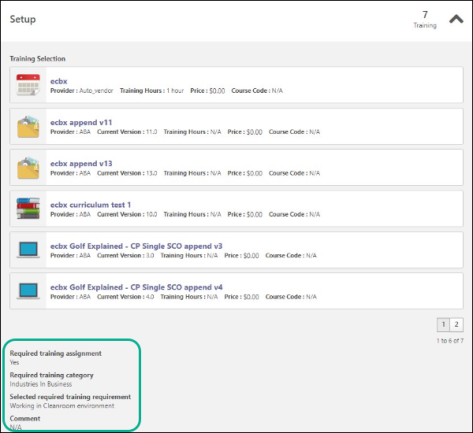
Before expanding, the Setup tile displays the number of learning objects (LOs) which have been added to the learning assignment. After expanding, each LO displays in its own tile with details about the training, in addition to the other options configurable in the Setup section. The read-only information that displays for each LO includes:
- LO Type icon - This icon visually represents the LO type, such as online course, material, test, etc.
- Title - The title of each LO is clickable and opens the Training Details page for the LO in a new tab when clicked.
- Provider - The provider set for the LO.
- Version - The version of the LO that was assigned.
- Training Hours - The number of training hours associated with the LO.
- Price - The price of the LO, if applicable.
- Course Code - The unique course code generated for the LO. This field will be hidden if Course Codes are not enabled for your portal.
- Email Settings - The email configurations set at the LO level for the training item. This will only appear if you have selected the Training Specific Emails setting on the Options page.
If you provided a comment when adding to the training or selected a training purpose, they display under the selected training in the Setup section.
If Required Training Tagging is active in the portal and a requirement is selected in the Setup, then expand the Setup tile by clicking the drop-down arrow on the right side of the tile to see the selected requirement and the requirement category. See Required Training Tagging Overview.
Options
Before expanding, the Options tile displays an overview of the assignment type, training assignment workflow, and email options configured for the learning assignment. After expanding, the following detailed information displays:
- Type - The learning assignment type that was selected for the assignment (standard
- Dynamic Removal - Whether Dynamic Removal is on or off.
- Remove in progress training - Whether the option to remove in-progress training is on or off.
- Remove training within Curricula - Displays whether the setting to automatically remove child LOs within a dynamically removed curricula is on or off.
- Training Assignment Workflow - The assignment workflow setting for each training you selected.
- Email Settings - The email settings selection you made when configuring emails for the assignment. Depending on your selection, additional details about your selections may also appear in this section.
Schedule
Before expanding, the Schedule tile displays an overview of the assignment's scheduling selections, including the processing start date and due date. After expanding, the following read-only information displays:
- Processing Start Date
- Processing Frequency
- Processing End Date
- Training Start Date and Due Date
- Recurrence Setting
Users
Before expanding, the Users tile displays the number of users who will be assigned the training contained in the learning assignment and also the assignment's Force Re-Assignment status. After expanding, the selected user criteria, Force Initial Assignment, and Only Force "Completed" Status settings will display.
Submit
After reviewing all your learning assignment configurations and ensuring all selections are correct, you can click the button to submit the new learning assignment. The learning assignment will process and assign training according to your scheduling selections.
- Note: The assignment settings, with the exception of the title, certain dynamic processing-related settings, and the due date (for dynamic assignments only) cannot be altered once the assignment has been submitted.
- Note: If needed, training that was assigned with the Learning Assignment Tool can be removed from users' transcripts via the Assignment Summary page. See Assignment Summary Page.
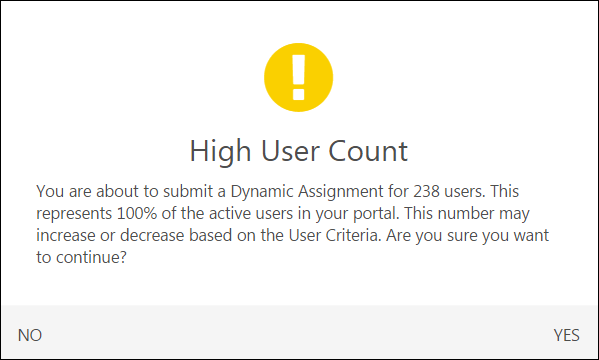
High User Count
If the assignment is configured to assign training to more than 20% of the active users in the entire portal, a High User Count warning message appears after clicking the button. If you wish to proceed with the submission, click . If you want to cancel the submission and revise your assignment, click .
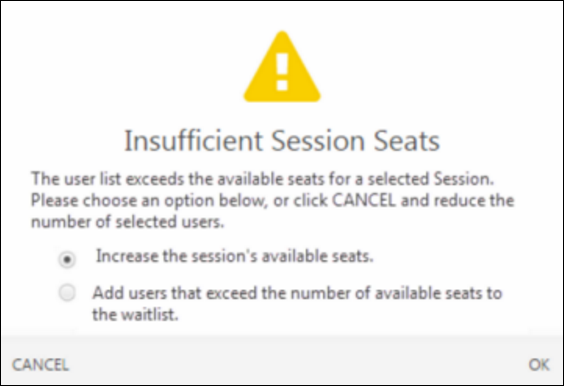
Insufficient Session Seats
When assigning users to a session via a learning assignment, if the number of users selected for the assignment exceeds the number of seats available in the session, the administrator receives an Insufficient Session Seats notification after navigating to the Confirm step of the learning assignment creation process and clicking . The Insufficient Session Seats pop-up notification provides two options for this scenario:
- Increase the session's available seats - Selecting this option and submitting the learning assignment causes the number of available seats, or Maximum Registration, for the session to automatically increase to accommodate all the users in the assignment. Note: Session seats will only increase if the Assign, Approve, and Register option was selected for the assignment.
- Add users that exceed the number of available seats to the waitlist - Selecting this option and submitting the learning assignment causes any users for whom a session seat was not available to be automatically added to the waitlist for the session.
Click the button in the bottom right of the pop-up to confirm your Insufficient Session Seats option selection and continue creating the learning assignment, or click the button in the bottom left of the pop-up to return to the learning assignment without making a decision and revise your assignment selections.
Considerations
Important: When assigning a large curriculum to a high volume of users, the assignment may take longer to process because it must process every child LO inside the curriculum against each user’s transcript. This means you may see a standard assignment in the Queued status, or a dynamic assignment’s summary page that has not yet populated, for a longer period of time than normal. This is more apparent when assigning several large curricula to a high volume of users.
Tip: When an Assignment has not finished processing and you are assigning multiple curricula, you can see which curricula have been processed and assigned by looking directly at a user’s transcript history. As the curriculum is assigned to each user, the transcript history for that user is updated.