On the Setup page of the learning assignment tool process, enter general information for the new learning assignment and select the training that will be assigned to users.
To begin creating a new learning assignment, go to and click the Assignment Tool link. From the Manage Learning Assignments page, click the button.
| PERMISSION NAME | PERMISSION DESCRIPTION | CATEGORY |
| Assignment Tool - Standard and Dynamic |
Grants ability to create Standard (one-time) and Dynamic (continuous) Learning Assignments to directly assign training to users. This permission can be constrained by OU, Provider, Training Item, Training Type, User, User Self and Subordinates, and User's OU. If this permission is constrained by Location, Provider, Training Type, or Training Item, then they can only assign training within the constraints. If this permission is constrained by OU, User, User Self and Subordinates, or User's OU, then they can only assign to and view assignments created by users within the constraints. This is an administrator permission. |
Learning - Administration |
| Assignment Tool - Standard |
Grants ability to create Standard (one-time) Learning Assignments to directly assign training to users. This permission can be constrained by OU, Provider, Training Item, Training Type, User, User Self and Subordinates, and User's OU. If this permission is constrained by Location, Provider, Training Type, or Training Item, then they can only assign training within the constraints. If this permission is constrained by OU, User, User Self and Subordinates, or User's OU, then they can only assign to and view assignments created by users within the constraints. This is an administrator permission. |
Learning - Administration |
| Assignment Tool - Dynamic Reassignment | Grants ability to enable/disable Dynamic Re-assignment for an assignment after submission. When Dynamic Re-assignment is enabled, users that meet the User Criteria again (after previously being dynamically removed) are re-assigned. This permission is dependent on the Assignment - Standard, Dynamic - Standard and Dynamic, and Dynamic Assignment - Standard and Dynamic - Recurrence permissions. This permission cannot be constrained. This is an administrator permission. | Learning - Administration |
| Assignment Tool Preferences | Grants access to Assignment Tool Preferences where an administrator can activate the new Assignment Tool and configure the processing options and settings to create Learning Assignments. This permission cannot be constrained. This is an administrator permission. | Learning - Administration |

Assignment Type
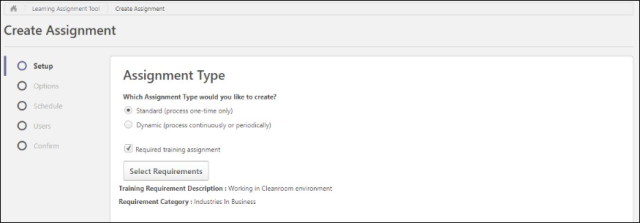
In the Assignment Type section, determine whether the learning assignment will be a standard assignment or a dynamic assignment.
- Standard - This is a one-time assignment for the users who meet the defined criteria of the learning assignment. This assignment will process one time only. This option is selected by default.
- Dynamic - A dynamic learning assignment processes daily or one time per year and attempts to assign the learning objects to users who newly meet the criteria set for the assignment. Selecting this option causes a Dynamic Removal section to appear on the Options page. Administrators must have permission to create dynamic learning assignments in order to see this option. Note: This option is not available for assigning cohorts.
With the Required Training Tagging activated, an additional option Required training assignment is available to tag the assignment as a required training. Tagging the assignment as a required training assignment makes the selection of a requirement for that assignment mandatory to continue with the creation of the assignment. To know more about Required Training Tagging, See Required Training Tagging Overview.
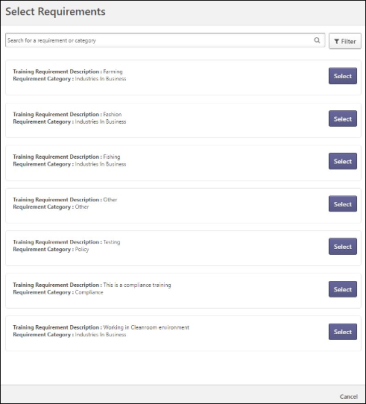
Select Required training assignment checkbox. Click . It opens the Select Requirements modal. The administrator can search for the requirement via a keyword in the Search for a requirement or category. Select the requirement you want to tie to this assignment; only one requirement can be tied to an assignment.
General Information
The General Information section contains the following fields:
- Assignment Title - Enter a title for the learning assignment. This title will display for the assignment on the Manage Learning Assignment page after you either submit the assignment or save it as a draft. All LOs you select will be grouped under this title on the Manage Assignments page. This field is required.
- Assignment Description - Enter a description for the new assignment. This description is visible to administrators when viewing the details of the assignment after it has been saved as a draft or submitted.
Training Selection
In the Training Selection section, search for and select the training that will be assigned via the learning assignment. To add training to the assignment:
- Click the button. The Select Training flyout appears.
- Using the available search fields and filters, search for learning objects (LOs) to add to the assignment. The search uses Enhanced Search as the default search engine. You can also use Traditional Search engine by disabling Enhanced Search in Assignment Tool Preferences (See Learning Assignment Tool Preferences.). Enter a full or partial training title into the search bar and press Enter on your keyboard to process search results. When Enhanced Search is enabled, Enhanced Search only considers the Title field. Filters can also be applied. Available filter options include:
- Training Type - Select a training type from the drop-down menu.
- Course Code - Enter the course code of the desired LO. This field is only available for portals with Course Code enabled.
- Provider - Click the Search icon. A flyout appears. Select a provider from the flyout.
- Languages - Select a language from the drop-down menu.
- Locator Number - Enter the locator number of the desired session LO.
- Location - Click the Search icon. A flyout appears. Select a location from the flyout.
- Description - Enter words that are present in the description of the desired LO. The Description Filter is not available when Enhanced Search is used.
- Reset Filters - To remove any filters that have been selected, click this link.
- - Click this button to apply any filters you have selected and receive relevant search results.
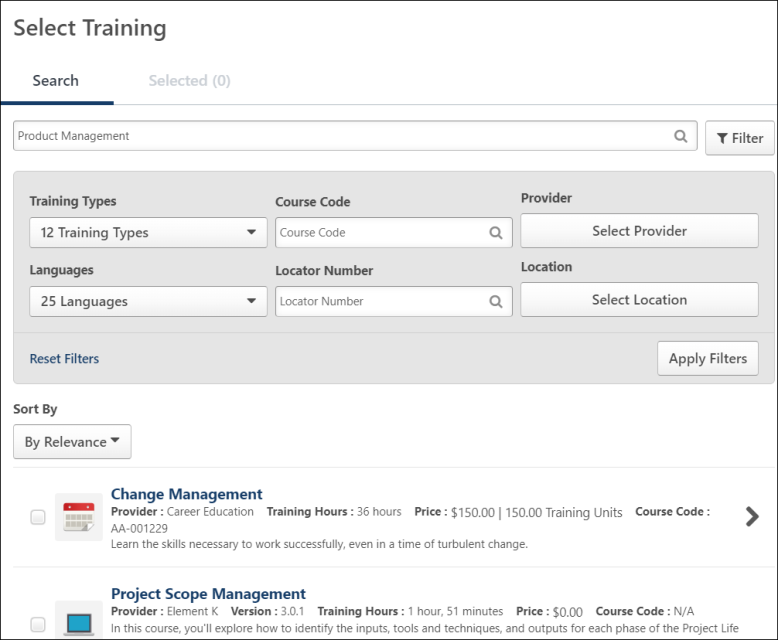
- Sort search results by relevance or title with the help of the dropdown. The default state of the dropdown is By Relevance, but you can also sort the search results alphabetically by selecting the By Title option. The dropdown disappears if Enable Enhanced Search on Select Training is turned off in Assignment Tool Preferences.
- Check the boxes next to LOs you wish to add to the assignment. If you wish to view more information about an LO, you can click the LO's title. For event LOs, a clickable arrow allows you to view and select sessions of that event, if needed. You can click the Selected tab in the Select Training pop-up to view only training that has been selected for the assignment. On the Selected tab, you can remove any selected training by clicking the Remove icon to the right of the LO.
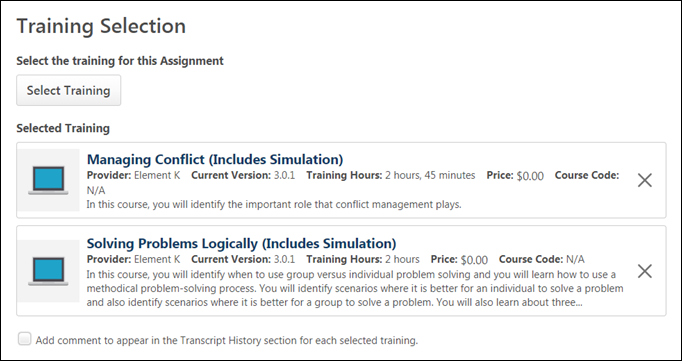
- Click the button after all needed training has been selected. The selected training will be added to the learning assignment. Review your training selections. Your training selections will be paginated if more than six LOs have been selected, and you can navigate to pages of additional results. If needed, you can click the X icon on the training card to remove training that is not needed, or select more training by clicking the button again.
- If applicable, select a training purpose from the Training Purpose drop-down menu. Training Purpose considerations:
If all selected training items have the same training purpose, and none of the training has more than one training purpose, then the training purpose field in the Learning Assignment Tool is auto-populated and read-only.
- If the selected training items have more than one common training purpose, then the training purpose drop down appears with all possible common options.
- If a training item is added to the assignment and it does NOT share a common training purpose, then the field is hidden from the Learning Assignment Tool because it no longer applies.
- If desired, add a comment to the learning assignment by checking the Add Comment checkbox and entering text into the comment box that appears. This comment will appear in both the audit history for the assignment and also in users' transcript histories.
- Click the button at the bottom of the page to advance to the Options step once all necessary selections have been made on the Setup step.See Create Learning Assignment - Options.