Create Session - Details
The Details tab is the second step in the session configuration process. Details settings include the basic information for the session.
Design Note: An updated interface is available for this page, which can be enabled by administrators in Feature Activation Preferences. With the new design, the functionality of the page is unchanged.
To create an ILT event session, go to . Search for the event and in the Options column next to the event, click the View Sessions icon ![]() . To create a new session, click the Create New Session link. Navigate through the process to the Details step.
. To create a new session, click the Create New Session link. Navigate through the process to the Details step.
| PERMISSION NAME | PERMISSION DESCRIPTION | CATEGORY |
| Sessions - Cancel | Grants ability to cancel instructor led training sessions. This permission works in conjunction with Events - View and Sessions - View permissions. This is an administrator permission. | Learning - Administration |
| Sessions - Edit | Grants ability to edit/update existing instructor led training sessions. This permission works in conjunction with Events - View and Sessions - View permissions. Administrators can only edit sessions for which they have the availability to view and edit. When adding users to a session in which the session roster is full, this permission grants the ability to increase the session's available seats. This permission can be constrained by OU, User's OU, Instructor, User as Instructor, Facility, Facilities Owned by User, ILT Provider, User's ILT Provider, User, and User Self and Subordinates. This is an administrator permission. | Learning - Administration |
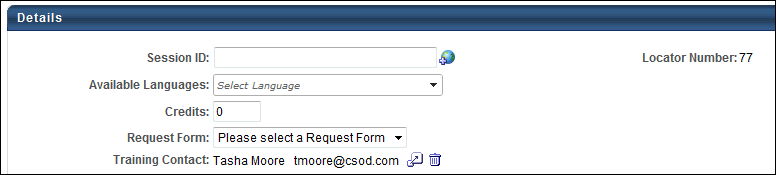
Details
-
- Locator number - This is a system-generated number that is automatically populated and is used to uniquely identify the session.
- Available Languages - This displays the languages in which the session is available. If multiple languages are enabled for the portal and more than one language is selected in the Language field on the Properties step when creating the event, a Select Language drop-down displays to select the available languages for the session. If multiple languages are enabled for the portal and only one language is selected on the Properties step when creating the event or if multiple languages are not enabled for the portal, then the available language displays with no drop-down.
- Credits - Enter a number of credits that are awarded for completion of the session.
- Webex Extended Options - Click this link to set the default Webex extended options for the session. Visibility of this functionality requires that your Webex is integrated with the system ILT and that you have permission to set the default Webex options. See Create Session - Webex Extended Options.
- Hands on Lab - Click this link to reserve computers from a Webex hands-on lab. Visibility of this functionality requires that your Webex is integrated with the system ILT. See Create Session - Webex Hands-On Lab.
- Request Form - Select a request form from the drop-down if applicable. User can complete this form at the time they request the session.
- Required Training Approvals - Enter the number for this learning object for initial approval. If this is left blank, it defaults to the number of required training approvals set in the User Record. Setting required training approvals at the LO level overrides the required training approvals in the user record.
- Required Completion Approvals - Enter the number of completion approvals that are required for the session to be marked complete. If this is left blank, the LO follows the normal workflow for LO completion. If a value is entered (number greater than 0) the LO requires completion approval for all users who complete the training using the normal approval workflow process.
- Training Contact - Select a contact for the LO by clicking the Select icon
 . The administrator who is creating the LO is listed as the training contact by default, but this can be changed. Only one contact person can be selected. To delete the training contact, click the Delete icon to the right of the training contact. This field is optional.
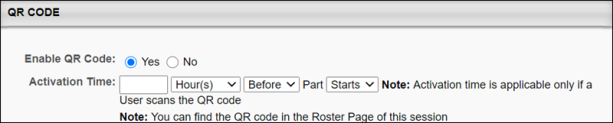
QR Code
In the QR Code section of the Details step of the session creation process, the following QR code configuration options are available to the administrator:
- Enable QR Code - To enable QR code functionality for the session part, select the Yes option for the Enable QR Code field. If QR codes should not be activated for the session, leave the No option selected.
- Activation Time - Configure the activation time for QR codes generated for the session part. The activation can be a specified number of hours or minutes before or after the session part starts or begins. The QR code begins to be scannable at the defined activation time, either before or after a session part starts or ends. Example: Activation time is set to 2 hours before a session part starts. The session part begins at 10am. This means a user or instructor can scan QR codes beginning at 8am.
- When setting the activation time for x amount of time "Before" a session part start or end, the session QR code will be active from the "Before" time through the part's start or end, depending on which was selected. Example: If Activation Time is set for 2 hours before part start, and the part starts at 10am, the session QR code is active from 8am - 10am.
- When setting the activation time for x amount of time "After" a session part start or end, the session QR code will be active from the part start or end time, depending on which was selected, until the "After" time is reached. Example: If Activation Time is set for 2 hours after the session part start, and the part starts at 10am, the session QR code would be active from 10am - 12pm.
Email Tag for QR Codes
When QR code functionality is available for a session, a new SCHEDULES.DETAILS email tag is available when configuring session emails. The SCHEDULES.DETAILS email tag can be used in the following email types:
- Session Changed
- Session Start Date
- ILT Session Becomes Available
Resources
The Resources section on the Details tab enables administrators to view and manage attachments for the session. The visibility of each attachment can be determined by the administrator. For example, some attachments may be visible to only administrators, while other attachments may be visible to all users. In addition, attachments can be made visible to users only if they are registered for the corresponding session. This section is only available for users that have permission to view or manage LO attachments.
When the session is first created, this section contains any attachments that were added on the Session Defaults page for the event.
See Create Session - Details - Resources.
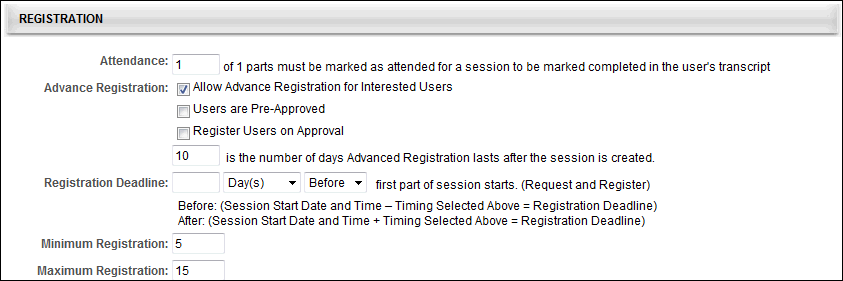
Registration
- Attendance - Enter the number of session parts that must be attended by a user in order for the session to be marked complete in the user's transcript. For example, if there are five parts, a user may need to only complete three parts in order to complete the session. On the other hand, a user may also have to complete all five parts in order to complete the session.
- Advance Registration - If configured to display, you can select to allow users to register in advance, determine approval settings, and set the advanced registration period.
- Allow Advance Registration for Interested Users - Select this option to allow advanced registration.
- Users are Pre-Approved - Select this option to allow advanced registration users to be pre-approved.
- Register Users on Approval - Select this option to allow users to be pre-approved.
-
 is the number of days that advanced registration lasts after the session is created. The number of days that displays in the box is configured at the event level or in ILT Preferences. You can keep the default number or enter a different number.
 - Registration Deadline - The deadline set here applies to the request and the registration. For example, if the deadline is 2 days before the first part of the session starts, the user must request the session and register by this deadline. This functionality can be useful with multi-part sessions where attendance of later parts is not contingent upon attendance of earlier ones because this option allows users to miss certain parts, but still attend others as needed. The administrator can also set a minimum number of parts that are required for completion. If the administrator edits the first part start time or the registration deadline, the request and registration deadline is recalculated for new users who wish to request or register for the session. If no registration deadline is added, then the default deadline is the start date and time of the session.
- Select whether or not the deadline occurs before or after the first part of the session starts. This is selected from the last drop-down list.
- From the middle field, select whether the deadline will be measured in minutes, hours, days, or weeks. For example, if you are setting the deadline to 4 days before the first part starts, select days from the middle field since you are measuring the deadline in days.
- Specify the number of minutes, hours, days, or weeks before or after the first part starts that the deadline occurs. This quantity combines with the time unit and the before/after drop-down list to determine the deadline. For example, if you set the deadline as 10 minute(s) after first part of session starts, users must register for the session no more than 10 minutes after the first part starts. If a user attempts to register 11 minutes after the first part starts, they cannot register. Note: The system may display a variation of the time specified. For example, 24 hours is displayed as 1 day, and 60 minutes is displayed as 1 hour.
- Minimum Registration - Enter number of minimum registration users. The number of days that displays in the box is configured at the event level. You can keep the default number or enter a different number. This field is required.
 Email Notification email.
 - Maximum Registration - Enter number of maximum registration users. The default value is configured at the event level. You can keep the default number or enter a different number. This field is required. The maximum registration for sessions is 9,999 unless the sessions use a Citrix integration.
- Citrix Integration Note: When creating a session for a Citrix event, the maximum registration is 25.
Enrollment
The Enrollment section on the Details tab allows administrators to limit the number of users by OU that can enroll for the event's sessions. If enrollment restrictions are placed on organizational units, the number of seats available to a user differs depending on the maximum registration defined for the OU, and the number of users currently registered from their OU.
Note: This section only displays if the "Allow reservation of seats" option or at least one of the "Allow enrollment restrictions" options are enabled in ILT Preferences.
See Create Session - Details - Enrollment.
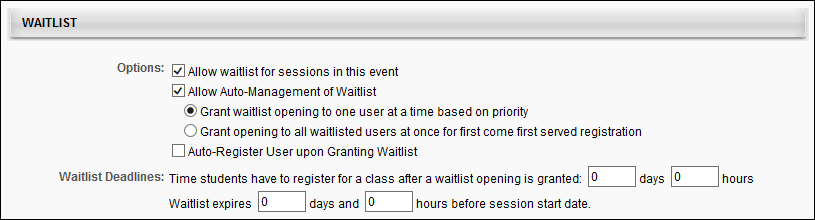
Waitlist
- Allow waitlist for sessions in this event - Check to allow waitlists. Users will be added to the waitlist when they register for a session with no seats available. Each session has a separate waitlist.
- Allow Auto-Management of Waitlist - Allow the system to manage the waitlist by maintaining a list of waitlisted users and granting waitlisted users a seat automatically if one becomes available or if another session is created.
- Grant waitlist opening to one user at a time based on priority - Select to grant a waitlist opening to one user at a time based on the waitlist order.
- Grant opening to all waitlisted users at once for first come first served registration - Select to grant waitlist opening to all users as soon as an opening is available.
- Auto-Register User upon Granting Waitlist - When a user is granted a seat from the waitlist, users are automatically registered if this option is selected.
- Waitlist Deadlines - If configured to display in ILT Preferences, you can set the period of time waitlisted users have to register. A default number for each box can be configured at the event level.
- Time students have to register - Set the number of days and hours waitlisted users have to registered.
- Waitlist expires XX days and XX hours before session start date - Set when the waitlist expires in relation to the session start date.
- Limit users to one waitlist per event - This option is not editable at the session level. It displays the configuration that is set at the event level. When this option is selected, users can only add themselves to one waitlist for the corresponding event. If this option is selected and a user attempts to add themselves to more than one waitlist for the event, then a message is displayed, indicating that they can only be on the waitlist for one session in the selected event. Note: This option is only visible if the Allow waitlist for sessions in this event option is selected.
- When this option is selected, it limits users for all waitlist requests for the event after the preferences are saved. The system does not remove users from any waitlists if they have previously been added to multiple waitlists for the event. However, if this option is enabled, a user is already added to multiple waitlists for the event, and the user requests to be added to an additional waitlist for the same event, then the user must be removed from all other session waitlists for the event in order for the request to be granted.
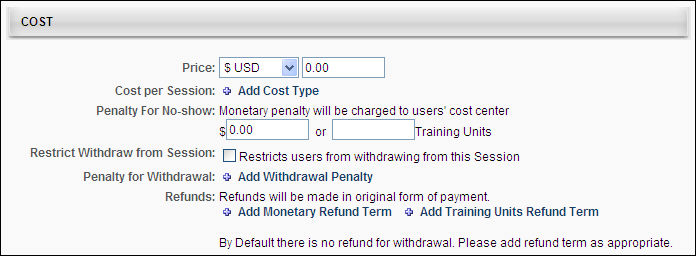
Cost
- Price - Enter a price for session. Each user (or their cost center) will be billed this price upon registration. Administrators can enter any number of decimal places. Once the page is saved, this field is rounded to use two decimal places of precision.
- Cost Per Session:
- Click Add Cost Type link.
- Select Cost Type from drop-down.
- Enter amount of cost. Administrators can enter up to ten digits, including decimal places. Once the cost is saved, this field is rounded to use two decimal places of precision.
- Click Save icon.
- Repeat steps to add other costs.
- Total Cost per Session - When a cost is added in the Cost per Session field, this field is displayed, and appears and displays the sum of the Cost per Session costs. Administrators are only able to add one cost per cost type. If no cost is added in the Cost per Session field, then the Total Cost per Session field does not display. This calculation uses the rounded values that are displayed. This field always uses two decimal places of precision.
- Penalty for No-Show - No Show penalties are charged to users who do not attend any part of a session for which they are registered (without prior withdrawal).
- Specify the monetary value that is charged and also specify the amount of training units that is penalized. Training unit prices can be represented using up to two decimal places.
- No-show penalties are charged in the same form of payment that is used to purchase the session. If a user purchases a session with training units, but does not have any training units in their account, the no-show penalty is deferred to the monetary amount. If training units is not enabled for the portal, the training unit option is not available.
- All no-show penalties are billed to the user (or their cost center) when the roster is submitted.
- Restrict Withdraw from Session - When this option is selected, users that are registered for the session are unable to withdraw from the session.
- Penalty for Withdrawal:
- Click on Add Withdrawal Penalty link.
- Enter % or $ amount of penalty for withdrawals from the event's sessions.
- Enter number of days before session start date that penalty to be incurred.
- Click Save icon.
- Repeat steps to add another refund.
- Refunds - All refunds are billed to the user (or their cost center) on the session registration date. Multiple refund terms can be configured.
- Add Monetary Refund Term - Click this link to add a monetary refund term. This adds a new line to this section, which is listed below.
- Refund XX% or $XX for withdrawals XX days prior to session start date - For a monetary refund, you may specify the percentage of the cost that is refunded, or you can specify the monetary amount. Also, specify the number of days prior to the session start date by which the user must withdraw to receive the specified refund. Click the Save icon to save the refund term. The maximum number of days is 9999.
- Note: Refunds cannot be greater than the session cost.
- Add Training Units Refund Term - Click this link to add a training unit refund term. This enables the refund terms fields to appear below the link. Note: This option is only available if training units are enabled for the portal.
- Refund XX Training Units for withdrawals XX days prior to session start date - For a training unit refund, enter either a percentage of training units to refund or a specific amount of training units to refund. The percentage field accepts values between 1 and 100. Training unit prices can be represented using up to two decimal places. Then, specify the number of days prior to the session start date by which the user must withdraw to receive the specified refund. The maximum number of days is 9999.Click the Save icon to save the refund term. Note: If you only click the button at the bottom of the page before clicking the Save icon, the refund terms are not saved.
Only one refund type can be configured. Therefore, if issuing a refund percentage, the Training Units field must be left blank and vice versa. Refunds cannot be greater than the session cost.
For training unit percentage refunds, if the user purchased the session with distributed training units, then the percentage is refunded to their personal training units account. If the user purchased the session with a training unit key code, then the percentage is refunded to their key code.
Prerequisites
The Prerequisites section on the Details tab enables administrators to set prerequisites for the session, and the defined prerequisites must be completed by the user before they are able to register for the session. The status of the training will be Exemption Requested or Pending Prerequisite until the user completes the prerequisites. It is not required that a session have prerequisites. See Create Session - Details - Prerequisites.
Pre-Work
- Click on Add icon
 .
. - Search for training by keyword by entering full or partial title or description in Keyword free-text box.
- Click Search button.
- Click Add icon to add training. Note: If you have permission to restrict the Select Training pop-up, the learning objects visible to you are dependent upon the availability set for this permission. Also, non-required learning objects cannot be marked as post-work for a learning object that is post-work of another item. This causes a circular reference, and a learning object cannot refer to itself.
- Add free form training if applicable by entering title in Free Form Training free-text box.
- Click Add.
- Click Done.
- Repeat the above steps to add more free form training.
- Check Req. for each training item that is required for the completion of the class.
- If a student does not complete this training, their status will be Pending Pre-work. After completing the required pre-work, users will receive a Completed status for the session.
- Enter number for the training sequence in the Seq. free-text box for each training item to set a required sequence for the training.
- If there is a required sequence, users will not be able to request training until the training which is before it in the sequence is completed first.
- If no numbers are entered, students may take all the pre-work training in any order or all at once.
- Enter number for display position in the Display Position free-text box for each training item.
- The training items will be displayed in this sequence on the Training Details page.
- Note: The completion of any pending pre- or post-work will mark its associated session's completion date per the Default Session Completion Date ILT preference setting.
Post-Work
- Click the Add icon
 .
. - Search for training by keyword by entering full or partial title or description in Keyword free-text box.
- Click Search button.
- Click Add icon to add training. Note: If you have permission to restrict the Select Training pop-up for prerequisites, pre-work, and post-work, then the learning objects visible to you are dependent upon the availability set with this permission.
- Add free form training if applicable by entering title in Free Form Training free-text box.
- Click Add.
- Click Done.
- Repeat steps to add more free form training.
- Check the Req. checkbox for each training item that is required for the completion of the class.
- If a student does not complete this training, their status will be In Progress. When the student completes this training, their status is moved from In Progress to Completed.
- Enter number for the training sequence in the Seq. free-text box for each training item to set a required sequence for the training.
- If there is a required sequence, users will not be able to request training until the training which is before it in the sequence is completed first.
- If no numbers are entered, students may take all the post-work training at once.
- Enter number for display position in the Display Position free-text box for each training item.
- The training items will be displayed in this sequence on the Training Details page.
- Note: The completion of any pending pre- or post-work will mark its associated session's completion date per the Default Session Completion Date ILT preference setting.
Click Save to save the session or Next to set Availability. See Create Session - Availability. The session will inherit the availability and the session setting details from the event unless changed.
Modification History
The initial creation of the session title and description and changes to the description display in the panel as follows:
- Title at Initial Creation - Session created by <User Full Name> (<User ID>) on <Date/Time of Creation>.
- Description at Initial Creation - <Learning Object Type> created with <Language of Description> Description of "<Description>" by <User Full Name> (<User ID>) on <Date/Time of Creation>.
- Change to Description - Description in <Language of Description> was changed to "<New Description>" by <User Full Name> (<User ID>) on <Date/Time of Creation>.
- Title/Description Translation Change - Description in <Language> "<New Description>" was added by <User Full Name> (<User ID>) on <Date/Time of Creation>.
Note: Editing the Description field for a session is enabled by a backend setting. To enable this functionality, contact Global Customer Support.