The Bio - Resume page enables users to view and edit their resume sections.
To access the Bio - Resume page, go to . Click the Bio tab. Then, click the Resume subtab. Note: The location of this link is configurable by your system administrator.
| PERMISSION NAME | PERMISSION DESCRIPTION | CATEGORY |
| Bio Resume - View | Enables user to view the Bio - Resume page for users within their permission constraints. If a user does not have permission to view the Bio - Resume page, then the Resume tab is not available. This permission can be constrained by Employee Relationship, OU, User's OU, User Self and Subordinates, User's Direct Reports, User's Self, and User. | Universal Profile |
| Users - View | Grants the ability to search for and view summary information about users in the portal via the Admin/Users screen. This permission can be constrained by OU, User's OU, User Self and Subordinates, and Users. If multiple constraints are added, these constraints are considered OR statements. This is an administrator permission. | Core Administration |
View Team
The View Team flyout allows managers
The button displays if enabled in the portal.
See Universal Profile - View Team Flyout.
Options
An drop-down may be available on various pages of the Universal Profile. This menu may include options such as Assign Training and Create Goal. See Universal Profile Options Drop-down Overview.
Connect
When viewing the Universal Profile - Bio page of another user, you can send a connection request for the user by selecting the button in the upper-right corner of their profile.
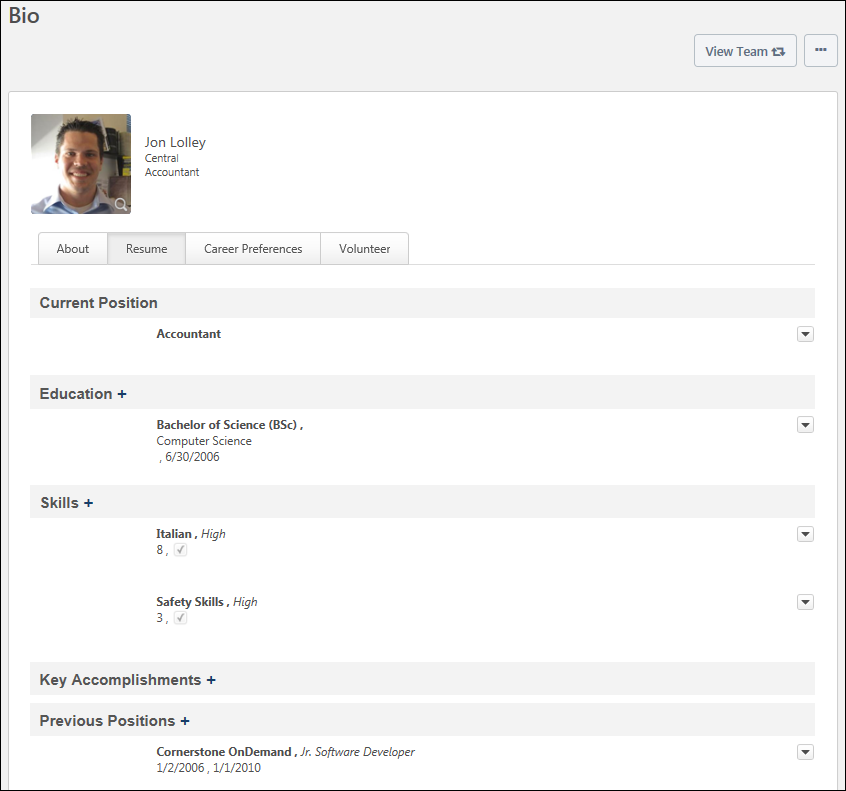
User Information
At the top of the page, the information that is displayed about the user is determined by the administrator.
The user's photo may be displayed. Select the user's photo to view an enlarged version of the photo in a pop-up. In addition, the following user information may be displayed:
- User's First and Last Name
- User OU 1
- User OU 2
Note: Users may be able to edit their photo via the My Account > Preferences page. See My Account - Preferences.
Bio Page Subtabs
The following subtabs may be available on the Bio page:
Resume Sections
Within the Resume section, the following sections may appear:
- Previous Position
- Current Position
- Prior Experience
- Education
- Skills
- Key Accomplishments
- Competencies
- Awards
- Certifications
- Licenses
- Role/Experience
- Special Training/Development
- Background Experience
- Internal Positions
For sections with a date field or date range field, entries are displayed in reverse chronological order with the most recent entries displayed at the top of the section. If a single entry has more than one date or date range field, then entries are sorted in reverse chronological order using the date or date range field in the lowest position number. For example, if there are date range fields in position 2 and 7, then the entries are ordered using the date range field in position 2.
For sections without a date field or date range field, entries are ordered in the order in which they are added to the section, with the most recently added entries displayed at the top of the section.
Each Resume section entry is limited to six lines. If an entry exceeds six lines, then the entry is truncated and a more... link appears at the end of the sixth line. Click the link to expand the entry to display all lines.
Note: In order for a user to be able to update another user's resume page, the user must have permission to manage user resumes and the permission to view users. If you would like managers to be able to make changes to the resume page for their direct reports, then the constraints of the permissions must not be restricted in a way that prevents the manager from making changes (i.e., restricted to a user who is not a direct report). See the Permissions section above for permission details.
Max Items
Administrators can define the maximum number of items that can be selected for each section on the Resume tab. If a maximum is defined for a section, then the maximum number of entries is displayed in the section header. For example, if the maximum number of skills that can be selected is set to three, then "Max 3" is displayed in the Skills section header. If no maximum is defined for a section, then no maximum is displayed in the section header.
If you attempt to select more items than is allowed for the section, then an error message is displayed.
If you have already selected the maximum number of allowed items for a section, then you must remove one or more selection before you can add a new item.
Resume Section Entry - Add
![]() to the right of the section heading. Depending on how the administrator configured the resume section, you may be able to add more than one item to the section at a time.
to the right of the section heading. Depending on how the administrator configured the resume section, you may be able to add more than one item to the section at a time.
If the section IS NOT configured to allow you to select more than one item at a time, then a new, blank entry is added at the top of the section. Which fields are available for each section is dependent upon which fields are defined for the section by the administrator in Resume Administration. See the Resume Section Entry - Edit section below for additional information.
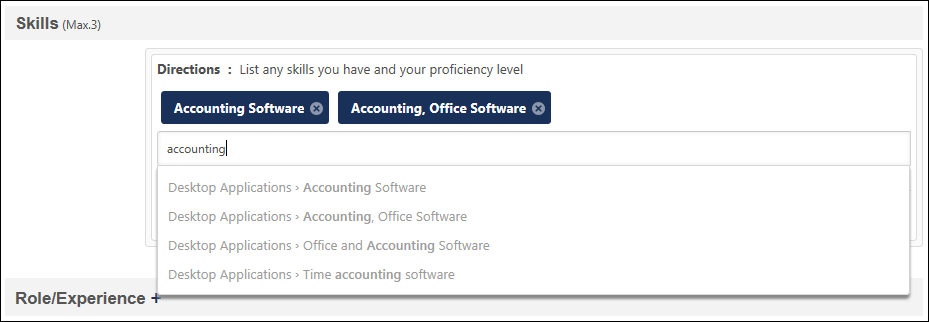
If the section IS configured to allow you to select more than one item at a time, then a text box is displayed, which allows you to type the name of a skill in the text box. As you enter text in the Search field, predictive search results appear in a menu below the field. You can select an item from the predictive search results, and it will be added above the Search field.
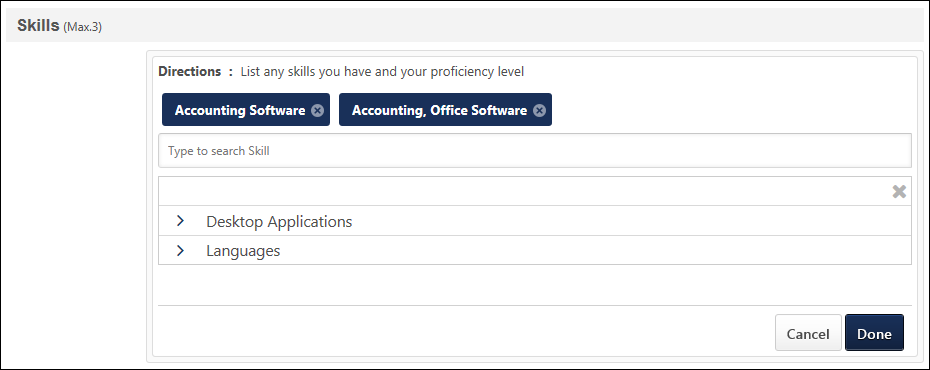
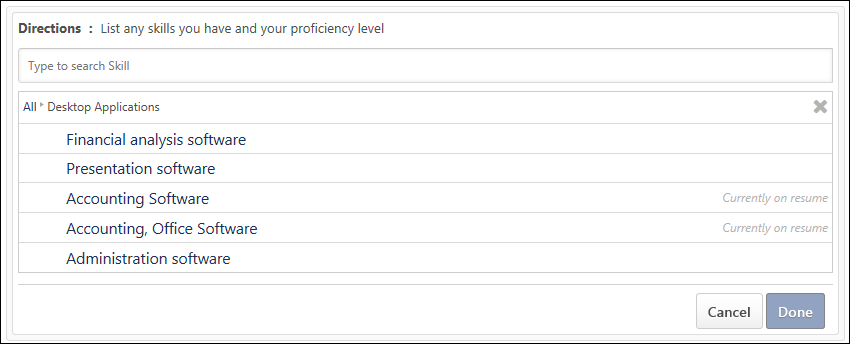
If the section IS configured to allow you to select more than one item at a time, you can also select the View Full List link below the Search field to browse all items for the Resume section. Select the Arrow icon ![]() next to a category to view items within the category. If an item in the list is already on the user's Resume, then "Currently on resume" is displayed next to the item. When you select an item, it will be added above the Search field.
next to a category to view items within the category. If an item in the list is already on the user's Resume, then "Currently on resume" is displayed next to the item. When you select an item, it will be added above the Search field.
After selecting the appropriate items, select the button to configure the selected items. Each selected item is added as an entry in the Resume section, and you must add additional information for each item. For example, for each skill that is selected, you must add information such as Proficiency, Years of experience, etc. See the Resume Section Entry - Edit section below for additional information.
Resume Section Entry - Edit
To edit an existing entry of a Resume section, click the Options icon ![]() to the right of the entry. Then, select Edit. The selected entry becomes editable.
to the right of the entry. Then, select Edit. The selected entry becomes editable.
If directions are defined for the section, then they appear only when editing the entry.
For fields that use a rich text editor, a Spell Checker is available. To check the spelling of the text box contents, click the ABC icon ![]() in the text box toolbar. This opens the Spell Checker pop-up.
in the text box toolbar. This opens the Spell Checker pop-up.
For fields that have predefined attributes, click the Select icon ![]() to select a predefined attribute. This opens the Select Attribute pop-up. See Select Attribute Pop-up.
to select a predefined attribute. This opens the Select Attribute pop-up. See Select Attribute Pop-up.
After editing the entry information, click to save the changes, or click to discard any unsaved changes.

Resume Section Entry - Delete
To delete an existing entry of a Resume section, click the Options icon ![]() to the right of the entry. Then, select Delete. Upon confirmation, the selected entry is removed.
to the right of the entry. Then, select Delete. Upon confirmation, the selected entry is removed.