Use the Check-Ins meetings and topics page to manage meetings, topics, notes, and settings. With the appropriate permissions, you can also view goals and development plans for participants in the discussion.
From the meetings and topics page, you can perform the following tasks:
- Add a new meeting
- Add Follow-Up action items See Check-Ins - Manage Follow-Ups.
- Archive/restore a meeting
- Delete a meeting
- Download topics, notes, and follow-ups to a .pdf file
- Manage views
- Manage topics See Check-Ins - Manage Topics .
- View settings See Check-Ins - Manage Settings.
- View or add meeting notes
- See Date/Edited/Saved/View History.
- View user goals
- View user Skills Profile
- View user development plans
To view the meetings and topics page, go to and then click the appropriate check-in on your home page.
| PERMISSION NAME | PERMISSION DESCRIPTION | CATEGORY |
Note: All of the actions you perform on this page are saved automatically.
Check-Ins Icons
The following icons are always visible on this page:

|
Check-Ins Menu- Click this icon to return to the Check-Ins Home Page. |

|
Search- Locate people with whom you want to start a check-ins discussion, search for participants in current discussions or search for previously conducted Check-Ins with participants who are inactive or no longer work for the company. You can also locate participants from archived conversations. Note: You cannot create check-ins with inactive users.
|

|
People Sidebar- Displays all participants with whom you had a Check-In discussion. Click any member to view their meeting dates, archive a meeting, or create a new check-in discussion. Participants are filtered as follows: Users can view everyone they have an active Check-In with ordered by last date modified. |
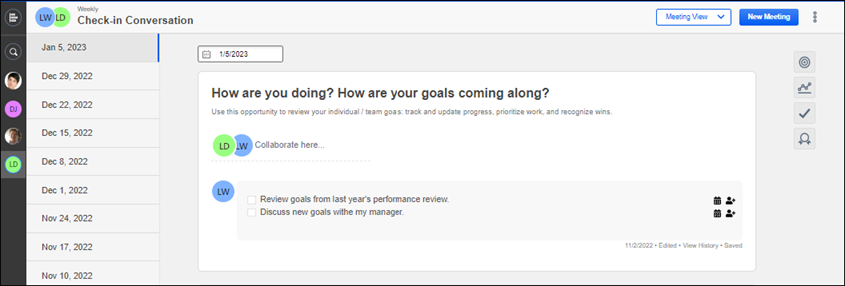
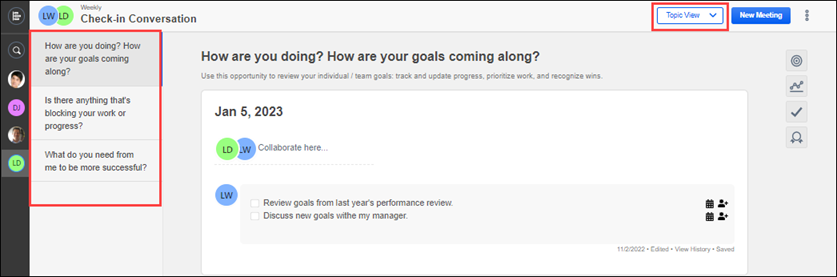
Meeting or Topic View
Use the view drop-down to display Meeting View or Topic View.
- Meeting View - Displays meetings in the left pane and all related topics, notes, and follow-ups topics in the left pane. This is the default view. Right click on any meeting to:
- Mark as completed - Only check-in meetings that have content can be marked as completed.
- Cancel this meeting - Cancel meetings at anytime.
Participants can edit the notes of a check-in meeting when a meeting is completed or cancelled.
- Topic View - Displays all topics in this meeting in the left pane. Select a topic to view associated notes sorted by meeting dates. Topics are listed in the same order as they appear in the Manage Topics list.
New Meeting
Click the button to add a new meeting to this discussion.
There are two ways to create a new meeting:
- If you set a meeting frequency when you created this discussion, when you click , the new meeting date appears in the meeting list based on the set frequency.
- Select a meeting date in the date field. The selected date appears in the meeting column.
All meetings associated with the selected template will have the same topics, but you can add and save different notes per meeting. See Check-Ins - Manage Notes.
Options
Click the Options menu to access the following options:
- Archive - Select to archive a check-in series. This item not appears on the Archived tab.
- Share check-in - Share a meeting series with other users.
- Check-In Settings - View the settings pages for this meeting. Settings include:
- General Settings - View or edit the name, description, or meeting frequency for this discussion.
- Manage Topics - Manage the topics for this meeting. You can add, edit, move, and archive topics.
- Modification History - View all changes made to this meeting.
- Export to PDF - Select to export all topics, notes, and follow-ups for this meeting to a .pdf file. This option is only visible in Meeting View.
- Delete Meeting - Select the appropriate meeting date, click the ellipses, and then click Delete Meeting. The creator of a meeting can delete it, but only if all of the notes or follow-ups were also entered by the creator. If another user entered notes or follow-ups, the meeting cannot be deleted. Deleted Check-In meetings cannot be restored. You can view deleted meeting details on the Check-Ins Modification History page. This option is only visible in Meeting View. See Check-Ins - Manage Settings.
- Download Calendar Invite (Series) - Select to download a series calendar invite.
- Download Calendar Invite (Occurrence) - Select to download a single calendar invite.
Archive/Restore a Meeting
You can archive and restore a check-in meetings.
- To archive a meeting, in the People Bar, click the user icon for the user whose meeting you want to archive. The meeting page opens. Click the ellipses for the appropriate meeting, and then click Archive. Click Confirm on the confirmation message. The meeting is archived and moves to the Archived tab.
- To restore a meeting:
- In the People Bar, click the user icon for the user whose meeting you want to restore. The meeting page opens. Click the ellipses for the appropriate meeting, and then click Restore. The meeting is now active moves to the Active tab.
- Select the Restore button in the "This check-in is archived" banner at the top of the page. The meeting is now active moves to the Active tab.
- To view a check-in meeting without restoring it, from the People Sidebar, click a participant's name. Click the Archived tab and select the meeting you want to view. To make any changes to an archived check-in, it must be restored. An archived check-in cannot be shared.
Meeting List/Topic List
This list appears at the left of the window and displays the meeting list or topic list based on the selected view.
Formatting Toolbar
Use the formatting toolbar to add emphasis to any text that you enter on this page. You can bold, italicize, underline, and add numbers or bullets to text. You can also add, delete, or open hyperlinks in a new tab.
The check-mark allows you to add Follow-Up action items to a topic. See Check-Ins - Manage Follow-Ups.
Date Field
Click and select a date to schedule a meeting for this discussion. The selected date appears in the meeting list.
Goals Icon
Click the Goals icon ![]() to display a quick view of the current goals for the selected participant. Click the button to view full goal details. You must have the appropriate permissions to view or manage user goals. Note: The Goals Panel applies the same rules that the 'View Goals' permission allows for goals, so Managers can only view goals for their direct reports.
to display a quick view of the current goals for the selected participant. Click the button to view full goal details. You must have the appropriate permissions to view or manage user goals. Note: The Goals Panel applies the same rules that the 'View Goals' permission allows for goals, so Managers can only view goals for their direct reports.
Development Plan Icon
Click the Dev Plan icon to display a quick view of the current development plan for the selected participant. You can click on a Development Objective for more information or click the button to display the full development plan. Note: The Dev Plan panel applies the same rules that the "Snapshot - Development Plans permission allows for development plans, so managers can only view goals for their direct reports.
Follow-Ups Icon
You can add follow-up action items to a meeting topic. Follow-up action items can be assigned a due date and assigned to a user. See Check-Ins - Manage Follow-Ups.
Skills Icon
Click the Skills icon to view a flyout that provides skills information and access to your Skills Profile.
Notes
The meetings and topics page provides a place to write collaborative and individual notes for all participants in the meeting.
- To add a collaborative note, click in the Collaborate here area and enter your notes.
- To add an individual note, scroll down to your personal identifier, click on the note line, and add your notes. Individual notes can only be changed or deleted by the original writer.
Once you click the notes area, you can use the formatting toolbar to customize the look of your notes.
Additionally, you can create follow-up action items in the notes areas. See Check-Ins - Manage Follow-Ups.
Date/Edited/Saved/View History
These fields appear under each group of notes when a participant makes changes. These options only appear if there are changes.
- The date displays when the notes were edited.
- Edited - The notes are changed.
- Saved - The changes are saved to the notes section and the View History page.
- View History - Opens the Edit History page that displays all changes to notes.
Manage Topics
Click to open the Manage Topics page where you can add, edit, move, and archive topics. See Check-Ins - Manage Topics .