Applicant Flags Preferences
Applicant Flags Preferences enables administrators to create and manage applicant and application flags. Administrators create flags in the Applicant Flag Bank, and then add them to the Applicant Flag Preferences page and define the flag's visibility settings.
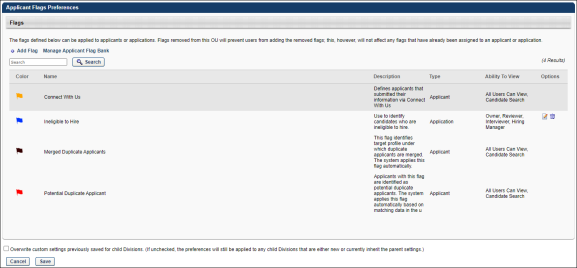
Add Flag
Click this link to add flags to the Applicant Flags Preferences page. Flags must first be created in the Applicant Flag Bank in order to be available to add to the Applicant Flags Preferences page. See Applicant Flags Preferences - Add Flag.
Note: When adding flags from the Applicant Flag Bank, the Potential Duplicate Applicant flag cannot be added manually to the Flags table. The flag is a default flag that appears automatically in Applicant Flags Preferences.
Manage Applicant Flag Bank
Click this link to open the Manage Applicant Flag Bank. See Manage Applicant Flag Bank Overview.
Note: The Applicant Flag Bank is only available to administrators in the top level organizational unit (OU). The link does not display for administrators in child OUs.
Flags Table
The following information displays in the Flags table for each flag:
- Color - This column displays the flag in the color defined for the flag.
- Name - This column displays the name of the flag. By default, the Flags table is sorted alphabetically by flag name. This column is sortable. For portals with multiple languages enabled, the field displays in the viewing administrator's language, if available.
- Description - This column displays the description of the flag. For descriptions that are longer than the space allows, hover over the description to display a tooltip with the full text. For portals with multiple languages enabled, the field displays in the viewing administrator's language, if available.
- Type - This column displays the flag type, either Applicant or Application.
- Ability To View - This column displays who can view the flag. If there are no users currently defined, then "Not defined. Click Edit to define visibility" displays. See Applicant Flags Preferences - Define Flag Visibility. The following are the possible viewers:
- Options - The following options are available in the Options column:
- Edit - Click the Edit icon to edit the flag's visibility. See Applicant Flags Preferences - Define Flag Visibility.
- Remove - Click the Trash Can icon to remove the flag. Removed flags are no longer available for use for the associated OU and are removed from applicants for whom the flag is currently designated.
Flags can also be deleted from the Flags table within the Select Flag pop-up by clicking the Trash Can icon in the Remove column.
Default Flags
The following are the system-defined default flags:
The Connect With Us flag is system defined and cannot be edited or removed. This flag indicates that an applicant has applied via Connect With Us. The flag color is orange.
| Color | Name | Description | Type | Ability to View | Options |
|---|---|---|---|---|---|
| Yellow | Connect With Us | Indicates that an applicant has applied via Connect With Us. | Applicant | All users can view, Candidate Search | None; visibility settings cannot be edited; flag cannot be removed |
The Connect With Us flag displays in the following areas of the Applicant Tracking System (ATS):
The Potential Duplicate Applicant flag is a system defined flag. This flag is available to the top level organizational unit in Applicant Flags Preferences and automatically displays in the Flags table. This flag is an Applicant flag type and cannot be edited or removed. The visibility settings are predefined and cannot be modified. The flag displays in Applicant Flags Preferences regardless of the duplicate applicant preference settings in Requisition and Applicant Preferences.
The following attributes are assigned to the Potential Duplicate Applicant flag:
| Color | Name | Description | Type | Ability to View | Options |
|---|---|---|---|---|---|
| Bright Red (ff000) | Potential Duplicate Applicant | Applicants with this flag are identified as potential duplicate applicants. The system applies this flag automatically based on matching data in the user record fields. | Applicant | All users can view, Candidate Search | None; visibility settings cannot be edited; flag cannot be removed |
For portals with multiple languages enabled, the flag name, type, description, and visibility settings are localized.
The Merged Duplicate Applicants flag is system defined and cannot be edited or removed. The flag color, name, description, and type are also system defined and cannot be modified. This flag is always available on the Applicant Flags Preferences page.
The following attributes are assigned to the Merged Duplicate Applicants flag:
| Color | Name | Description | Type | Ability to View | Options |
|---|---|---|---|---|---|
| Dark Red (33000) | Merged Duplicate Applicants | This flag identifies target profile under which duplicate applicants are merged. The system applies this flag automatically. | Applicant | All users can view, Candidate Search | None; visibility settings cannot be edited; flag cannot be removed |
Overwrite Settings
Select this option to overwrite custom settings for child division OUs. If you overwrite custom settings for child division OUs, the selected settings are applied to both new and existing child OUs. Any previously customized child OUs are updated with the selected settings.
- If there are no customizations to the child OU, then the parent OU customizations are applied to all child OUs.
- Overwrite custom settings checkbox setting
- If this option is selected, all child OU customizations are deleted from the database, which means the parent OU customizations will be applied to new and existing child OUs.
- If this option is unselected, all existing child OU customizations will remain unchanged, and any new child OUs will inherit the parent OU customizations by default.
- If a child OU has been customized to display any widgets, then regardless of the parent OU customizations, the child OU customizations are applied.
- If a child OU has been customized to hide all widgets, then parent OU customizations will take precedence and will be applied.
Save/Cancel
Click to save the preference settings. If is not clicked, then any modifications made to the preference settings are not committed.
Click to cancel changes to the page settings.