Org Chart Preferences
Use Org Chart Preferences to configure the fields that display in the user details on the Org Chart page.
To access Org Chart Preferences, go to .
| PERMISSION NAME | PERMISSION DESCRIPTION | CATEGORY |
| Org Chart - Preferences |
Grants access to the Org Chart Preferences page. This permission cannot be constrained. |
Core |
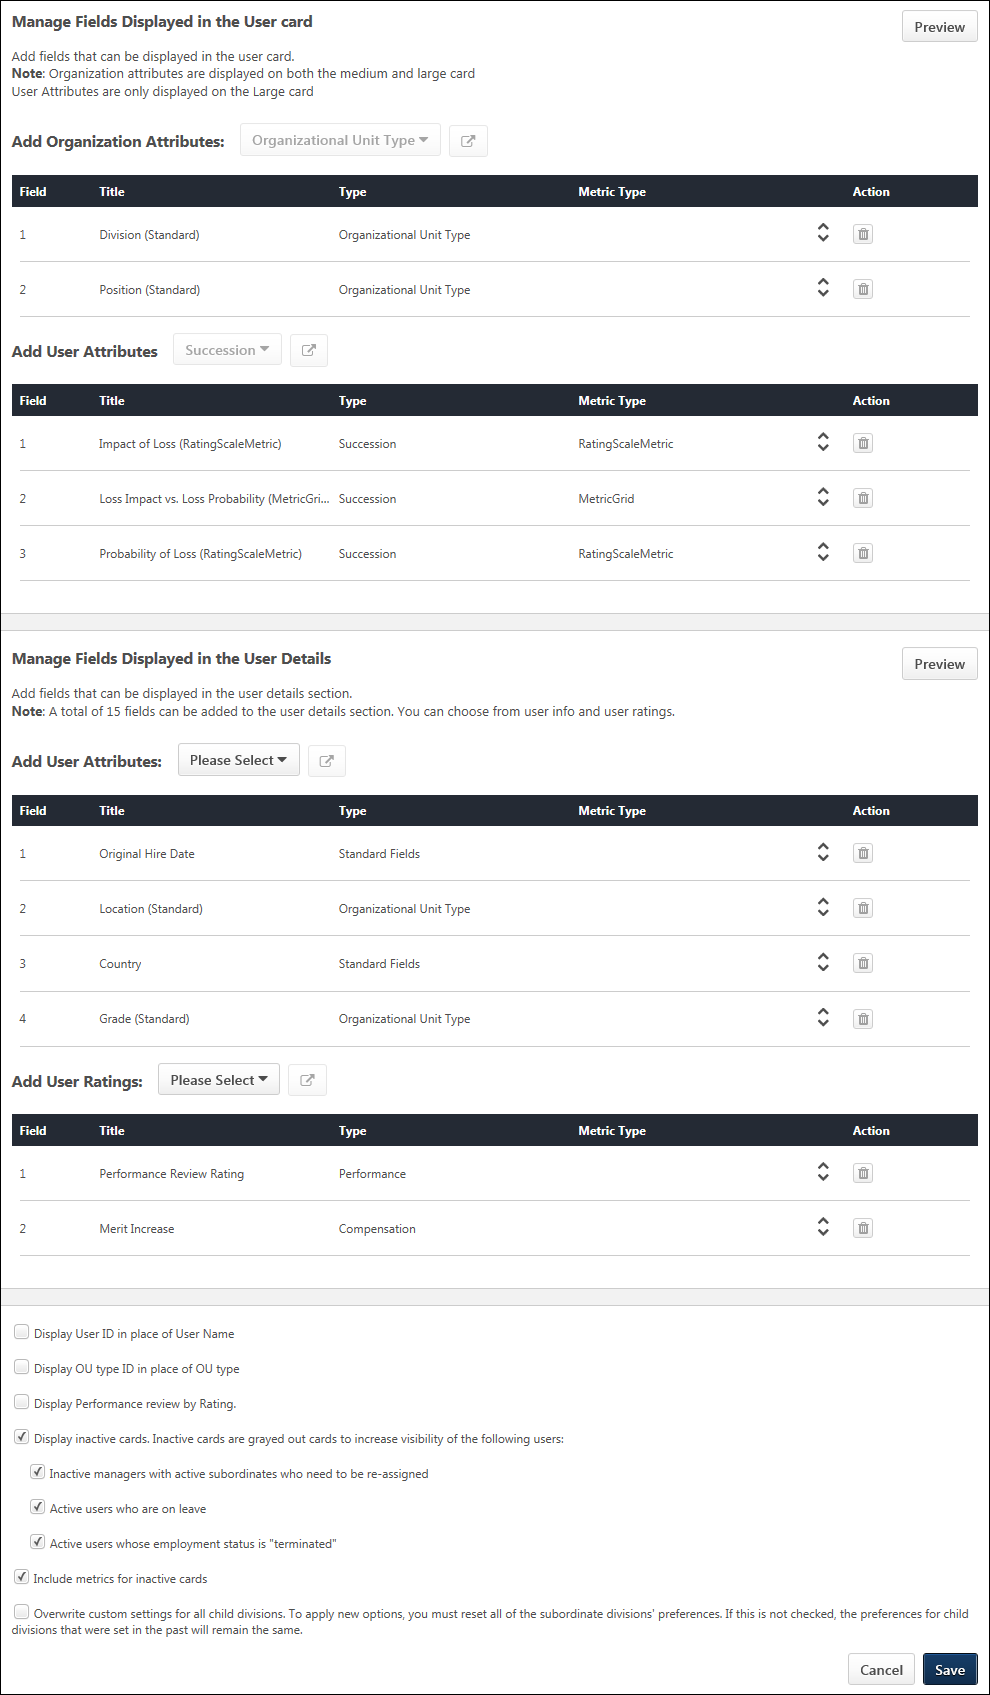
Manage Fields Displayed in the User Card
This section includes options to add up to five organization and user attributes. The organization attributes display in the top portion of the user card flyout, directly below the user's photo. The user attributes appear at the bottom of the flyout.
This section allows you to select organizational unit (OU) fields that will display in the user cards and user flyout on the Org Chart page. The ability to add OU fields is disabled when the maximum number of fields has been added.
By default, the Division and Position fields are added. You can modify the default selection by removing the field(s) and adding different OU fields.
To add fields:
- Click the select icon
 . This opens the a pop-up that allows you to select the OU fields.
 - Click the Select options drop-down. This displays the list of standard and custom OUs that you can add.
- Check the OU(s) to add. Up to two OU fields can be added. If there is already one OU field in the table, then only one additional OU field can be added. The fields that display in the drop-down are based on your availability to view the fields.
- Click . This adds the OU(s) to the fields table.
In this section, you can select the user attributes that will appear at the bottom of the user card flyout on the Org Chart page.
The following are the possible field types that can be added:
- Compensation - This option is only available for portals with Compensation enabled. The following fields can be added:
- Organizational Unit Type
- Organizational Unit Custom Field - This option only displays if at least one Organizational Unit custom field has been configured in Custom Field Administration, and you meet the availability criteria defined for the field. The field will display as "[Field Title (Metric Type, OU Type)]." The following field types can be added:
- Checkbox
- Date
- Dropdown
- Numeric
- Radio Button
- Short Text Box
- Performance - This option is only available for portals with Performance enabled. The latest performance review rating can be added.
- Succession (custom fields) - This section allows you to add Succession custom fields. This option is only available for portals with Succession enabled, and if at least one Succession custom field has been configured in Custom Field Administration, and you meet the availability criteria defined for the field. The fields that are available will display as "[Field Title (Metric Type)]." The following custom field types can be added:
- User Record Custom Field - This section allows you to add User Record custom fields. This option only displays if at least one User Record custom field has been configured in Custom Field Administration, and you meet the availability criteria defined for the field. The fields that are available will display as "[Field Title (Metric Type, Category)]." The following custom field types can be added:
- Checkbox
- Date
- Dropdown
- Numeric
- Radio Button
- Short Text Box
To select fields:
- Click the Organizational Unit Type or Performance drop-down and select one of the field types.
- Click the select icon . This opens the select fields pop-up.
- In the pop-up, check the box next to the desired fields in the Select options drop-down.
- Click . This adds the fields to the section.
Click the arrows to drag and drop the fields to reorder them. Note that you can also click and drag anywhere in the row to reorder the field.
Click the Remove icon to remove the field from the list. The removed data will no longer appear in the user details on the Org Chart page, unless the field is re-added on the preferences page.
Up to 5 fields can be added to the main user card. The select fields pop-up will indicate how many more fields you can add based on the number of fields that have already been added.
If you have met the 5-field maximum and would like to add different fields, then you can delete previously added fields by clicking the Remove icon ![]() in the Action column and adding new fields.
in the Action column and adding new fields.
This option allows you to preview how your field selections will look on the user card on the Org Chart page. Click to view the user card with your field selections displayed.
If a field becomes inactive or is deleted from the system, then the field is no longer available to select.
If the field had already been selected, then the field is automatically removed from the section and will no longer be visible on the Org Chart Preferences page and the Org Chart page.
If you no longer have permission to view a field as a result of changes to your permissions and constraints, then the field is no longer available to select and will no longer be visible on the Org Chart Preferences page.
The fields table shows you which attributes will be visible in the user details on the Org Chart page.
The following information displays in the table:
- Title - This displays the title of the OU field.
- Type - This displays the OU field type.
- Metric Type -
- Action - The following options are available in this column:
- Drag to Rearrange - Click the arrows to drag and drop the fields to reorder them. Note that you can also click and drag anywhere in the field row to reorder the field.
- Remove - Click the Remove icon
 to remove the field from the list. The removed data will no longer appear in the user details on the Org Chart page unless the field is re-added on the preferences page.
Manage Fields Displayed in the User Details
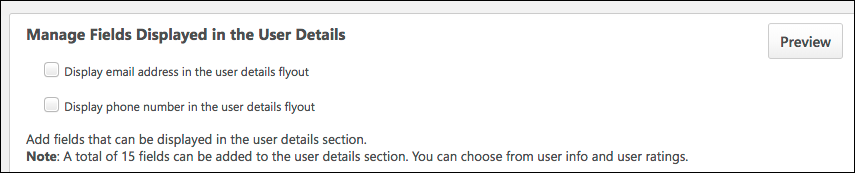
In this section, you can select up to 15 fields that will appear in the user details section of the user card flyout on the Org Chart page. The types of fields that are available to select are dependent upon the functionality that is enabled for the portal, your availability to view the fields, and your permissions and permission constraints.
You can also determine whether or not a user's email and phone number should appear on the flyout by configuring the following fields:
- Display email address in the user details flyout - When checked, the user's email address displays in the user details flyout. When unchecked, this information is hidden.
- Display phone number in the user details flyout - When checked, the user's phone number displays in the user details flyout. When unchecked, this information is hidden.
User attributes provide a deeper understanding of the user in the org chart. Administrators can add attributes from across the application to provide more information beyond what is available on the user card on the main org chart page.
The attributes also act as a quickly accessible snapshot of important user data, rather than needing to access this information from various pages in the Universal Profile. The Universal Profile can still be accessed by clicking the user's photo, but by adding attributes, you can deliver more of a 1-stop experience on the org chart.
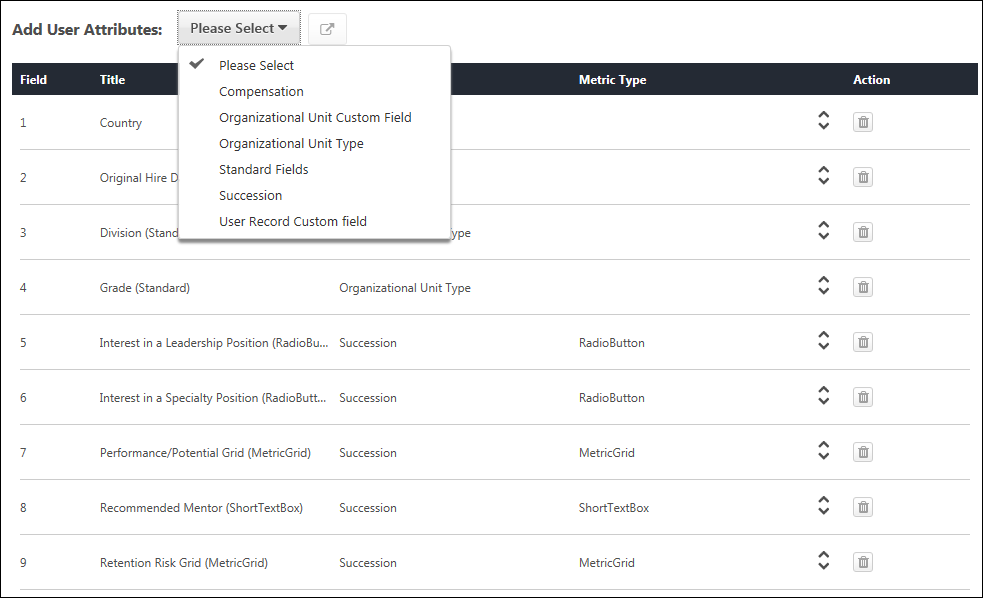
The following are the possible field types that can be added:
- Compensation - This option is only available for portals with Compensation enabled. The following fields can be added:
- Compa-Ratio
- Salary/Rate (current)
- Merit Increase
- Organizational Unit Type
- Organizational Unit Custom Field - This option only displays if at least one Organizational Unit custom field has been configured in Custom Field Administration, and you meet the availability criteria defined for the field. The field will display as "[Field Title (Metric Type, OU Type)]." The following field types can be added:
- Checkbox
- Date
- Dropdown
- Numeric
- Radio Button
- Short Text Box
- Standard - The following standard fields can be added:
- Succession (custom fields) - This section allows you to add Succession custom fields. This option is only available for portals with Succession enabled, and if at least one Succession custom field has been configured in Custom Field Administration, and you meet the availability criteria defined for the field. The fields that are available will display as "[Field Title (Metric Type)]." The following custom field types can be added:
- Checkbox
- Date
- Dropdown
- Metric Grid
- Numeric
- Radio Button
- Short Text Box
- User Record Custom Field - This section allows you to add User Record custom fields. This option only displays if at least one User Record custom field has been configured in Custom Field Administration, and you meet the availability criteria defined for the field. The fields that are available will display as "[Field Title (Metric Type, Category)]." The following custom field types can be added:
- Checkbox
- Date
- Dropdown
- Numeric
- Radio Button
- Short Text Box
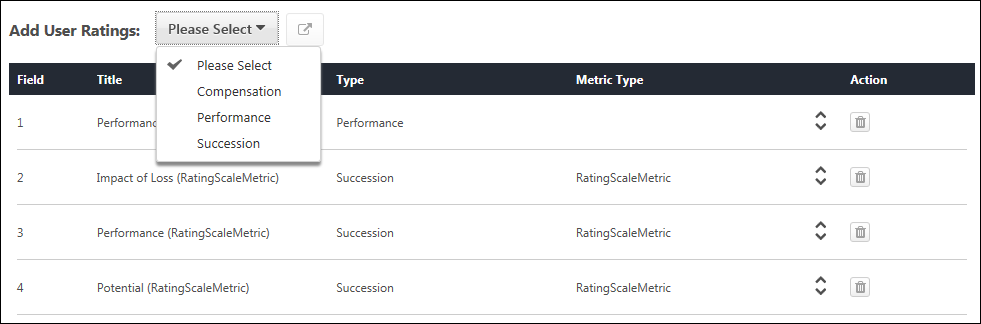
This section allows you to add succession, compensation, and performance data. The types of fields that are available to select are dependent upon the functionality that is enabled for the portal, your availability to view the fields, and your permissions and permission constraints.
The following are the possible field types that can be added:
- Compensation - This option is only available for portals with Compensation enabled. The following fields can be added:
- Compa-Ratio - Note: The maximum value is 2.0. If the value is greater than 2.0, then the progress bar for the field on the Org Chart page will display as full.
- Merit Increase
- Performance - This option is only available for portals with Performance enabled. The latest performance review rating can be added.
- Succession (custom fields) - This section allows you to add Succession custom fields. This option is only available for portals with Succession enabled, and if at least one Succession custom field has been configured in Custom Field Administration, and you meet the availability criteria defined for the field. The fields that are available will display as "[Field Title (Metric Type)]." The following custom field types can be added:
- Formula Metric
- Rating Scale Metric
To select fields:
- Click the Please Select drop-down and select one of the field types.
- Click the select icon . This opens the select fields pop-up.
- In the pop-up, check the box next to the desired fields in the Select options drop-down.
- Click . This adds the fields to the section.
Click the arrows to drag and drop the fields to reorder them. Note that you can also click and drag anywhere in the row to reorder the field.
Click the Remove icon to remove the field from the list. The removed data will no longer appear in the user details on the Org Chart page, unless the field is re-added on the preferences page.
Up to 15 fields can be added to the user card flyout. The select fields pop-up will indicate how many more fields you can add based on the number of fields that have already been added.
If you have met the 15-field maximum and would like to add different fields, then you can delete previously added fields by clicking the Remove icon ![]() in the Action column and adding new fields.
in the Action column and adding new fields.
This is a new option. This option allows you to preview how your field selections will look on the user card flyout on the Org Chart page. Click to view the flyout with your field selections displayed.
If a field becomes inactive or is deleted from the system, then the field is no longer available to select.
If the field had already been selected, then the field is automatically removed from the section and will no longer be visible on the Org Chart Preferences page and the Org Chart page.
If you no longer have permission to view a field as a result of changes to your permissions and constraints, then the field is no longer available to select and will no longer be visible on the Org Chart Preferences page.
Display User ID in Place of User Name
Select this option to display the user's user ID instead of their name.
Display OU Type ID in Place of OU Type
Select this option to display the OU type ID instead of the OU type.
Display Performance Review by Rating
This is a new field with this enhancement. This field enables you to determine how the performance rating displays, either as a text value or numeric equivalent.
By checking the Display Performance Review by Rating box, the performance review result will display as a numeric value rather than a text value.
Display Inactive Cards
This option enables the administrator to display inactive user cards for users who are inactive, on leave, or no longer with the organization. Administrators can enable one or more of these settings to manage how the image for these users appears on the Org Chart page. All settings are enabled by default.
The following options are available for inactivating user cards:
- Inactive managers with active subordinates - This option inactivates the user card for users who are set to "Inactive" on the user record but have direct reports who need to be reassigned.
- Active users who are on leave - This option inactivates the user card for users who are set to "On Leave" on the user record.
- Active users whose employment status is "terminated" - This option inactivates the user card for users who are set to "Terminated" on the user record.
At least one option must be selected when the Display inactive cards option is checked. When the Display inactive cards option is unchecked, the additional options are grayed out and not selectable.
Include Metrics for Inactive Cards
When checked, the large user card and flyout still display metrics (i.e., data for Performance, Succession, etc.) for users whose card is inactive on the org chart. When unchecked, the large user card and flyout do not display metrics for users whose card is inactive.
Overwrite Settings
Select this option to overwrite custom settings for child division OUs. If you overwrite custom settings for child division OUs, the selected settings are applied to both new and existing child OUs. Any previously customized child OUs are updated with the selected settings.
- If there are no customizations to the child OU, then the parent OU customizations are applied to all child OUs.
- Overwrite custom settings checkbox setting
- If this option is selected, all child OU customizations are deleted from the database, which means the parent OU customizations will be applied to new and existing child OUs.
- If this option is unselected, all existing child OU customizations will remain unchanged, and any new child OUs will inherit the parent OU customizations by default.
- If a child OU has been customized to display any widgets, then regardless of the parent OU customizations, the child OU customizations are applied.
- If a child OU has been customized to hide all widgets, then parent OU customizations will take precedence and will be applied.
Save/Cancel
Click to save the preferences. Click to cancel the changes to preferences.