Email Administration allows administrators to create and edit emails and associate these emails with pre-defined triggers. Email tags can be included in email templates, and they allow you to automatically substitute specific information, such as the user's name
- Emails are sent when an action occurs if they are based on a time frame.
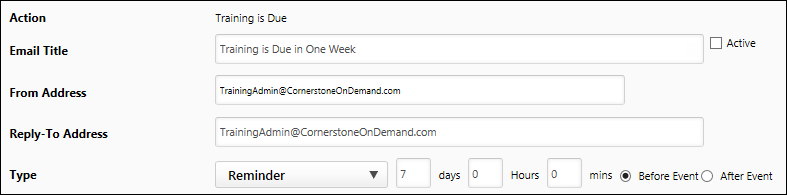
- If an email is based on a time frame, (Training is Due, Session Start Date, etc.) then the email is sent based on the event date of the activity.
- Example: If a session starts in three days at 8:30 am, the 3-day reminder will go out three days prior at 8:30 am.
- Example: If activity is an online course with a due date and a 3-day reminder email, the 3-day reminder will go out three days prior at midnight.
- For more information about configuring time-based (Reminder) emails, see the Type row in the Title and Email section of the Create New Email page. The Reminder bullet discusses how to configure such emails. See Email - Create.
To properly utilize Email Management, an organization's email server must be set up to accept TLS encrypted emails. If this is not done, users may not be able to receive the proper emails. If the server is not set up to accept TLS encrypted emails, contact Global Customer Support for assistance.
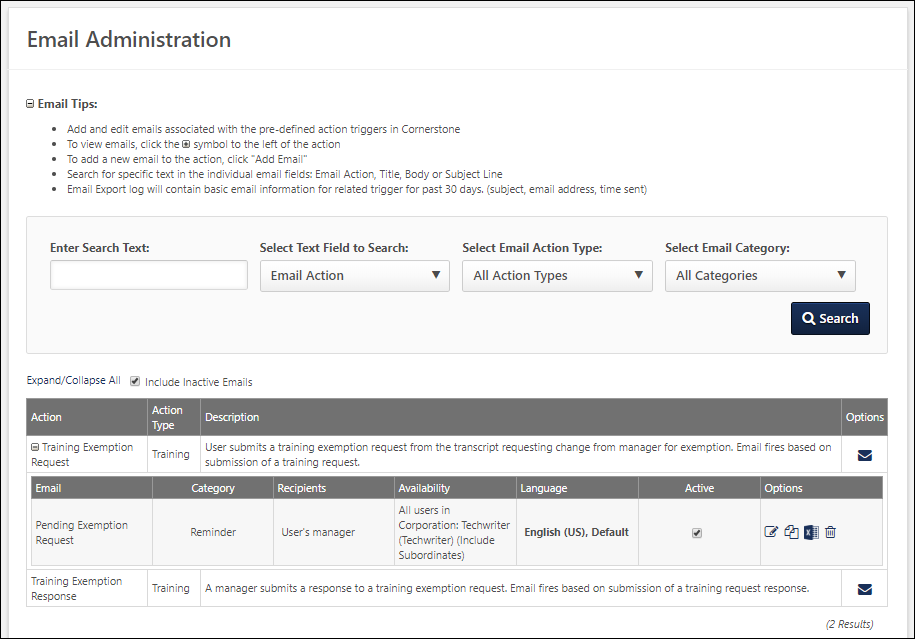
To access Email Administration, go to .
| PERMISSION NAME | PERMISSION DESCRIPTION | CATEGORY |
| Email - Edit From Address | Grants ability to edit the "from" address when creating or modifying an email trigger. In addition, the Allow user to change email address option must be selected in Email Preferences. This permission works in conjunction with the Global Email Administration - Manage permission. This is an administrator permission. | Core Administration |
| Email Preferences - Manage | Grants ability to manage Email Preferences, which includes defining end users' ability to change their email address and the associated email notifications when emails are changed. This is an administrator permission. | Core Administration |
| Emails by Learning Object - View | Grants access to view custom email triggers at the learning object level. When viewing Course Console, this permission also grants ability to view email triggers at the LO level. This permission works in conjunction with the Course Catalog - Update and Course Catalog - View permissions. This permission can be constrained by OU, User's OU, User's Self and Subordinates, and User. This is an administrator permission. | Learning - Administration |
| Global Email Administration - Manage | Grants ability to manage email trigger templates across all active modules in the portal. Enables creating, editing and deleting email message templates for various system actions and workflows. This permission can be constrained by OU, User's OU, User Self and Subordinates, and User. This is an administrator permission. | Core Administration |
| Global Email Administration - View | Grants view only access to email templates/triggers and email logs at the global level for the portal. This permission can be constrained by OU, User's OU, User Self and Subordinates, and User. This is an administrator permission. | Core Administration |
Email Triggers
This topic contains a list of all available email triggers and their descriptions: See Email Triggers.
Notes Regarding Email Modification
Modifications to an email trigger will not affect any emails that have already been queued to be sent, and only Reminder type emails will enter the email queue.
- Reminder Type: Before Event - These emails are added to the email queue at the time the object is associated with the user. For example, if a Reminder type email is configured to be sent two weeks before a learning object's due date, then that email is added to the queue when the user registers for the learning object (LO).
- Reminder Type: After Event - These emails are added to the email queue when the event occurs. For example, if a Reminder type email is configured to be sent two days after a LO's due date, then that email is added to the queue when that LO's due date has passed.
If an email is not a Reminder type email, then the email will not enter the email queue, and it will inherit the email configurations that are set at the time the email is triggered. For example, a Training is Completed - Confirmation type email will automatically be sent when a user completes their LO, and the email that is sent will match the configurations that exist at the time the email is triggered.
If an object is configured to use Custom Emails, then only emails that are configured specifically for that object are utilized. For example, LOs configured via the Course Catalog to use Custom Emails will only use emails as they are configured for the LO in Course Catalog. Another example is that performance review tasks that are configured in the Review Workflow step to use Custom Emails will only use emails as they are configured for the performance review task in the Review Workflow step. In both examples, administrators must manually enable each email they want to fire in the Custom Emails section.
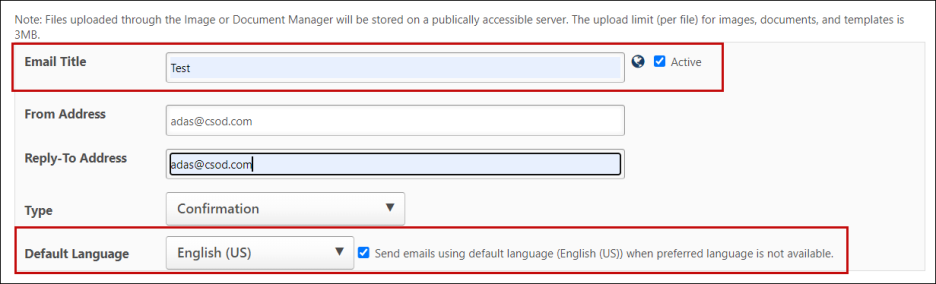
The administrators can now localize custom emails without having to set up and maintain custom email templates for every language active in a portal. Localize the email title, subject, and body or text by accessing the globe icon or through the language dropdown as in the standard or system email feature. The checkbox called which sends emails in the default language if no preferred language is set. The administrators can change the default language setting of a custom email via the language dropdown.
Search for an Email Trigger
Use the following search fields and filters to search for a specific email trigger:
- Enter Search Text - This search field enables you to search for an email trigger by email action, subject line, or body text. The search is performed based on which option is selected in the Select Text Field to Search drop-down menu. By default, the search is performed by Email Action.
- Select Text Field to Search - From the drop-down menu, select whether the search is conducted on email actions, subject lines, or email body.
- Email Action - Select this option to search the text of the email actions (i.e., the names of the email triggers).
- Email Subject Line - Select this option to search the text of the email subject lines in previously created emails.
- Email Body - Select this option to search the text of the email bodies associated with the previously created emails.
- Select Email Action Type - Select an action type from the drop-down menu to filter the email triggers by a specific action type. The action types represent email trigger groupings related to different areas of the system.
- Select Email Category - Select an email category from the drop-down menu to filter the email triggers by a specific category, such as Confirmation, Notification, Reminder, or Promotional.
View Email Triggers
Use the following options to control how email triggers are displayed on the page:
- Expand/Collapse All - Select this link to expand all triggers. When selected again, this collapses all triggers.
- Include Inactive Emails - Select this option to include inactive emails in search results.
- Expand
 - Select this icon next to an email action to view the existing emails associated with the action. This option is only available if the email trigger has at least one existing email configured.
Add Email Trigger
To add a new email, select the Add Email option ![]() in the Options column. See Email - Create.
in the Options column. See Email - Create.
Email Options
The following options may be available for an email trigger:
- Active - Select this option to make the email trigger active or inactive. When an email trigger is made inactive, a pop-up opens to confirm the action. This is intended to prevent the unintentional deactivation of emails.
- Edit
 - Select this icon to edit the existing email trigger.
 - Copy
 - Select this icon to copy the existing email trigger.
 - Export Log
 - Select this icon to export the email activity log for the email trigger. The email log is a basic Excel report showing to whom the email was sent for the last 30 days. See Email Export Log.
 - Delete
 - Select this icon to remove the existing email trigger.
See also: