From the Requisition Request page, reviewers can view requests and accept or decline the request. When accepting a request, a job requisition is created from the request. When declining a request, reviewers can enter comments to explain why the request is declined.
To access the accept/decline page, click the View Request icon ![]() in the Options column of the Submitted Requisition Requests page.
in the Options column of the Submitted Requisition Requests page.
| PERMISSION NAME | PERMISSION DESCRIPTION | CATEGORY |
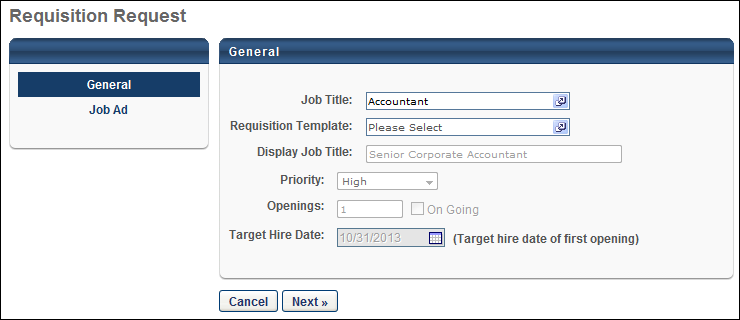
General
The General tab displays all fields that the hiring manager completed when creating the request. All fields except the Requisition Template field are read-only.
Note: The fields that are available for hiring managers to complete on a request are defined by the administrator in Requisition Request Preferences.
Requisition Template Field
The Requisition Template field always displays for reviewers, even if the field was not available for the hiring manager when creating the request. This field must be completed in order to accept the request.
If the field was completed by the hiring manager when creating the request, then the field displays the value selected by the hiring manager. The reviewer can change the value by selecting a different template.
If the field was not included by the administrator for requisition requests, then the field is blank for the reviewer. The reviewer must select a template in order to accept the request and create a requisition from the request. Once selected, the template does not update the fields on the request with the template values.
If a default requisition template is available, then the default template can be selected. Note: A default template must be defined for the recruiter's OU in order for a default template to be available to select. In addition, the Default Requisition Template link only displays in the Select Requisition Template pop-up if the Default Requisition Template option is selected by the administrator in Requisition and Applicant Preferences.
The Requisition Template field is not required to complete when declining a request.
Job Ad
The Job Ad tab only displays if the tab is included on requisition requests by the administrator. The tab displays the job ad that the hiring manager created for the request.
Next
If the Job Ad tab was included by the administrator for requisition requests, then the button displays at the bottom of the General tab. Click to navigate to the Job Ad tab to decline the request.
The button does not display if the General tab is the only tab that displays for the request.
Cancel
Click to return to the Requisition Requests page without accepting or declining the request.
Decline Request
If the Job Ad tab was not included by the administrator for requisition requests, then the button displays at the bottom of the General tab. If the Job Ad tab displays for the request, then the reviewer must navigate to the Job Ad tab to decline the request.
To decline a requisition request:
- Click . This opens the Decline Request pop-up.
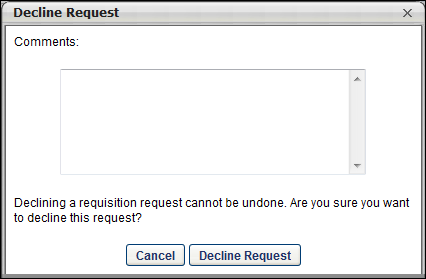
- Enter comments in the Comments box, up to 2000 characters. This is not a required field. Note: Comments are visible to the requester.
- Click . This places the request in a Declined status, which cannot be reversed.
- Click to cancel the decline action.
Declining a request triggers the Requisition Request Response email, if configured by the administrator.
Create Requisition (Accept Request)
If the Job Ad tab was not included by the administrator for requisition requests, then the button displays at the bottom of the General tab. If the Job Ad tab displays for the request, then the reviewer must navigate to the Job Ad tab to accept the request. Accepting a request automatically creates a job requisition from the request.
To accept a request, click . This opens the General tab of the Create Requisition page. All completed fields from the request populate on the requisition. The Requisition Template field can be modified. If a different template is selected, then the template updates all fields on the requisition, per current functionality. All values from the requisition request are lost and cannot be recovered.
The reviewer can modify all fields and tabs on the requisition in order to create a completed job requisition. Once all fields are completed, the reviewer can submit the requisition from the External Postings tab.
Or, the reviewer can choose to save the requisition without submitting it, per existing functionality. See Job Requisition - Overview.
Submitting or saving the requisition updates the request status to Accepted. A requisition ID is automatically generated and displays in the Requisition ID column on the Requisition Requests page. Accepting a request triggers the Requisition Request Response email, if configured by the administrator.