The Create Onboarding Workflow page allows administrators to create onboarding workflows. The workflows can be created for new hires who are just entering the organization, or they can be created for internal employees who are starting a different role. The workflows help employees acclimate to the company and their position. They can also include forms created from the Form Management functionality. Such forms may be needed for Human Resources, IT Security, or other departments that are part of the employee onboarding process.
To access the Create Onboarding Workflow page, click the button on the Onboarding Workflows page.
| PERMISSION NAME | PERMISSION DESCRIPTION | CATEGORY |
| Onboarding Workflows - Manage | Grants ability to access and manage Onboarding Workflows. This permission cannot be constrained. This is an administrator permission. | Employee Onboarding - Administration |
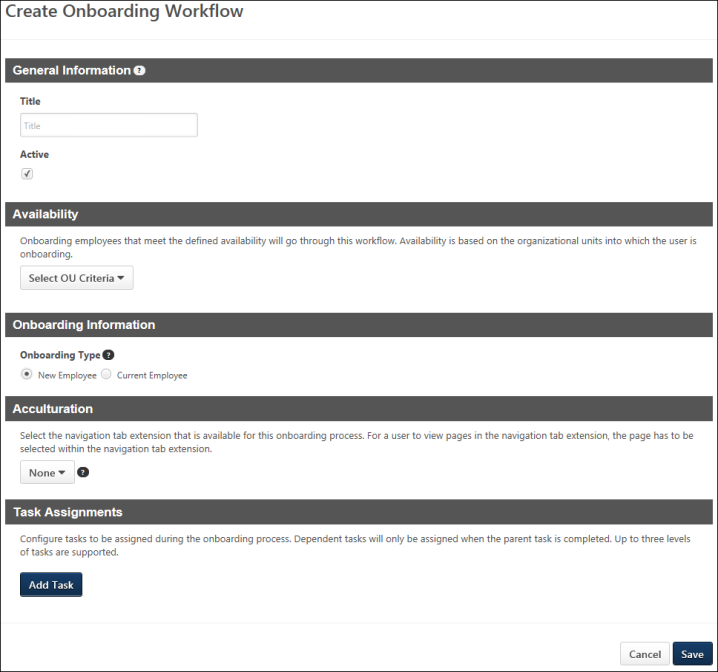
General Information
Complete the following fields in this section:
- Title - Enter a title for the workflow, up to 100 characters. This is a required field.
- Active - Define the active status for the workflow. Workflows are active by default. Uncheck the box to inactivate the workflow.
Availability
In the Availability section, administrators are required to define the organizational units (OUs) and/or users who will complete the workflow. If the workflow is defined in the Onboarding Information section as an internal-to-internal workflow, then employees who are moving from one role in the organization to another role will go through the workflow when onboarding. If the workflow is defined in the Onboarding Information section as an external-to-internal workflow, then external candidates who have been hired will go through the workflow.
To define the availability, select one or more OUs and/or users from the drop-down. The Include Subordinates box is checked by default. Unchecking the option does not include subordinate OUs or users.
Onboarding Information
In the Onboarding Information section, define the type of workflow. The following options are available:
- New Employee - Prior to migration, this option was named "External-to-internal" and allowed administrators to select temporary OUs for external candidates who were hired from outside the organization and are being onboarded to an internal position. After migration, selecting this option will create an onboarding workflow for external-to-internal onboarding.
- Current Employee - Prior to migration, this option was named "Internal-to-internal" and allowed administrators to select temporary OUs for users who were onboarding from one internal position to another. After migration, selecting this option will create an onboarding workflow for internal-to-internal onboarding.
Note: Preboarding OUs are configured on the Create Preboarding Organizational Unit Configuration page.
Acculturation
In the Acculturation section, select the navigation tab that will be available for the onboarding workflow. In order to add a navigation tab, at least one navigation tab has to be created already in Navigation Tabs and Links Extensions. This section is not required.
To select the tab, click the drop-down and select from one of the available tabs.
Note: The purpose of creating navigation tabs and links extensions for Onboarding is to provide onboarding employees with a dedicated space in your portal where the new employees can have quick access to important onboarding information and actions. For example, you can include a custom Welcome page, as well as links to key system pages, such as Universal Profile and Browse for Training. You can also include a link directly to the new employee's transcript, depending on the products that have been enabled in your portal.
Task Assignments
In the Task Assignments section, administrators can add tasks that will b e assigned to the employees on the date the onboarding workflow starts. Both form and integration tasks can be added.
Add Task
To add a task:
- Click . This opens the task carousel.
- Select Form Task from the carousel. This opens the Select Form Task pop-up.
- Select the form task from the pop-up. The tasks that display are onboarding task types for which the administrator meets the availability criteria. The filter options can be used to search for tasks. Task Availability Note: The form tasks that are available to select in the pop-up are the tasks that are within the administrator's permission constraints for the permission needed to access the Form Task Administration page. Form tasks that are not within the administrator's permission constraints are not available to select in the pop-up.
- Selecting the task adds the task to the Task Assignments section.
Once the task is added, the following additional options are available prior to saving the task to the workflow:
Edit Task Selection
Click the Edit option in the options drop-down in the upper-right corner of the Task section. This opens the Select Form Task pop-up, allowing the administrator to select a different task before saving the task to the workflow.
Assignment Criteria
The Select Assignment option in the Assignment Criteria section is a required field. This option allows the administrator to select the role to which the task will be assigned. The following roles are available to select:
- Onboarding Employee
- Manager
- Cost Center Approver
- [Custom Relationship(s)] - Note: This functionality is only available for portals that have enabled the Performance module.
Date Criteria
In this section, administrators determine when the onboarding task begins for the employee. The following options are available:
- Onboarding Launch Date - Select this option to assign the task on the date the employee launches the onboarding workflow. This option is selected by default.
- Start Date - Select this option to assign the task on the employee's start date of employment.
- Relative Date - Select this option to assign the task on a certain number of days before or after the employee's start date of employment. When selected, options display that require the administrator to define the number of days before or after the employee's start date that the task will be assigned. Enter the number of days in the Day(s) numeric text box, from 1 to 200. Then select the Before or the After option from the drop-down to define the task assignment date relative to the start date.
The Onboarding Form Assigned email is triggered on the task assignment date. The start date selected populates the TASK.START.DATE tag in the email, provided that the tag is used in the email.
The Assignment Date section does not display when configuring dependent tasks.
In this section, administrators determine when the onboarding task is due. The due date for parent tasks must be after the assignment date. The due date for dependent tasks must be after the parent task due date.
The following options are available:
- Start Date - Select this option for the task to be due on the employee's start date of employment. This option is selected by default.
- Relative Date - Select this option for the task to be due on a certain number of days before or after the employee's start date of employment. When selected, options display that require the administrator to define the number of days before or after the employee's start date that the task will be due. Enter the number of days in the Day(s) numeric text box, from 1 to 200. Then select the Before or the After option from the drop-down to define the task due date relative to the start date.
The Onboarding Form Assigned email is triggered on the task due date. The due date selected populates the TASK.DUE.DATE tag in the email, provided that the tag is used in the email.
Save Task/Add Additional Task
The task must be saved to the workflow. Click to save the task to the workflow.
Additional tasks can be added by clicking the button and configuring the tasks.
Task Options
Once the task is saved, an options drop-down is available for the task to enable the administrator to further manage the task. The following options are available:
- Add Dependent Task - Dependent tasks can be added to the first and second level tasks for a workflow. To add a dependent task, click Add Dependent Task from the options drop-down. This opens the Select Form Task pop-up. The available Onboarding task types display in the pop-up. Selecting a task from the pop-up adds the dependent task to the parent task. When the task is added, configure the assignment criteria, and then click . Note: A dependent task can be the same task as the parent task.
- Edit - Click Edit to change the task or select a different assignee.
- Copy - Click Copy to copy the task. Both the task and assignee are copied.
- Delete - Click Delete to delete the task. This opens a confirmation pop-up. Click to delete the task, or click to cancel the delete action. The task and dependent relationships are removed. The delete action cannot be undone.
Dependent Task Options
The same options drop-down that is available for parent tasks is available for dependent tasks. However, the Add Dependent Task option is only available for the first and second level tasks.
The Integration task option displays in the Task Assignments section. This option allows administrators to include integration tasks in the onboarding workflow. The option only appears if there is at least one integration available for onboarding workflows. Note: The availability of integrations for onboarding workflows is defined by the administration on the Recruiting and Onboarding Integrations page.
To add an integration task:
- Click the button. This enables the task options to display below the button. Note: Click to close the task options.
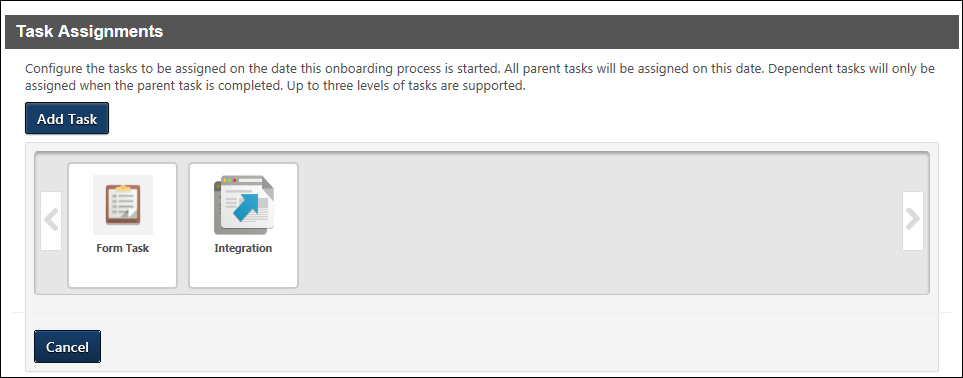
- Select the Integration option. This opens the Select Integration pop-up.
![]()
- Complete the following fields in the Select Integration pop-up:
- Task Title - Enter a title for the task, up to 50 characters. The title appears to task recipients. This is a required field.
- Integration Provider - Select the integration provider from the drop-down. The drop-down lists all available integration providers for onboarding workflows, as defined by the administrator in Recruiting and Onboarding Integrations. This is a required field.
- Click to add the task to the workflow. Or, click to cancel adding the task.
When the task is added to the workflow, the Task Assignments section is updated to display the task and include an option to edit the task details and configure the assignment criteria.
Electronic W-4 Form Tasks
Electronic W-4 Form tasks can be added to onboarding workflows for portals with an active integration with CIC Plus. The W-4 Form task can be added to the workflow by selecting the task from the Task Assignments section.
When saving the Task Assignments section, the W-4 Form task can only be saved if the CIC Plus integration is active. If the integration is not active, then an error message display indicating that the task is not available to be added to the workflow.
Edit Task
Once the integration task is added to the workflow, the task title and integration provider can be modified by clicking the Edit link in the options drop-down, which displays in the upper-right corner of the Integration section.
Assignment Criteria
Complete the following fields in this section:
- Select Assignee - Select the user to whom the task is being assigned. The options that are available to select are the custom relationships defined on the user record. By default, Onboarding Employee is selected as the assignee.
- Select Employer - Define the user who will act as the employer representative for completing Section 2 of the I-9 form. Enter a full or partial name in the field. Predictive search displays a list of matching names. Or, click the Select icon
 to open the Select a user pop-up and search for a user from the pop-up. Note: The Select Employer option is hidden for CIC Plus integrations.
Save/Cancel Task
Once the task is added and configured, click to save the task to the workflow. Or, click to cancel adding the task to the workflow.
Edit/Delete Saved Task
Once the task is saved to the workflow, the task details can be modified. The task can also be deleted.
Select the Edit option in the options drop-down to edit the task details. The task title, integration provider, assignee, and employer can be modified.
Select the Delete option in the options drop-down to delete the task. This opens a confirmation pop-up. Select to delete the task, or select to cancel the delete action.
Save/Cancel Workflow
Click to save the workflow. Note: If a task has not been saved to the workflow, the workflow cannot be saved.
Click to cancel creating, editing, or copying the workflow.