Create Playlists
To create a new playlist, go to: and click the button. To only edit a playlist, click a playlist's title.
Important: Learner Home must be enabled in the portal in order for playlists and external content functionality to be available.
| PERMISSION NAME | PERMISSION DESCRIPTION | CATEGORY |
| Course Catalog - View |
Grants access to view the learning objects in the course catalog and enables administrators to view the Course Console and the Popular Requests and Highest Rated widgets on the Learning Admin Console (in conjunction with the Learning Admin Console - View permission). This permission can be constrained by OU, User's OU, Training Type, Training Item, Provider, ILT Provider, User's ILT Provider, and User's LO Availability. This is an administrator permission. Adding an OU constraint and a provider constraint to this permission results in an "AND" statement. |
Learning - Administration |
| Playlists - Create | Grants ability to create private Learning Playlists. This permission cannot be constrained. This is an end user permission. | Learning - Administration |
| Playlists - View | Playlists will be visible to users with this permission. The user can search for playlists, follow playlists, and consume training contained within playlists that are available to them. The learning playlists that are visible to a user are not impacted by this permission, but instead is based on the availability of the playlist. This permission cannot be constrained. This is an end user permission. | Learning - Administration |
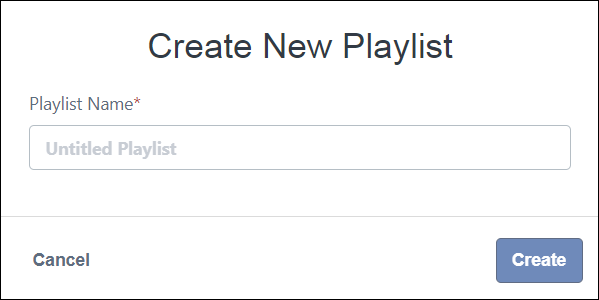
Create New Playlist
To begin, first enter the playlist name into the Playlist Name field in the Create New Playlist pop-up window. Then, click the button to move on to the next step. If you wish to leave the playlist creation process without creating a playlist, click the Cancel link instead.
Create Playlist
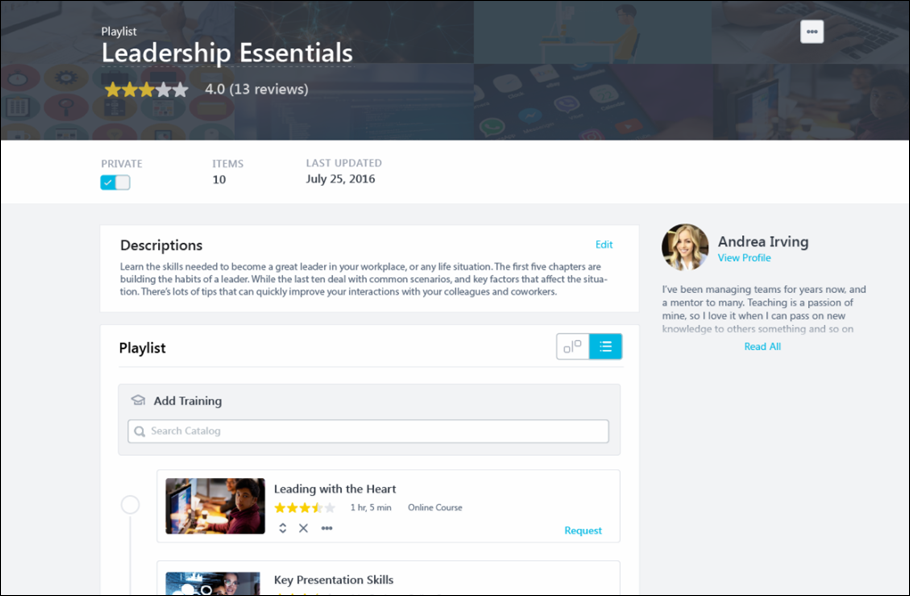
The Create Playlist page allows users to design a playlist of training items which can, if configured, be accessed by other users. The following information and features display on the page:
- Banner - When training items have been added to the playlist, the playlist banner is automatically comprised of thumbnail images from the selected training. If no training has been added yet, the banner is solid black. A maximum of eight images can be included in the banner.
- Title - By default, a new playlist's title is "Untitled Playlist." To provide another title for the playlist, click the title field and enter the desired text in the pop-up window that appears. Once finished entering the new title, click the button. To discard any text you have entered, you can click the Cancel link.
- Options - The Options button in the upper-right corner of the page provides access to the following options:
- View as Administrator - Click this option to view the playlist learning object (LO) in edit mode via the Course Console.
- Delete - Click this option to delete the playlist. Once deleted, the playlist is removed from the Course Catalog and is no longer available in the system.
- View as Administrator - Click this option to view the playlist learning object (LO) in edit mode via the Course Console.
- Privacy Switch - This toggle switch allows users
- Items - This field displays the total number of training items contained within the playlist. All training items added to the playlist are included in this figure, including items that are active, inactive, available, and unavailable.
- Last Updated - This field displays the last date the playlist was modified.
- Description - To add a description to the playlist, click the Edit link in the Description section. Then, enter your description into the text box that appears. Provide context for the training contained within the playlist so users understand the playlist's objective. When finished adding the description, click away from the text box. This field is limited to 4000 characters.
- Creator Information - The following information about the playlist creator displays:
- Profile photo - This photo is the system profile photo uploaded for the user via My Account.
- User name - This is the name of the playlist creator, as provided by the user record.
- View Profile - Users can click this link to view the playlist creator's Universal Profile.
- Bio - This is the bio information the user has provided about themselves via their Universal Profile. Click the Read All link to read the entire bio. If no content is available for this field, the Bio does not display.
- Playlist - In this section, you can add training to the playlist and configure the playlist layout. See the Playlist Structure section below for information about building the structure of a playlist.
![]()
Playlist Structure
Users can add training to the playlist and decide how the selected training displays to learners using this section by dragging and dropping the learning object (LO) tiles.
Playlist View
Users can select from two layouts when viewing a playlist structure:
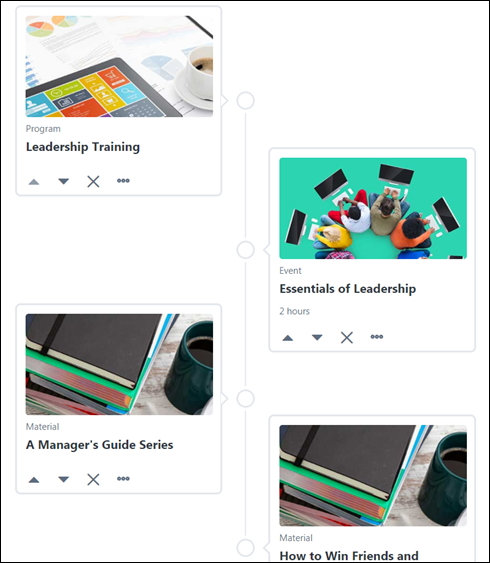
- Timeline View - When selected, the training items added to the playlist display on two sides of a center line.
- List View - When selected, the training items added to the playlist display in a simple list format.
Playlist creators can choose a view when creating the playlist, and learners can choose a view when accessing a playlist.
Add Training
Playlists can be comprised of both internal and external content. You can either add internal system learning objects (LOs) or you can add external content from outside the system.
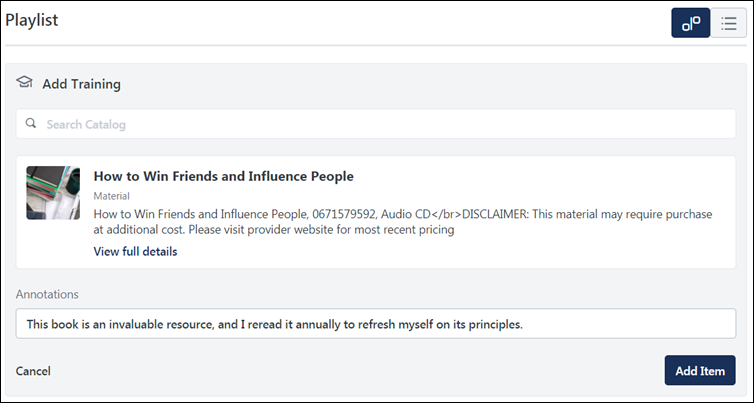
Add From Catalog
To add an LO from the system to the playlist structure, ensure the Add From Catalog tab is selected, and then:
- Enter search terms into the Search bar to find training you would like to add to the playlist. Predictive search results appear under the Search bar as you enter text. Each predictive search result displays the following information about each training item:
- Title
- Training Type
- Description Preview (limited to one line of text)
- If the item you wish to add appears in the predictive results, click the item. If you do not see the item in the predictive results, click the Search Catalog link to open the Learning Search page in another window and use the provided filters to find the training item. Then you can return to the Create Playlist page and search for the correct training item by title. A user can also add the training directly from Learning Search. See Learner Home - Playlists.
- After clicking the training item from the predictive results, the training tile for the item displays the item's title and description. Clicking the title allows you to open the Training Details page for the training in a new window. If desired, enter annotations for the training item in the Annotations field, explaining the value of the training. The Annotations field is limited to 300 characters.
- Click the button to add the training to the playlist structure. If needed, you can click the Cancel link to discard the training item instead. After the training has been added to the playlist, it displays as a training tile in the playlist's structure.
- Continue adding up to twenty total items, using the same process. Note: If a training item in a playlist is NOT on a user's transcript, the playlist displays the latest version of the training item to them. If a training item in a playlist IS on a user's transcript, the playlist displays the version of the training that the user already has.
Note: Learners can only see training in a playlist if they meet the availability criteria for the training items.
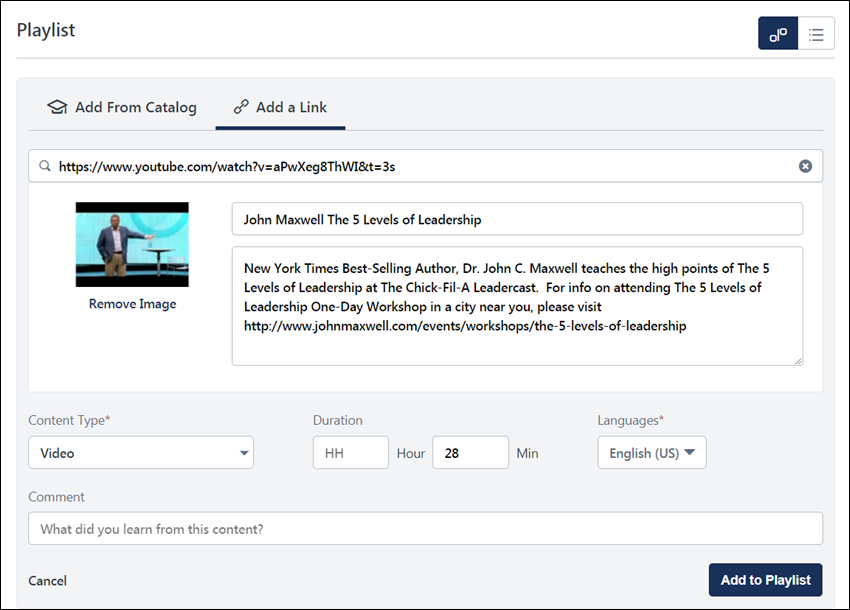
Add a Link
To add training from outside the system to the playlist in the form of external content, select the Add a Link tab. You can then provide a link for the training item and provide information for it. See External Content - Create.
Training Tiles
Each training item added to the playlist structure displays as a tile. Each tile provides the following information and options:
- Thumbnail Image - The thumbnail image configured for the training via Course Catalog displays at the top of the training tile.
- Training Type - This is the learning object (LO) type of the training, such as online course, curriculum, event, etc.
- Title - This is the title of the training item.
- Status - If the training is already on the playlist creator's transcript, the current status for the training displays.
- Options - The following options are available for each training tile:
- Move Training Up - Click this icon to move the training higher in the playlist structure.
- Move Training Down - Click this icon to move the training lower in the playlist structure.
- Delete - Click this icon to remove the training item from the playlist structure.
- Actions - The following additional actions may be available for training items:
Primary Transcript Action - The Actions drop-down provides quick access to the current primary action on the user’s transcript for the specific training item. For example, if the current action for the training on the user's transcript is Launch, a Launch link displays.
- Secondary Transcript Actions - Any other available transcript actions available to the user for the training item appear in the Actions drop-down menu and allow the user to perform the associated action on the training.
- Add Annotation - Click this option to provide or edit the annotation for the training item. Annotations are limited to 300 characters.
- Save for Later - Click the option to save the training item for later. The item is saved to the Saved for Later carousel on Learner Home. See Learner Home - Training and Banner Carousels.
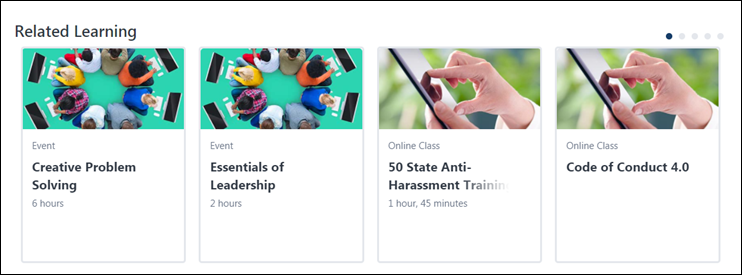
Related Learning
Below the playlist structure, a carousel of additional training recommendations displays, which can help the playlist creator discover additional training to add to the playlist. See Playlist Details.
Save
Playlists are saved automatically upon creation, so it is not necessary to save manually. When a new playlist is created, an LO ID is automatically generated for the playlist, and the playlist is added to the Course Catalog as a learning object. Administrators can access the Course Console page for the playlist and view the playlist as a learner.