Badges are a form of employee recognition awarded when a user receives positive feedback or when a user completes training. Badges may have an associated point value. Based on portal configuration, you may be able to view badges through a widget on the Universal Profile - Snapshot page.
Note: Badges can only be edited from the division in which they are created. For example, if you create a badge for the California division, the Edit option will only be available for that badge when you access the California division's Badge and Point Preferences. If you access the Los Angeles division's Badge and Point Preferences, the badge that was created for the California division is NOT editable. Either return to the division where the badge was created, or copy the badge to the child division and edit the copy.
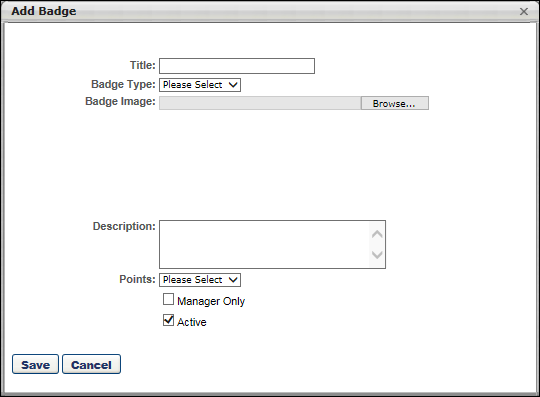
To add a new badge, click the Add Badge link on the Badge Preferences page.
| PERMISSION NAME | PERMISSION DESCRIPTION | CATEGORY |

To add/edit a badge:
- Complete or edit the following fields:
- Title - The purpose of the badge. When editing a badge, modifications to the badge title are reflected on the Training Completion page and Snapshot: Badges sub-page for users who have already completed training and earned the badge. 50 characters maximum.
- Badge Type - The purpose of the badge. This will determine in which scenarios the badge can be awarded. When editing a badge, you cannot modify the badge type. Options are:
- Badge Image - The image that represents the badge. Click the button to select an image file. When uploading an image file, the character limit for the file name is 91. When editing a badge, modifications to the badge image are reflected on the Training Completion page and Snapshot: Badges sub-page for users who have already completed training and earned the badge. For badge images, the acceptable file types are .png, .jpeg, and .gif. Badge images should be square with a recommended size of 100 x 100 pixels. To have a square badge image display properly on the My Badges page, use a 66 x 66 pixel image centered on a white square that is 100 x 100 pixels.
- Description - The description of the badge, up to 150 characters. This should describe the purpose of the badge in detail. When editing an existing badge, changes to this field are applied to all past instances of this badge.
- Points - The point value associated with the badge. A user's badge points are visible on the Universal Profile Snapshot page and on the Points Leaderboard. When editing an existing badge, changes to this field are only applied to future instances of this badge. The points that are associated with badges already awarded will not be changed.
- Manager Only - Whether the badge is only available to be awarded by managers. When this option is selected, only direct or indirect managers are able to award this badge, and they can only award it to their direct or indirect reports. When editing an existing badge, changes to this field are only applied to future instances of this badge. This option is only available when the Badge Type is set to Feedback.
- Active - Whether the badge is active. When editing an existing badge, changes to this field are only applied to future instances of this badge. See the Deleting or Deactivating Badges section of the Badge & Point Preferences - Badges topic for additional information. See Badge & Point Preferences - Badges.
- Click .
After a badge is created, it is awarded to a user via the Universal Profile: Feedback page. You can also associate it with a learning object (LO) so that it is automatically awarded when a user completes the associated LO.