Requisition and Applicant Preferences - Requisition Custom Fields
Note: Inserting tags into modular offer letters requires additional configuration. See Custom Field Admin - Offer Letter.
To access Requisition and Applicant Preferences, go to .
| PERMISSION NAME | PERMISSION DESCRIPTION | CATEGORY |
| Requisition Preferences - Manage |
Grants ability to access and manage Requisition and Applicant Preferences. This permission cannot be constrained. Note: Users with the Requisition: Manage permission will not be affected by Field Level Access settings. |
Recruiting Administration |
Add Custom Field
To add an OU custom field:
- Click the Add icon
 . This opens the Select Requisition Custom Field pop-up. The pop-up displays all "Position" OU Type custom fields that are available to you. If a custom field has already been selected, it does not display in the pop-up. You can also narrow the list by using the keyword search option.
 - Click the name of the custom field. This adds the custom field and closes the pop-up.
Create Custom Field
You can create a new custom field from within the Select Requisition Custom Field pop-up. To create a new custom field, click in the pop-up. This opens the Custom Field Administration > Organizational Units > Define Field page. See Custom Field Admin - Organizational Units.

Reorder Fields
You can reorder the fields by dragging and dropping them to the desired position. If the fields are not reordered, they display on the job requisition template or job requisition in the order in which they are added to Requisition Preferences.
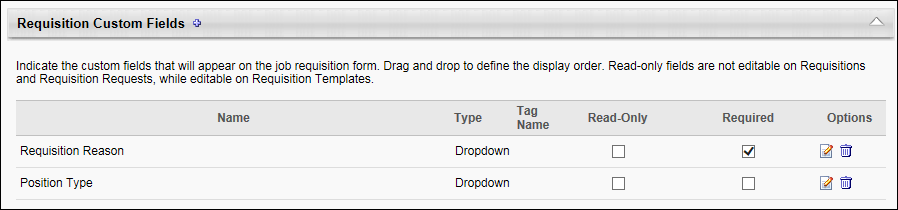
Requisition Custom Fields Table
The following columns display in the Requisition Custom Fields table:
- Name - The name of the custom field.
- Type - The value selected in the Type field in OU Custom Field Administration.
- Tag Name - This column displays the tag for the custom field. Requisition custom fields are not available as tags in offer letters, job ads, and Recruiting emails unless a tag name is defined. All tag names automatically begin with CUSTOM., which cannot be modified. Adding a tag for custom fields is not required. Each tag name must be unique. Requisition custom field tags are not available in modular offer letters. Custom fields must first be configured in Custom Field Administration.
- Read-Only - This field is unchecked by default. When unchecked, the requisition custom field can be modified when used in a requisition. When checked, the field cannot be modified when creating and editing job requisitions and requisition requests. Note: Even if the custom field is defined as read-only, the value in the field can still be modified when configuring requisition templates and default requisition templates.
- Required - The box in the Required column is checked by default. Unchecking the box makes the field optional, but the field still displays on the General step when creating/editing a job requisition template or job requisition.
- Options - The following options display in the Options column:
- Edit - Click the Edit icon
 to add or edit the tag name.
- Add Tag Name - If the custom field does not yet have a tag name, then clicking the Edit icon opens the Edit Tag Name pop-up. The Name field displays the name of the custom field.
- Edit Tag Name - If the custom field already has a tag name, then clicking the Edit icon opens a warning pop-up that indicates editing the tag name affects all areas in which the tag is currently used. Click to cancel the edit action and close the pop-up.
To add a tag, enter the tag name in the Email Tag field, up to 50 characters. The tag must be entered in all capital letters, with a period after each word except the last word. The field accepts all characters.
Once the tag is entered, click . This adds the tag to the Tag Name column, with "CUSTOM." at the beginning of the tag. Then, click to save the tag to the Requisition Preferences page.
Click to edit the tag name. This opens the Edit Tag Name pop-up. Enter the changes in the Email Tag field. Once the changes are entered, click . This updates the tag in the Tag Name column. Then, click to save the update to the Requisition Preferences page.
Note: When changes are made to a requisition custom field tag name in Custom Field Administration, the system does not automatically update the tag name in areas of the system where the tag is being used. The tag name must be manually updated to the new tag name in all places in which the tag appears.
- Delete - The Delete icon
 displays if the custom field has never been selected on a job a requisition template. Deleting a custom field removes it from all existing requisition templates.
- Edit - Click the Edit icon