The Sessions section enables administrators to add and manage sessions for the event. From this section, administrators can also add session parts when adding a session. At least one session must be added in order for the interview event to be available to select when inviting applicants to the event from the Applicant Profile page or the Manage Applicants page.
To create an interview event, go to . Then, click the Create New Event link on the Interview Events & Sessions page.
| PERMISSION NAME | PERMISSION DESCRIPTION | CATEGORY |

Filter Options
Use the following filter options to filter the results in the Sessions table:
- Interviewer - This option filters the results based on whether or not an interviewer has been defined for the session part. The following options are available for this filter:
- All Interviewer(s) - This option is selected by default. This option displays all session parts, regardless of whether or not an interviewer is scheduled for the part.
- [Interviewer Name] - If at least one user has been added as an interviewer to a session part, the user's name displays in the drop-down. Select an interviewer to search for parts for which the user is defined as an interviewer.
- Undefined - Select this option to search for parts for which an interviewer is not yet defined.
- Scheduling Status - The following scheduling status options are available:
- All Scheduling Statuses - This option is selected by default. This option displays sessions with any scheduling status.
- Scheduled - This option displays parts for which at least one applicant is scheduled.
- Not Scheduled - This option displays parts for which no applicants are scheduled.
Once the filters are defined, click . The Sessions table updates with the matching results.
Add Session
Click the Add Session link to add a session to the event. This opens the Session Details page, which also enables administrators to configure session parts. See Create Interview Event - Add Sessions.
Note: Sessions cannot be added until the required fields are completed in the Event Details and Availability sections. Sessions can be added to ongoing events.
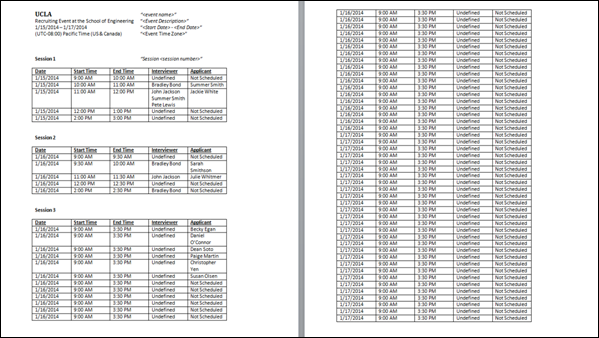
Click the Print icon ![]() in the upper-right corner above the Sessions table to print the session and session part information. The print preview opens, showing the information in the Event Details section, as well as a grid displaying all of the sessions and each of their parts. The interviewers who are associated with the session part are included in the printable version, as well as the applicants who have been scheduled for the part.
in the upper-right corner above the Sessions table to print the session and session part information. The print preview opens, showing the information in the Event Details section, as well as a grid displaying all of the sessions and each of their parts. The interviewers who are associated with the session part are included in the printable version, as well as the applicants who have been scheduled for the part.
The availability information does not display on the printable version.
The Print option is available even if the event has not yet been saved.
Sessions Table
The sessions table displays all sessions configured for the event. If session parts are configured for the session, then the parts also display.
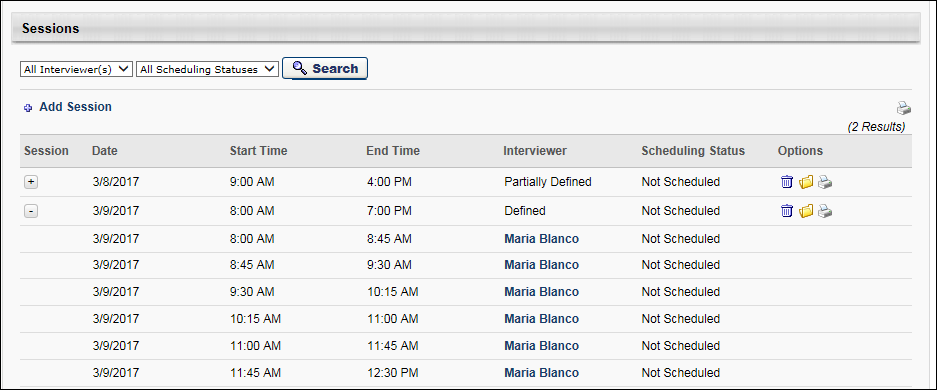
The following information displays in the table:
Session
This column lists the system-defined session number. This number is defined when the session is created. This column is not sortable.
An Expand/Collapse icon displays to the left of session numbers to view the list of parts for the session. Note: The session number only displays for the first session part row. The number does not appear in the column for other parts in the session.
If "Blank" displays in the Session column, this indicates that the session has not yet been saved to the event. Once the session is saved, a session number will be generated automatically for the session.
Date
This column displays the session part start date in MM/DD/YYYY format. This column is not sortable.
Start Time
This column displays the session or session part start time. The time displays in the time zone defined for the event. This column is not sortable.
The start time in the first row of a session is the start time of the actual session. For subsequent rows of the session, this column displays the start time of the part.
End Time
This column displays the session or session part end time. The time displays in the time zone defined for the event. This column is not sortable.
The end time in the first row of a session is the end time of the actual session. For subsequent rows of the session, this column displays the end time of the part.
Interviewer
This column indicates whether or not interviewers are defined for a session and the session parts. The following values display:
- Defined - This indicates that interviewers have been defined for all of the session parts but the interviewer names vary.
- [Interviewer Name] - The interviewer's name displays in this column if an interviewer has been defined for the session part. Hovering over the interviewer's name opens an information pop-up that displays the interviewer's image if available, name, position, phone number, and a linked email address. Click the email link to email the interviewer from your organization's email provider.
- Partially Defined - This displays if an interviewer has been defined for any of the session parts but not all parts have an interviewer defined.
- Undefined - In the session row, this displays for sessions for which an interviewer has not been defined for any of the session parts. In the session part rows, this displays for parts for which an interviewer has not been defined.
Scheduling Status
This column indicates whether or not applicants have been scheduled for the session and session parts. The following values display:
- [Applicant Name] - If an applicant has been scheduled for the session part, this column displays the applicant's name. The name displays as a link. Clicking the link opens the Applicant Profile page.
- Not Scheduled - In the session row, this displays for sessions for which an applicant has not been scheduled for the session parts. In the session part rows, this displays for session parts for which an applicant has not been scheduled.
- Partially Scheduled - This only displays in the session row. This displays if applicants have been scheduled for some of the session parts but not all of the parts.
- Scheduled - This only displays in the session row. This displays if applicants have been scheduled for all of the session parts.
Options
The options in the Options column only display for the session row. They do not display for the session parts.
- Delete - Click the Trash Can icon to delete the session. This opens a confirmation pop-up. Click to delete the session, or click to cancel the delete action. Deleting a session also deletes all of the session's parts. If an interviewer has been scheduled for the session part, the part no longer displays in the interviewer's interview dashboard on the Interview Manager page.
- Open - Click the Open icon to open the Session Details page for the session.
- Print - Click the Print icon to print the event details along with the details for single session and its parts. The print preview opens, showing the information in the Event Details section, as well as a grid displaying the session and its parts. The interviewers who are associated with the session parts are included in the printable version, as well as the applicants who have been scheduled for the parts. The availability information does not display on the printable version. The Print option is available even if the event has not yet been saved.
Save/Cancel
Once the required settings in each section are completed for the interview event, click to save the event.
Click to cancel creating, copying, or editing the event.