Applicant Review Tab - Offer Letter Status Type
The panel for the default status type of Offer Letter enables administrators to select the offer letter template and define the approval workflow that will display on the Applicant Review tab for the status type when creating or editing a job requisition.
The status panel of the type Offer Letter on the Applicant Review tab displays the name of the status as the panel heading. The status type of Offer Letter displays in parentheses to the right of the status name. This panel is expanded by default.
Status change emails can be configured for the Offer Letter status type panel. See Status Change Emails.
Note: If the panel was configured for the template selected on the General tab for the requisition, then the default configurations display in the panel on the Applicant Review tab.
Note: When editing the panel, the changes do not impact applicants that are currently in the status.
To access Manage Job Requisitions, go to Recruit > Manage Requisitions.
| PERMISSION NAME | PERMISSION DESCRIPTION | CATEGORY |
| Requisition: Edit Applicant Review | Grants ability to edit the Applicant Review tab of the Edit Requisition page. This permission cannot be constrained. | Recruiting |
Note: The permission to review or approve a job requisition grants users view access to the requisition.
Note: For users with permission to access job requisitions but who do not have permission to edit the Applicant Review tab, the tab is visible but cannot be modified.
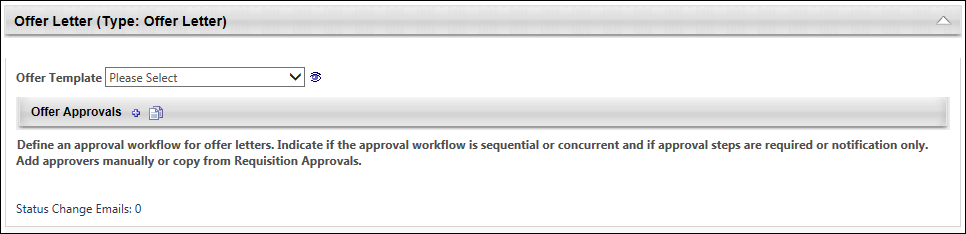
Offer Template
Select a template from the Offer Template drop-down. The offer letter templates that are available to select are the templates that have been configured for the Location Organizational Unit (OU) selected in the Location field on the General tab. Templates by OU are defined by the administrator when configuring offer letter templates.
To preview the template, click the Preview icon ![]() to the right of the Offer Template field. Within the preview, click the PDF icon
to the right of the Offer Template field. Within the preview, click the PDF icon ![]() to view the letter in Adobe Acrobat®.
to view the letter in Adobe Acrobat®.
Selecting a template is not required. If a template is selected, then any changes made to the offer letter settings on the job requisition are not changed on the requisition template.
Note: The Preview icon only displays after an offer letter template is selected.
Note: If tags are used in the template, the tags appear in preview mode as tags because the template is not connected to a position or candidate.
Offer Approvals
The Offer Approvals panel enables administrators to define an approval workflow for the offer letter. Defining an approval workflow is not required. If an approval workflow is defined on the template, then a default approval workflow appears in the Offer Approvals panel.
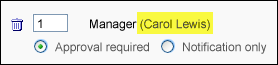
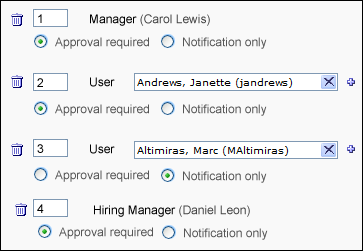
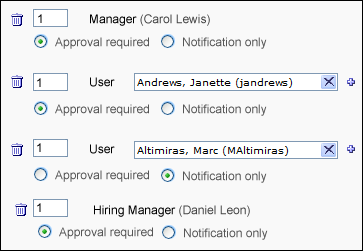
For dynamically assigned roles at the requisition level, the name of the user in the role appears in parentheses to the left of the role. If a user is not defined for a role, then "None Defined" appears in parentheses.
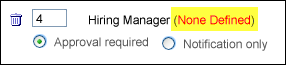
Note: If a user is not defined for a role, then the step is skipped and the offer letter is assumed Approved for that step.
Define Approval Workflow
To define an approval workflow:
- Click the plus icon to the right of the Offer Approvals header. This opens the Select Approvers pop-up.
- Select an approver from the following options:
- Manager - This is the requisition owner's manager. This option can only be selected once as an approver.
- Next Level Manager - This is the indirect manager at each level of the user hierarchy. This option can be selected repeatedly as an approver.
- <OU Type> Approver - This is the person defined as the <OU Type> Approver in Requisition and Applicant Preferences.
- Hiring Manager - This is the person defined as the hiring manager on the General step of the requisition template.
- User - This option enables administrators to select a specific user as an approver. This option can be selected repeatedly as an approver and also added as an OR rule.
- Click . This closes the pop-up and adds the approvers to the Offer Approvals panel.

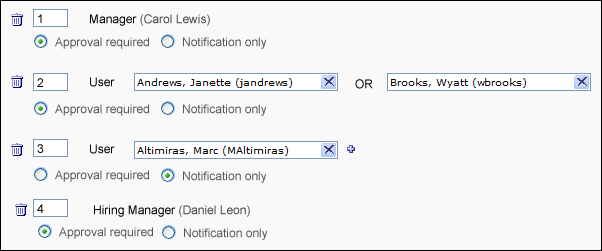
Approval Workflow Order
Once all approvers are selected, define the approval order. The order can be sequential, concurrent, or both. To define the approval order, enter the step number in the numeric text box to the left of the approver. There must be at least one step with a "1" entered.
Sequential Approval Workflow
For a sequential approval workflow, approval notifications are sent in numeric order. For example, Approver B (Janette Andrews) is sent the Pending Approval Notification email after the user's manager approves the request.
Concurrent Approval Workflow
For a concurrent approval workflow, approval notifications are sent at the same time to all approvers. For example, if a "1" is entered for the user’s Manager, Janette Andrews Hiring Manager, then the Pending Approval Notification email is sent to each of them at the same time.
If at least one of the approvers in a concurrent approval workflow denies the offer letter, then the offer letter is denied, even if the other approvers have not yet responded. For the other approvers in the step, the approval request is automatically retracted.
Note: A concurrent approval workflow creates an AND rule. When viewing the workflow on the Applicant Profile page, the approvers are displayed in the same row.
Sequential/Concurrent Approval Workflow
For a sequential/concurrent approval workflow, some approval steps are in numeric order and some steps are marked with the same number. For example, a "1" is entered for Approvers A and B, a "2" is entered for Approver C, and a "3" is entered for Approver D. In this example, if Approvers A or B deny the offer letter, then the Pending Approval Notification email is not sent to Approvers C and D.

Note: A sequential/concurrent approval workflow could create an OR and AND rule within the same approval step. (OR logic is explained in the subsequent section.) When viewing the workflow on the Applicant Profile page, the approvers are displayed in the same row. If one of the approvers in the step denies the offer letter, then the step is placed into a Denied status and the system automatically retracts the approval request for all other approvers in the step who have not yet recorded an approval decision.
Adding OR Rules
For approval steps that are configured for a specific user, more than one user can be added as an approver. This creates an OR rule (e.g., Approver A or Approver B can approve the offer letter for that approval step). Only one OR rule can be created for an approval step. The Pending Approval Notification email is sent to both approvers at the same time, but only one of them is required to approve the offer letter. If one of the approvers denies the offer letter, then the other approver's response is recorded but has no impact on the approval step.
To create an OR rule:
- Click the plus icon to the right of the approver box. This opens the Select Approver pop-up.
- Select a user.
- Click . The second approver is added to the right of the first approver in the approval step.
Note: In a step that contains both an OR rule and an AND rule, it is possible for two or more approvers to submit an approval decision for the offer letter. This is only possible if the approvers approve the offer letter. As soon as one approver in the step denies the offer letter, the step's status is Denied. For the approvers that approved the offer letter, their decision remains in the system.
Approval Required or Notification Only
The Approval required and Notification only options enable administrators to define whether or not the approver is required to approve the offer letter before the offer letter moves to the next step in the approval workflow.
- Approval required - If this option is selected, the approver must approve the offer letter in order for the offer letter to move to the next step in the workflow. If configured in Email Management, the Pending Approval Notification email is sent to the approver in the corresponding approval step to notify them that they are required to approve the offer letter.
- Notification only - If this option is selected and if configured in Email Management, the Pending Approval Notification email is sent to the approver in the corresponding approval step for notification purposes only. Such approvers do not have approval/denial options on the Recruiting Approvals page and are skipped in the approval process. For example, if the Notification only option is selected for the approver in the last row of the approval workflow, then the offer letter is approved when the last required approver completes their approval step.
Remove Approval Workflow Step
Approval steps can be removed by clicking the Trash Can icon to the left of the step. The entire step is deleted. If a step includes an OR rule, then both approvers for the step are removed.
Copy Approval Workflow
If a requisition approval workflow is created in the Approvals panel on the General tab, then the workflow can be copied to the Offer Approvals workflow. To copy an approval workflow, select the Copy Approval icon ![]() . The requisition approval workflow from the General tab appears in the Offer Approvals panel. By default, the Approval Required option is selected for each approver.
. The requisition approval workflow from the General tab appears in the Offer Approvals panel. By default, the Approval Required option is selected for each approver.
If an approval workflow is not configured on the General step, then the Copy Approval icon has no function.
Important Note: Clicking the Copy Approval icon overwrites any existing approval workflow without warning. This means that if you have configured an approval workflow in the Offer Approvals panel and then you click the Copy Approval icon, the workflow you created is replaced with the workflow from the General step and the existing approval workflow is not saved.