When creating a session, the first step is to define a part for the session. See Create Session - Parts Schedule - Define Part.
After at least one part is defined for a session, the parts are displayed in the Parts Schedule table. To create an ILT event session, go to . Search for the event and in the Options column next to the event, click the View Sessions icon ![]() . To create a new session, click the Create New Session link.
. To create a new session, click the Create New Session link.
Design Note: An updated interface is available for this page, which can be enabled by administrators in Feature Activation Preferences. With the new design, the functionality of the page is unchanged.
| PERMISSION NAME | PERMISSION DESCRIPTION | CATEGORY |
| Events Calendar |
Grants access to view Events Calendar page. This permission also makes the Event Calendar button on the Learning Search page visible. This is an end user permission. |
Learning |
| ILT Schedule Part Occurrence | Allows the admin to create more than one ILT session schedule part at the same time using a part occurrence schedule wizard. This is an administrator permission. | Learning - Administration |
| Sessions - Cancel | Grants ability to cancel instructor led training sessions. This permission works in conjunction with Events - View and Sessions - View permissions. This is an administrator permission. | Learning - Administration |
| Sessions - Edit | Grants ability to edit/update existing instructor led training sessions. This permission works in conjunction with Events - View and Sessions - View permissions. Administrators can only edit sessions for which they have the availability to view and edit. When adding users to a session in which the session roster is full, this permission grants the ability to increase the session's available seats. This permission can be constrained by OU, User's OU, Instructor, User as Instructor, Facility, Facilities Owned by User, ILT Provider, User's ILT Provider, User, and User Self and Subordinates. This is an administrator permission. | Learning - Administration |
Webex Integration Note: For additional considerations when creating a Webex virtual session, meeting, or training session, creating session parts, and adding instructors, see ILT Webcast.
Adobe Connect Integration Note: When creating a session for an Adobe Connect seminar room facility, certain information must be entered in order to map it to the seminar room in Adobe Connect. See Move Session to Adobe Connect Seminar Room.
Add Part
If the session duration is more than a day, or if separate sessions within the same day are required, add the session parts by clicking the Add Part link on the Parts Schedule page. Multiple parts can be added if the session covers multiple days or time periods, or if parts of the session are held at different locations. Repeat the process for each required part.
View Events Calendar
Click this link to display the events calendar.
Export to Excel
Click this link to export the parts schedule to Excel.
Check for Conflicts
Click this link to check if multiple sessions are being conducted at the same date, time, and location. If a prior session has been scheduled at the same time as the session you are creating, a message is displayed and session details of the conflicting session are displayed. This message can be bypassed by clicking Next or Save.
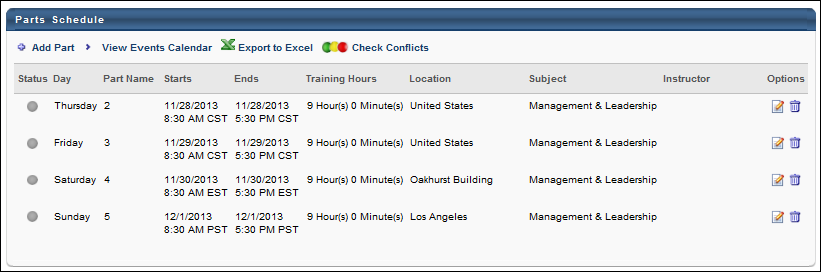
Parts Schedule Table
The following information is displayed in the Parts Schedule Table:
- Status - This light represents the session status.
- Day - This is the day of the week on which the session part occurs.
- Part Name - This is the session part name as defined for the part.
- Starts - This is the date and time on which the session part starts.
- Ends - This is the date and time on which the session part ends.
- Training Hours - This is the number of training hours that are associated with the session part. This is calculated using the start and end times of the session part. Note: Part breaks are not included in the training hours for the part. For example, if a part has a Start Time of 8:00 AM, an End Time of 5:00 PM, and a Part Break of 30 minutes, then the total training hours for the part is 8.5 hours.
- Location - This is the location of the session part as defined for the part.
- Note: A Location must be provided when creating the session to be able to generate a session QR code.
- A Tax Location icon
 appears next to a location if it is the tax location for the session. The tax location is the location on which the tax should be based for the session, and it is set on the Pricing page for the session. If no tax location is set for the session, then the Tax Location icon does not appear for any session part.
- Instructor - This is the instructor for the session part as defined for the part.
- Options - The following options are available in the Options column:
- Edit - Click this option to edit the part.
- Delete - Click this option to delete the part.
Save or Continue
Click to save the session, or click to set Session Details. The session will inherit the availability and the session setting details from the event unless changed.