When creating a session, the first step is to define a part for the session. See Create Session - Parts Schedule - Define Part.
After at least one part is defined for a session, the parts are displayed in the Parts Schedule table. To create an ILT event session, go to . Search for the event and in the Options column next to the event, click the View Sessions icon ![]() . To create a new session, click the Create New Session link.
. To create a new session, click the Create New Session link.
Design Note: An updated interface is available for this page, which can be enabled by administrators in Feature Activation Preferences. With the new design, the functionality of the page is unchanged.
To define a session part, enter the following information:
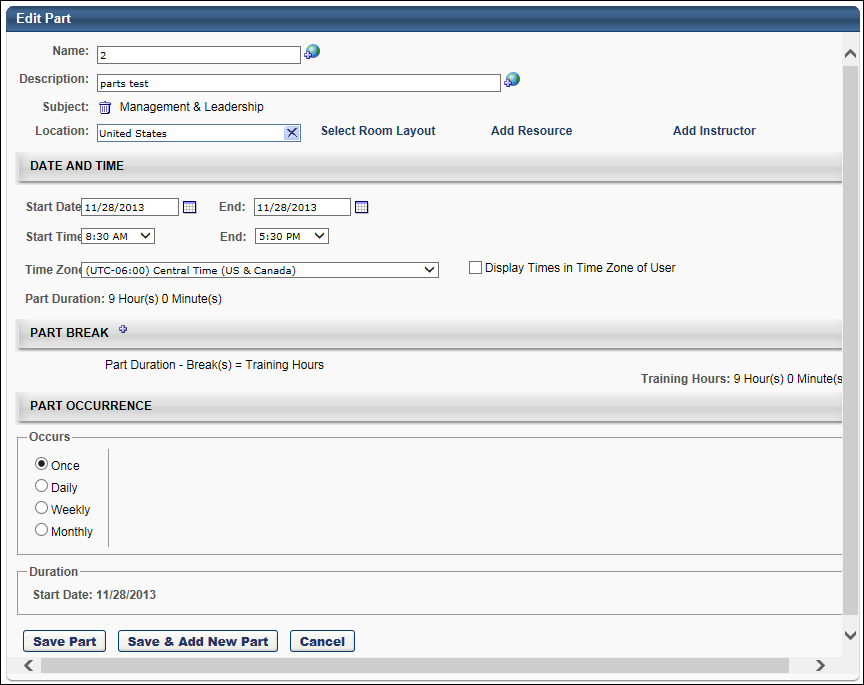
General Information
- Name - Enter a session name. The character limit is 50.
- Description - Enter a session description.
- Subject - Add a subject to the part by clicking the Add Subject link. This opens the Find Subject pop-up. Select a subject, which closes the pop-up automatically and populates the Subject field with the selected subject. Only one subject can be selected for a part.
- The ability to add a subject to a part is and limit the number of subjects added to an LO is controlled by backend settings that are turned off by default. If the backend setting that limits the number of subjects that can be added to a part is set to one, then when the part is created, the part automatically inherits the subject of the event. If the backend setting is set to a value greater than one and the event has multiple subjects, no subjects from the event are inherited to the part and the part is not required to have a subject. If the event has one subject, the part inherits the subject of the event. Note: Subjects inherited from events do not display on the Add/Edit/Copy Part page or in the Subject column of the Parts Schedule. However, they are searchable in Global Search and Learning Search.
- When copying an event or session, all subjects configured for all parts are copied.
- If a subject is added to a part, it can no longer be deleted from Subjects Management.
- Location - Click this field to select a location. Session locations are managed in Facilities and Resources. See Facilities and Resources Administration. See the Facilities, Room Layouts & Resources Tips section below for additional information.
- Search for a location by Name, ID, or Owner. Then add the location by clicking the plus icon to the left of the location name. Note: A Location must be provided when creating the session to be able to generate a session QR code.
- Select the Confirmation Required option to require the session's location to be approved by the Facility Owner before the session is approved. In this situation, the session status is Tentative the session is not searchable until the Facility Owner confirms.
- In the Notes field, enter notes for the Facility Owner. These notes are viewed when the Facility Owner responds to the request.
- Click Done. If confirmation is required, the location has a check mark next to it.
- Select Room Layout - Click this link to display available room layouts for the location, if applicable. Note: Room Layouts must be created for the location when setting up the location. See the Facilities, Room Layouts & Resources Tips section below for additional information.
- Select a room layout by clicking the room layout name.
- Add Resource - Click this link to display available resources for the location, if applicable. Note: Resources must be created for the location when setting up the location. See the Facilities, Room Layouts & Resources Tips section below for additional information.
- Click the applicable resource. Resources are tied to the facility.
- Enter quantity needed in Quantity field.
- Select whether the specified quantity is Per Part or Per Student.
- Select the Confirmation Required option to require the resources to be approved by the Facility Owner before the session is approved. In this situation, the session status is Tentative the session is not searchable until the Facility Owner confirms.
- Click Done. The selected resources are listed on the Session Schedule page with the quantity in parentheses.
- Add Instructor - Click this option to display available instructors for the vendor/provider for this session (Provider/Vendor is set at the event level). See the Instructor Tips section below for additional information.
- Search for an instructor by name by their first name or last name. Then, select the instructor by clicking the instructor name.
- From the Role drop-down list, select whether the instructor is the Primary or Secondary instructor.
- Select the Confirmation Required option to require the instructor to be approved by the Facility Owner before the session is approved. In this situation, the session status is Tentative the session is not searchable until the Facility Owner confirms.
- Click Done. You can then add additional instructors if necessary by repeating the process.
- If confirmation is required, instructors have a check mark next to their name. Also, the Request Instructor email may be triggered, if enabled.
Date and Time
- Start Date - Enter the session start date with the format (MM/DD/YYYY) or click on the calendar icon to select a date. If the Start Date field is blank, ILT Preferences are configured to allow administrators to enter a start date manually. If the Start Date field is populated, ILT Preferences are configured to display a default start date that is a certain number of days following the end date of the most recently added part. See ILT Preferences - General.
- End Date - Enter the session end date with the format (MM/DD/YYYY) or click on the calendar icon to select a date. If the End date field is blank, ILT Preferences are configured to allow administrators to enter an end date manually. If the End date field is populated, ILT Preferences are configured to display a default end date that is a certain number of days following the end date of the most recently added part. Start date and end date should be the same unless the sessions spans across midnight. Multi-day sessions should be scheduled using Part Break functionality.
- Start Time - On the first instance of adding a part to a session, the default value in the Start Time field is dependent on the default configuration of this field in ILT Preferences. The default start time in ILT Preferences is 8:30 AM but can be modified by the administrator. If modified by the administrator, the Start Time field displays the setting configured by the administrator. To change the start time, select the session start time from the drop-down list. Note: When adding a part to a session that has at least one existing part, the start and end time will be the same as the most recently added part. See ILT Preferences - General.
- End Time - On the first instance of adding a part to a session, the default value in the End Time field is dependent on the default configuration of this field in ILT Preferences. The default end time in ILT Preferences is 5:30 PM but can be modified by the administrator. If modified by the administrator, the End Time field displays the setting configured by the administrator. To change the end time, select the session end time from the drop-down list.
- Time Zone - Select the time zone in which the session start and end times are provided. For example, if the session start time is 10:00 AM Pacific Time, select 10:00 AM for the start time and select Pacific Time as the time zone. For Webex sessions, the selected time zone is sent to Webex. Note: Daylight saving time (DST) time zones are supported for ILT for events or sessions.
- Display Times in Time Zone of User - This field allows administrators to display the session start and end times in the time zone of the user viewing the session. This field is checked by default if the Display Times in Time Zone of User field is checked on the Session Details page when configuring the event.
- Events Calendar > Start field in calendar box
- Events Calendar > Start and end times in training details hover pop-up
- LO Details page > Registration Deadline field
- LO Details page > Starts/Ends fields in Schedule section
- Training Details page > Start and Ends columns
- Transcript > Select Session pop-up
- Create/Edit Session > Emails tab
- Email Administration > ILT Administration emails
- Email Administration > Instructor Led Training emails
When unchecked for standard sessions, the session start and end times display in the time zone defined on the Parts Schedule page. When unchecked for vILT sessions, the start and end times display in the user's time zone only on the Events Calendar page and in the time zone defined on the Parts Schedule page in all other areas of the system where the start and end time appear.
When this field is checked, the session start and end times display in the user's time zone in the following areas of the system for both standard and vILT sessions:
System default and custom emails that include the session start and end time via email tags (REGISTER.DEADLINE, SESSION.END.DATE, SESSION.END.TIME, SESSION.START.DATE, SESSION.START.TIME) also display the times in the user's time zone. The affected emails are configured in the following areas of the system:
Part Break
Click the plus icon to the right of the Part Break heading to add a part break.
In the field, enter the name of the break (e.g., lunch, coffee break). If multiple languages are enabled for your portal, select the Translate icon to translate the field into other available languages.
Enter any break duration in minutes. For example, if there is a lunch break or a nighttime break for a multi-day session.
To delete a part break, click the Delete icon to the left of the break.
Note: Part breaks are not included in the training hours for the part. For example, if a part has a Start Time of 8:00 AM, an End Time of 5:00 PM, and a Part Break of 30 minutes, then the total training hours for the part is 8.5 hours.
Part Occurrence
Select the occurrence of the part, whether it's Once, Daily, Weekly, or Monthly. Note: When creating a session for an event associated with a Citrix provider, the Part Occurrence section is not available because only one part is allowed for Citrix sessions.
Save Options
Click or button to continue.
Facilities, Room Layouts & Resources Tips
Room Layouts are not specific to Facilities.
Resources are specific to Facilities and can be defined as reusable or not. If resources are not reusable, then the number of available resources will decrease once they have been assigned to a session.
- Facilities inherit the resources of their parent facilities. For example, if a building has two projectors, every room in that building has access to those two projectors.
If resource confirmation is required, there will be a resource request for each Session for which the resource is selected.
If facility confirmation is required, there will be a facility request for that Session listing each part for which the Facility is selected.
When a session is created, a facility request for the location of that session's parts is always generated, regardless of whether or not the Confirmation Required box is checked for those Locations.
- The facility request status is Pending if that Facility has the Approval Required box checked on the Facility Details page. The status of the facility request does not depend on whether the Confirmation Required box was checked for that Session.
- If the Approval Required checkbox on the Facility Details page is not checked, or if the session scheduler is same as the facility's owner, then the request will automatically be approved.
- The facility request will remain Pending until the facility owner approves the request.
- If the Confirmation Required box is checked for that facility, for that session, the status of that session will be Tentative until that facility request has been approved.
If the Approval Required box is not checked on the Facility Details page, or if the session scheduler is the same as the facility's owner, the request is automatically approved.
Instructor Tips
If instructor confirmation is required, there will be an instructor request for that session. All the parts of that session part for which the instructor is specified, will be grouped into that request.
Instructor requests, resource requests, and facility requests are respectively sent to the Inbox of the instructors, resource or facility owners and are managed and responded to under Facilities & Resources.