Self-Registration functionality allows administrators to manage new users coming into the system via pre-defined groups. By sending them to a special URL (or converting that URL to a hypertext link) and assigning the users a code, users will get assigned to a particular group when they register through the Self-Registration page. Each group can then have parameters set which will determine how that user will be classified and handled within the system.
This functionality is available as an optional add-on feature upon request. Please contact Global Customer Support for additional information.
For portals with multiple languages enabled, when a user accesses a page as part of the self-registration process, the page displays in a user's browser language; if a user's browser language is not available in the portal, the user views the Self-Registration page in the portal's default language. However, pages that are configured as part of the anonymous user experience in the Guest User Settings tab are displayed in the portal's default language.
To manage self registration groups, go to .
| PERMISSION NAME | PERMISSION DESCRIPTION | CATEGORY |
| Available Languages - Modify | Grants access to choose what languages to which learning objects may be associated when users search for training. This is an administrator permission. | Core Administration |
| Self Registration Groups - Manage | Grants ability to create and update/edit self-registration groups, which are configured to make a self-registration page available to people who are not added to the portal via user feed. This permission can be constrained by OU, User's OU, and User's Corporation. This is an administrator permission. | Core Administration |
| Self-Registration and User Record Custom Fields - Manage | Grants access to manage custom fields for user Self Registration and the user record in Custom Field Administration. This permission can be constrained by OU and User's OU. This is an administrator permission. | Core Administration |
Filters
You can search for existing self registration groups by filtering the page to show only groups that match your search terms. To apply a filter:
- Enter your search terms in the Search box.
- Use the drop-down to filter by Self Registration Name, Self Registration ID, User Last Name, or User ID.
- Check the Include inactive box to include groups that have been made inactive.
- Click .
The Corporate Self Registrations table updates to show only groups that match your search terms.
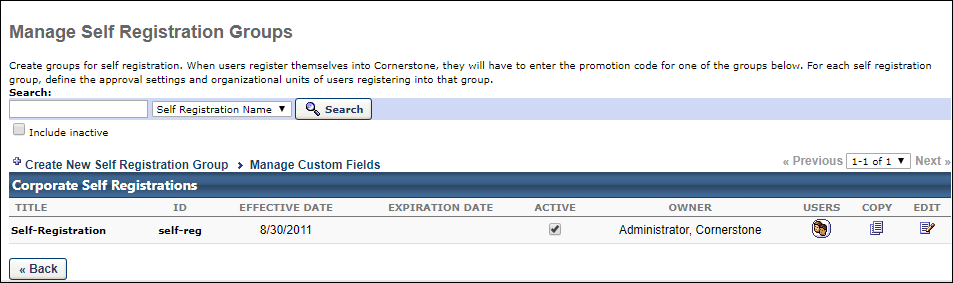
Create New Self Registration Group
Click Create New Self Registration Group to create a new self registration group. See Registration Group - Create - Step 1 - Details.
Manage Custom Fields
Click Create New Self Registration Group to manage self registration custom fields for users who are added to the portal via a self registration group. This opens the User Record and Self Registration Custom Fields page. See User Record and Self Registration Custom Fields.
Corporate Self Registrations Table
The following information and options are available in the table:
- Title - This column displays the title of the group.
- ID - This column displays the unique ID of the group.
- Effective Date - This column displays the date users in the group can begin to self register on the portal.
- Expiration Date - After the expiration date, users can no longer self register themselves into the system.
- Active - Check the box to activate the group. When unchecked, the group is inactive and users cannot self register.
- Owner - This column displays the user who created the group.
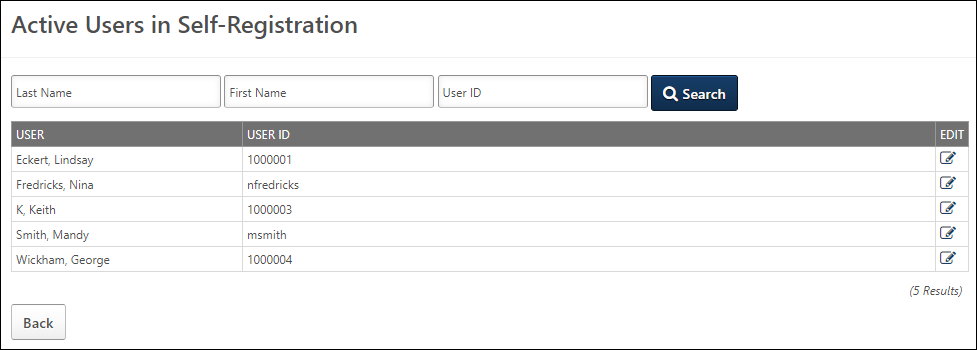
- Users - Click the icon
 in the column to view the user names and user IDs of the users in the group. If you have permission to edit user records, you can use the option in the Edit column to make changes to the user record.
- Copy - Click the Copy
 icon to copy an existing group. This will open a copy of the group with the Name and ID fields blank, the associated URLs cleared, and all other attributes open to editing.
 - Edit - Click the Edit icon
 to make changes to the group.
See also:
- Create Registration Group
- Approve Pending User Records
- Manage Users in Self Registration Group
- Manage Custom Fields
- Sample Self Registration Group Pages
- For information on emails for self registration groups, See Emails for Self Registration.
Training Resources
Visit the Extended Enterprise Fundamentals - System Administrator Training page in the Success Center to access additional training resources.
You can also view a short Self Registration training video in the Success Center for more information about the Self Registration functionality.