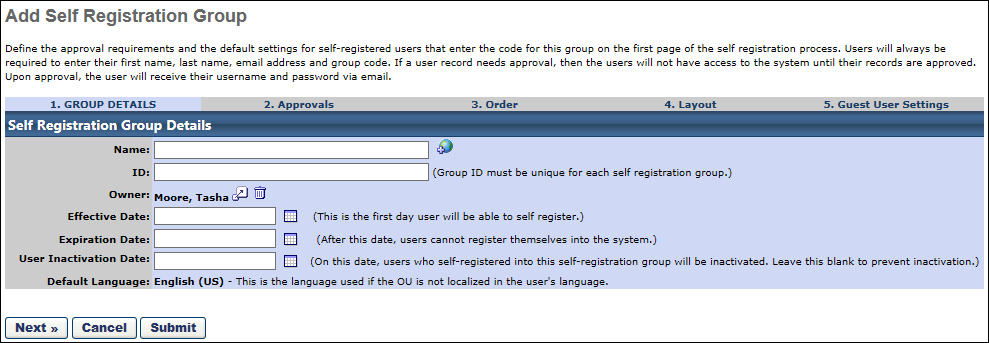
On the Details step of the self-registration group creation process, provide basic information about the self-registration group, such as its name and effective date.
To create a self-registration group, go to . Then, click the Create New Self Registration Group link.
| PERMISSION NAME | PERMISSION DESCRIPTION | CATEGORY |
Details
Enter the following details on the Group Details page:
- Name - Enter a name for the self-registration group. If OU Localization is enabled for your portal, click the Translate icon to translate the field into other available languages. A translation for the OU's default language is required for this field.
- ID - Enter the ID the user must enter upon registration on the New User Registration page.
- Owner - Select the registration group owner. This defaults to the creator, but can be changed by clicking the pop-up icon.
- Effective Date - Select a date to make the ID/Code effective.
- Expiration Date - Select the date the group expires. After this date, users cannot enter the ID code to register themselves into the system.
- Leave this field blank if the group should not expire.
- User Inactivation Date - Select the date on which all of the self-registered users are automatically inactivated. This is useful if the self-registration group code is intended to only allow users to access the system for a certain period of time. This is independent of the Expiration Date. This must be a specific date; it cannot be set to a relative date.
- There is a process which runs daily to confirm that any self-registered users who are past the inactivation date are deactivated. Therefore, even if a user is activated via another source such as the User Record or a data load, the user will be automatically deactivated the following day via this process.
- Leave this field blank if the group should not become inactive.
- User Segment - Select whether the group is used for customers or internal employees. Note: This setting does not impact the functionality of the group and is planned for deprecation in an future release.
- Default Language - If OU Localization is enabled for your portal, this displays the default language for the OU. This enables administrators to know which translation will be displayed to a user if a translation is not defined for the user's preferred language. The Default Language value cannot be modified.
- For OUs that are created after OU Localization is enabled, the OU's default language is set to the preferred language of the administrator who creates the OU. This is set at the time the OU is created
- For OUs that are created before OU Localization is enabled, the OU's default language is set to the default language of the portal's top-level OU. This is typically the Corporate Language, and it is set when OU Localization is enabled.
Note: At this time, there is no email associated with inactivating users in a self registration group. A Marketing email can be manually created and sent out to users in a particular self registration group to notify them of the impending inactivation date.
Click to continue to the Approvals page or to save changes. See Registration Group - Create - Step 2 - Approvals.