Material - Create/Edit - Step 1 - General (Simplified Versioning)
This topic applies to organizations that are using Simplified Versioning for materials.
Design Note: An updated interface is available for this page, which can be enabled by administrators in Feature Activation Preferences. With the new design, the functionality of the page is unchanged.
To create a material, go to . Then, click the button.
To edit a material, go to . Then, click the Edit icon ![]() to the right of the appropriate material.
to the right of the appropriate material.
| PERMISSION NAME | PERMISSION DESCRIPTION | CATEGORY |
| LO Attachments - Manage | Grants ability to upload attachments to learning objects. Administrators with this permission are automatically granted the LO Attachments - View permission. This permission can be constrained by User's ILT Provider, Provider, and ILT Provider. This is an administrator permission. | Learning - Administration |
| LO Attachments - View | Grants ability to view the learning object attachments that are set to be available to administrators. This permission can be constrained by User's ILT Provider, Provider, and ILT Provider. This is an administrator permission. | Learning - Administration |
| Materials Management | Grants ability to view the Material Administration page and create, edit, and copy materials. Once created, these "materials" can be managed like other learning objects via the course catalog. This permission can be constrained by OU, User's OU, and Provider. The constraints on this permission determine which materials the administrator is able to view, edit, copy, and create. This is an administrator permission. | Learning - Administration |
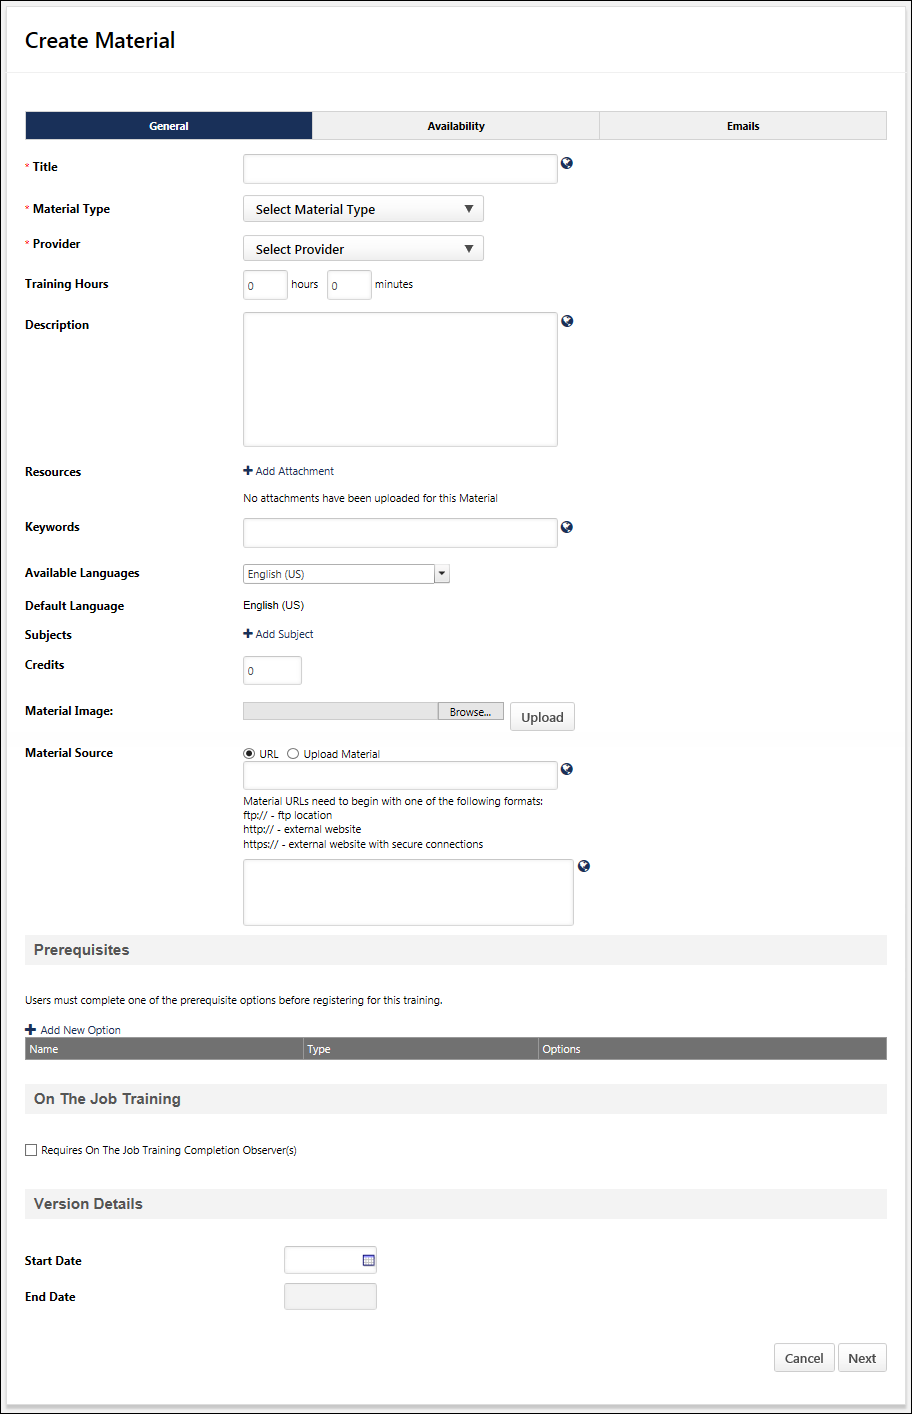
Enter the following information for the material:
- Title - Enter a title for the material. The character limit is 500. If multiple languages are enabled for your portal, select the Translate icon to translate the field into other available languages.
- Material Type - Select the appropriate material type from the drop-down list. When creating a material, this drop-down only includes active material types. Material types can be configured on the Manage Material Types page.
- Provider - Select the appropriate provider from the drop-down list. Note: This field cannot be edited when editing a material.
- Training Hours - Enter the number of hours and minutes that are required to complete the training.
- Description - Enter a description for the material, this field accepts HTML. If multiple languages are enabled for your portal, select the Translate icon to translate the field into other available languages.
- Resources - This section enables administrators to view and manage attachments for the material. The visibility of each attachment can be determined by the administrator. For example, some attachments may be visible to only administrators, while other attachments may be visible to all users. This section is only available for users that have permission to view or manage LO attachments. See Material Resources.
- Keywords - Enter words to associate with the training. When a user searches for training and enters any of the keywords specified here, the course title will appear in the search results. If multiple languages are enabled for your portal, select the Translate icon to translate the field into other available languages.
- Available Languages - From the drop-down list, select the languages in which the material is available. The available languages are mainly used for searching purposes and they are independent of the material's default language. At least one language must be selected. At the top of the drop-down list, all selected languages are displayed. The drop-down list only displays the languages that are available to the user. Select the All Languages option to select all available languages.
- When a language is selected, the material is associated with that language and users can search for the course by associated languages.
- Default Language - This displays the default language of the material. If a user views a material in a language that does not have a translation, the information is displayed in the default language for the material. When an administrator creates a material, the default language for the material is the administrator's default language at the time they create the material. Note: This field cannot be edited when editing a material.
- Subjects - Click the Add Subject link to add one or more subjects to the material. This is optional.
- Credits - Enter the number of credits a user receives upon completing the LO. This number must be greater than zero and less than 1000.
- Material Image - Select an image to upload if applicable. The image will be visible to the user when viewing the Transcript Details (sometimes referred to as Training Details) page for the LO.
Material Source
This section enables administrators to specify the material source. The administrator can either enter a URL or upload a file. This field can be edited when editing a material.
The following options are available:
- URL - Select this option to specify a URL as the material source. See Material Source - URL.
- Upload Material - Select this option to upload a document as the material source. The maximum file size for an uploaded material is 50 MB. See Material Source - File.
Custom Fields
Any training custom fields that are enabled for material LOs are available.
Prerequisites
The Prerequisites section enables administrators to set prerequisites for the LO, and the defined prerequisites must be completed by the user before they are able to register for the LO. The status of the training will be Pending Prerequisite until the user completes the prerequisites. It is not required that a LO have prerequisites.
Prerequisite - Add New Option
Prerequisite options are the options that a user can complete to satisfy the prerequisite requirement for training item. At least one of the training items within an option must be completed in order to satisfy the option.
- If the training only has one option, that option must be completed by the user before the user is able to register for the training.
- If the training has multiple options, the user is only required to complete one of the options before they can register for the training.
Click the Add New Option link to add a new prerequisite option. This opens the Select Training pop-up in which the administrator can select the training items that belong in the option. Multiple items can be selected. The selected training appears in alphabetical order within the new option in the Prerequisites table. Note: The same training item can be added to multiple options if it is a requirement for multiple options.
The following information displays for each item in the Prerequisites table:
- Name - This displays the name of the option or training within the option. Options are automatically numbered in the order in which they appear in the table (e.g., Option 1, Option 2). When an option is deleted, the remaining option names are updated to reflect the new option order.
- Type - This displays the training type for each item in the option.
A maximum of 10 prerequisite options can be defined. Once 10 options have been added, the Add New Option link is no longer available until an option is deleted.
A maximum of 50 training items can be added to an option. Once 50 items have been added, the Add Training icon ![]() is no longer available until a training item is deleted from the option.
is no longer available until a training item is deleted from the option.
Prerequisite - Delete Option
To delete a prerequisite option, click the Delete icon ![]() in the Options column for the appropriate option. This also removes all the training items within the option. Options are automatically numbered in the order in which they appear in the table (e.g., Option 1, Option 2). When an option is deleted, the remaining option names are updated to reflect the new option order.
in the Options column for the appropriate option. This also removes all the training items within the option. Options are automatically numbered in the order in which they appear in the table (e.g., Option 1, Option 2). When an option is deleted, the remaining option names are updated to reflect the new option order.
Prerequisite - Add LO to Existing Option
To add an additional training item to an existing prerequisite option, click the Add Training icon ![]() in the Options column for the appropriate option. This opens the Select Training pop-up in which the administrator can select the additional training items that belong in the option. Multiple training items can be selected. The selected training appears in alphabetical order within the option in the Prerequisites table.
in the Options column for the appropriate option. This opens the Select Training pop-up in which the administrator can select the additional training items that belong in the option. Multiple training items can be selected. The selected training appears in alphabetical order within the option in the Prerequisites table.
A maximum of 50 training items can be added to an option. Once 50 items have been added, the Add Training icon ![]() is no longer available until a training item is deleted from the option.
is no longer available until a training item is deleted from the option.
Prerequisite - Delete LO within Existing Option
To remove a training item from an existing prerequisite option, click the Delete icon ![]() in the Options column for the item. If all items are deleted from an option, the option is also deleted after the changes are saved.
in the Options column for the item. If all items are deleted from an option, the option is also deleted after the changes are saved.
On the Job Training
When creating a material, the On the Job Training section allows administrators to create an On the Job Training item. These options only display if the administrator has permissions for managing On the Job Training. This section is optional, and configuring On the Job Training options changes the behavior of the material LO. To create On the Job Training (OJT):
- Select the Requires On The Job Training Completion Observer(s) option in the On The Job Training section. The page will refresh to display additional OJT options for the material.
- Designate observers for the OJT by choosing one of the following options:
- Managers - Select this option to designate learners’ managers as the observers for the OJT. This option is selected by default.
- Observers by Providers - Select this option to choose a provider (vendor) and then select associated instructors as observers for the OJT. If ILT is not enabled in the portal, this option is read-only. Note: Administrators must have the permission to view ILT vendors to select a provider on this page. Visibility of system vendors can be constrained.
- Observers by OUs - Select this option to choose an organizational unit (OU) type and then select a specific OU or group of users to designate as observers for the OJT. Multiple OU types can be selected, but only one OU can be selected per OU type. For example, if you select the Group OU type and choose a group, groups are removed from the drop-down.
- Configure completion options for the OJT. For each completion option, determine whether a completion field is active for the OJT and then determine if a response is required for the field. A field must be active in order for a response to be required. The default settings for these options are set on the Formal On The Job Training Completion Options page. The following completion options are available for OJT:
- Date Observed (Required) - This field allows a completion date to be recorded when the OJT is recorded. This field is active by default and cannot be deactivated.
- Training Hours - When set to active, this field allows observers to enter training hours for the OJT.
- Score - When set to active, this field allows observers to enter a numeric score for the OJT.
- Comments - When set to active, this field allows observers to add comments to the OJT.
- Attachments - When set to active, this field allows observers to upload attachments to the OJT.
Note: Changes made to the On The Job Training section of the Create Material page are recorded in the Modification History section and are auditable.
Version Equivalency
When editing an active or pending material, the Version Equivalency section on the General page displays the name and version number of the equivalent material version, if available. This section is only available if the material has one equivalent version.
To remove an equivalent version, click the Remove icon ![]() in the Options column for the appropriate material version. A warning pop-up opens to confirm the removal. Removing an equivalent version only impacts users who are assigned the material in the future or who complete a previous version in the future. Tip: If an administrator assigned a new version that is equal to the previous version, but the administrator wants one or more users to complete the new version of the material, the administrator can proxy enroll the users in the new material version and force initial enrollment.
in the Options column for the appropriate material version. A warning pop-up opens to confirm the removal. Removing an equivalent version only impacts users who are assigned the material in the future or who complete a previous version in the future. Tip: If an administrator assigned a new version that is equal to the previous version, but the administrator wants one or more users to complete the new version of the material, the administrator can proxy enroll the users in the new material version and force initial enrollment.
Next or Cancel
Click to proceed to the Availability step. See Material - Create/Edit - Step 2 - Availability (Simplified Versioning).
Click to cancel the material creation process and return to the Manage Materials page. This discards the new material. See Material Administration.
Modification History
The Modification History section displays a record of each time the material is modified. This includes the modification description, the name of the user who modified the material, and when the modification occurred.
If the material has multiple versions, then this section displays the modification history for all versions of the material.
This section is only available when editing a material and when creating a new version of a material.
The following are examples of how changes appear in Modification History:
- Edit to Material Type - Material Type in English (US) changed from "Publication" to “Book” by Sarah Villamaino (svillamaino) on MM/DD/YYY HH:MM
- Edit to Material Source - Material Source in English (US) changed from "www.test.com" to “www.test1.com” by Sarah Villamaino (svillamaino) on MM/DD/YYY HH:MM
- Material Type for New Material - Material created with English (US) Material Type "Publication" by Sarah Villamaino (svillamaino) on MM/DD/YYYY HH:MM