To access Level 2 (Scored) evaluations, go to . Then, click the Level 2 (Scored) link on the left navigation panel.
| PERMISSION NAME | PERMISSION DESCRIPTION | CATEGORY |
| Level 2 Scored Evaluation Administration | Grant Access to create and manage level 2 (scored) evaluations associated with learning objects. This permission cannot be constrained. This is an administrator permission. | Learning - Administration |
To create an evaluation, click the Create New Evaluation link, or copy an existing evaluation by clicking the Copy icon in the Options column.
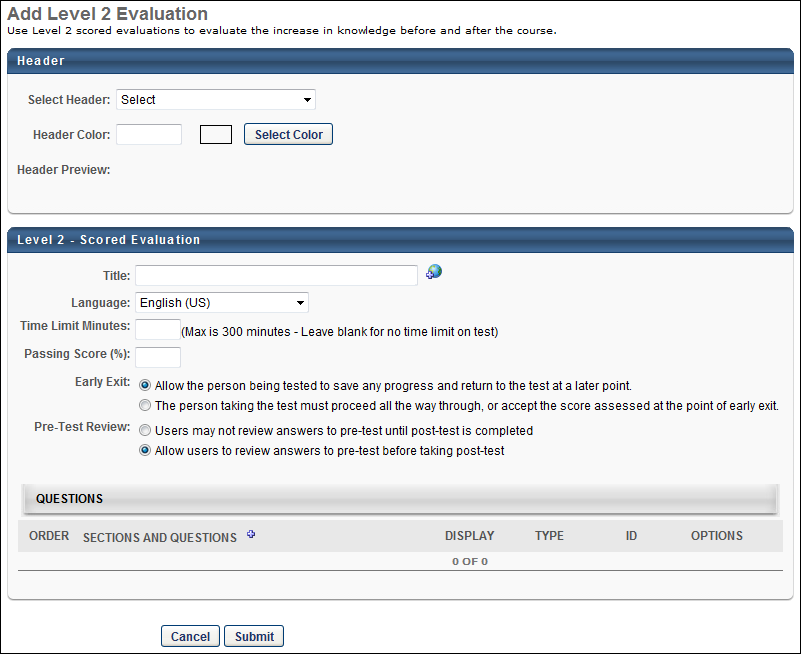
Header
- Select Header - From the drop-down list, select a header image for the evaluation. The available images are supplied from the Corporate Preferences images. A preview of the header image is displayed in the Header Preview field. This is optional.
- Header Color - Select the header color, which is the color that fills the header in areas that the header image does not fill. You may enter a hex value for the color or select a color by clicking the button. This is optional.
- Header Preview - This displays a preview of what the header will look like on the evaluation. The selected image is always aligned in the upper-left portion of the header. Any empty space in the header is filled with the selected header color. The selected logo is not resized.
General Information
Enter the following information for the evaluation:
- Title - Enter the evaluation title. For portals with multiple languages enabled, localize the field by using the Translate icon to enter localized text.
- Language - Select the language for the evaluation.
- Time Limit Minutes - Define the time limit for users to take the evaluation in minutes. The maximum time limit is 300 minutes. Leave this field blank to have no time limit for the evaluation.
- Passing Score (%) - Enter passing score percentage. If this field is blank, the default passing score is 80%.
- Early Exit - Select one of the following options to determine whether or not a user can exit the test and resume at a later time:
- Allow the person being tested to save any progress and return to the test at a later point - If this option is selected, users can exit the evaluation and resume at a later time.
- The person taking the test must proceed all the way through, or accept the score assessed at the point of early exit - If this option is selected, users must complete the evaluation without exiting the evaluation. If the user exits the evaluation, their score is based on their responses at that point and the user cannot resume the evaluation.
- Pre-Test Review - Select one of the following options regarding a pre-test:
- Users may not review answers to pre-test until post test is completed - Select this option to prevent users from reviewing their answers to the pretest until they have completed the post-test.
- Allow users to review answers to pre-test before taking post-test - Select this option to allow users to review their answers to the pretest before taking the post-test.
Add a Section to the Evaluation
When creating or editing an evaluation, administrators must add at least one section to the evaluation to which they can then add questions. Each section is considered a page break on the evaluation. See Add a Section to an Evaluation.
To remove a section, select the Remove icon in the Options column. Note: Removing a section also removes all questions in the section.
Add Questions to an Evaluation Section
When creating or editing an evaluation, administrators must add questions to a section within the evaluation. See Add a Question to an Evaluation Section.
Configure Questions Within the Evaluation Section
When creating or editing an evaluation, administrators can reorder, configure, and preview the questions that have been added to an evaluation section. See Configure Questions Within an Evaluation Section.
Display Subset of Questions to Users
By default, all questions in the section are displayed to the user. To only display a portion of the questions, click the Edit icon in the Display column. Then, enter the number of questions that should be displayed in the section. Click the Save icon to save the new display value.
Displaying only a portion of the questions allows you to create a unique evaluation experience for each evaluation attempt. For example, there are 10 questions in a section, but only five are displayed. If another user completes the evaluation, then that user may see different questions in their evaluation.
Submit
Click to finalize the evaluation.