Create/Edit Development Plan
Employees can collaborate online with their managers to create objective-based development plans and can also design a career path by determining proactive developmental activities and tracking and measuring targeted improvements that coincide with an employee's development plan.
Permission Note: The "Snapshot - Development Plans" permission enables users to access the Development Plans page and view the Create New Plan button. However, users must also have the "Development Plans - Manage" permission to create a development plan.
Navigation Warning Message: When creating or editing a development plan or development plan template, if you navigate away from the page without saving your changes, a confirmation pop-up opens to notify you that any unsaved changes will be lost. The pop-up gives you the option to leave the page and lose your unsaved changes, or stay on the page to avoid losing your unsaved changes.
- To create a development plan, go to , and click the button.
- To edit a development plan, go to . Next to the appropriate development plan, select the Options drop-down icon
 , and select Edit.
| PERMISSION NAME | PERMISSION DESCRIPTION | CATEGORY |
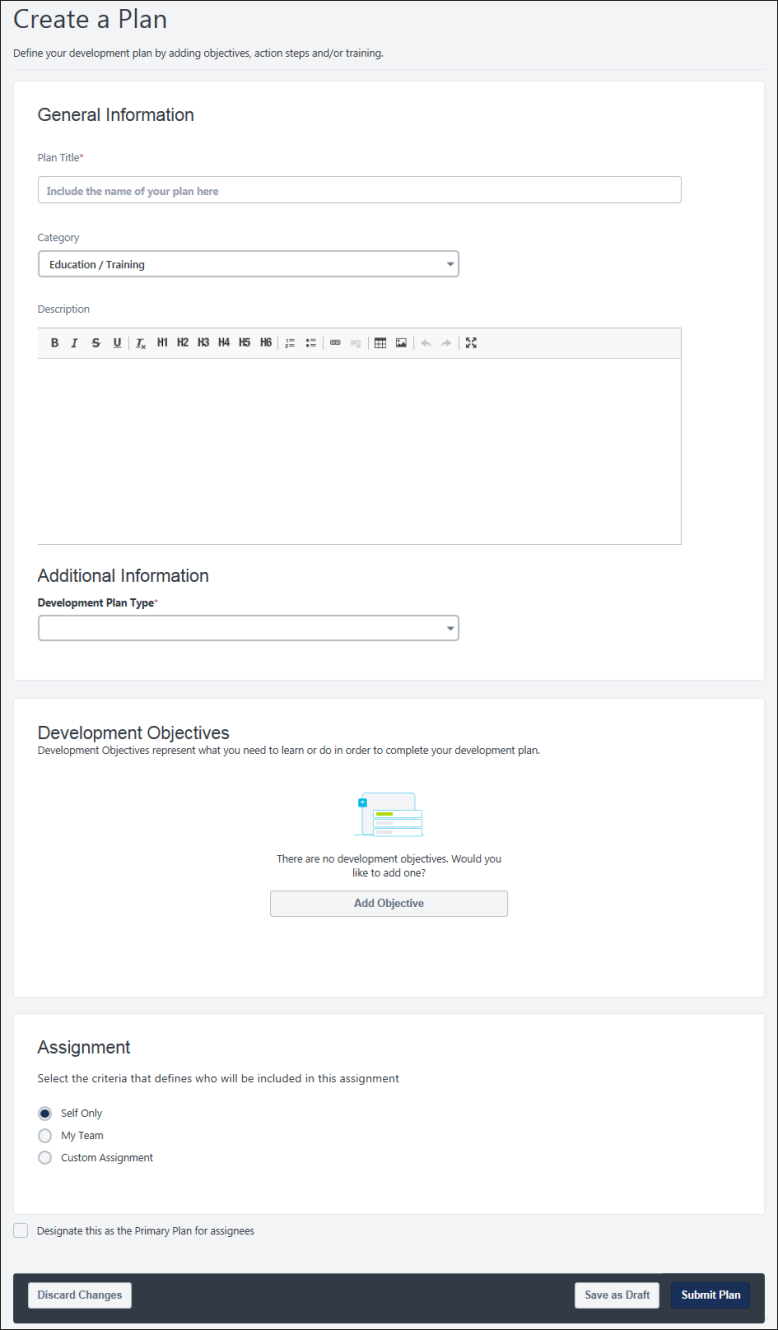
General Information
Begin defining the development plan by entering the following basic information about the plan:
- Plan Title - Title for the development plan. This title appears on your Snapshot: Development Plans page as well as anywhere else your plan is visible. The character limit for this field is 3,000 characters. This field is required.
- Category - Category for the development plan, which is intended to help organize development plans. Selecting a development plan category is optional. If no categories are available, then this field is hidden.
- Description - Overview of the development plan, including its purpose or focus. This field can be formatted using the text formatting options. The character limit for this field is 3,000 characters.
Additional Information
An Additional Information section may appear containing additional questions that must be answered.
Administrator Note: When creating a plan from a template, the custom fields within the template override any custom fields that are configured within Development Plan Preferences.
Add Development Objective
Development plans are creating by adding development objectives to outline what you are trying to achieve in your development plan. Objectives are the target areas of the plan. For example, if you are creating a development plan to improve your communication skills, you may create an objective to improve your writing skills. This objective should contain all of the training and actions you need to complete in order to achieve the objective, such as completing writing classes or shadowing a writer at your organization.
To add an objective to the development plan:
- Select the button. This opens the Add Development Objective page to define the objective. Complete the following fields:
- Objective Title - Title for the development plan. This title appears on your Snapshot: Development Plans page as well as anywhere else your plan is visible. The character limit for this field is 3,000 characters. For portals with multiple languages enabled, use the Translate icon to localize the title. This field is required.
- Category - Category for the objective, which is intended to help organize development plan objectives. Selecting an objective category is optional. If there no categories available, then this drop-down is hidden.
- Learning and Development - Add learning and development actions to your plan. The following options may be available:
- Search for Learning - Select this option to search for learning opportunities that may support your development objective. See the Add Objective - Search for Learning section below for additional information.
- Browse Recommended - Select this option to browse all recommended learning and development actions that may support your development objective. See the Add Objective - Browse Recommended section below for additional information.
- Add Development Action - Select this option to add an action step that is required to achieve the development objective. See the Add Objective - Add Development Action section below for additional information.
- Select one of the following options:
- - Save the objective and return to the Create a Plan page.
- - Save the objective and begin adding another objective to the plan.
The option is only available to organizations using the Learning functionality. Select this option to search for learning opportunities that may support your development objective. For example, if you are creating an objective to improve your writing skills, you may search for online classes related to writing. The following learning types cannot be added to a development plan: Certification, Cohort, and Playlist.
To search for learning items:
- In the Learning and Development section, select the button.
- From the Add Learning page, select the Add to Objective link for each item you want to add. If a learning item is already in the plan, then "Included in Plan" is displayed.
- Select the button to add the selected items to your development plan.
- Set a due date for the item by selecting the Due Date field.
- Note: The overall due date for a development plan is the latest due date for any objective within the development plan. The due date for an objective is the latest due date for any learning item or action step within the objective.
The option is only available if administrators enabled recommendations in Development Plan Preferences. Select this option to browse all recommended learning and development actions that may support your development objective. Recommendations may be based on competency assessments or machine learning. For example, if you have already completed learning items related to business writing, then the system may recommend similar learning items.
To browse recommended learning and development actions:
- In the Learning and Development section, select the button. On the Recommended Learning & Development Actions page, various carousels of recommendations may be displayed. When editing another user's development plan, the editor can only view recommended learning for another user if they have the appropriate permission.
- Select the Add to Objective link for each item you want to add. If a learning item is already in the plan, then "Included in Plan" is displayed.
- At the top of the page, review the Display Recommendations from option displays all potential sources for recommended training and development actions.
- Select or deselect options to control which recommendations are displayed.
Competency Model - When this option is selected, the page displays a carousel of recommended training and development actions based on a specific competency model even if the user was not assessed using the model. Up to 25 items are available in the carousel. The name of the competency model that is used for the recommendations is displayed above the carousel. By default, the alphanumerically first competency model that is available to the user who is creating the plan is selected. If no competency models are available to the user who is creating the plan, then no competency model carousel is displayed.
- To select a different competency model, select the Choose Model link below the Competency Model checkbox. This opens the Competency Model flyout, in which you can select a different competency model. The flyout displays all competency models. You can filter the available competency models by category using the Category drop-down menu. Note: If you change competency models, all selections from the original competency model are lost unless they were added to the objective.
- Competency Assessments - When this option is selected, the page displays a carousel of recommended training based on the results of the user's completed competency assessments. Note: When the Competency Models or Competency Assessment checkboxes are checked, the related carousels will populate with learning objects associated to the Competency Model/Assessment, even if the user is not within the availability of the learning object.
Machine Learning - When this option is selected, the page displays a carousel of recommended training based on machine learning, such as training based on the user's position, training the user has saved for later, or recommendations based on the user's learning history.
- Development plans support the following carousel types, if enabled: Saved for Later, Top Picks for User, Trending for Your Position, Inspired by Your Subjects, Most Popular.
- The functionality of these carousels mirror the functionality that is available in Learner Home. See Learner Home - Training and Banner Carousels.
- Select the button to add the selected items to your development plan.
- Set a due date for the item by selecting the Due Date field.
- Note: The overall due date for a development plan is the latest due date for any objective within the development plan. The due date for an objective is the latest due date for any learning item or action step within the objective.
- Competency Assessments - When this option is selected, the page displays a carousel of recommended training based on the results of the user's completed competency assessments.
Select this option to add an action step that is required to achieve the development objective. For example, if you are creating an objective to improve your writing skills, you may add a development action to shadow the Technical Writer in your organization for one hour to learn some of their best practices.
To add a development action:
- In the Learning and Development section, select the button.
- From the Development Action flyout, enter the following information:
- Description - Enter a description of an action that must be completed to achieve the objective. The character limit is 3,000.
- Activity Type - From the drop-down menu, select the activity type that corresponds with the action you are adding.
- Due Date - Set a due date for the item by selecting the Due Date field.
- Note: The overall due date for a development plan is the latest due date for any objective within the development plan. The due date for an objective is the latest due date for any learning item or action step within the objective.
- Progress - If there is already progress made on the action step at the time it is added to the plan, you may update the percentage complete at that time. If the step has not been started, enter 0, and if the step is complete, enter 100.
- Select the button to save the development action.
Assignment
Depending on your role in the organization and your security permissions, you may be able to assign a development plan to other users. This section enables you to determine who is assigned the development plan.
Note: You can only edit this section when editing the plan in Draft status.
Note: When creating a development plan from a talent pool, the Assignment information is automatically set to the users in the talent pool. With this enhancement, the Assignment information cannot be edited, including the Include Subordinates option. This helps ensure the assignment matches the users within the talent pool.
The following assignment options may be available:
- Self Only - Select this option to only assign the plan to you.
- My Team - Select this option to assign the plan to members of your team, which may include you.
- Custom Assignment - Select this option to assign the plan to any combination of users, organizational units (OUs), and groups.
Select this option to assign the plan to members of your team, which may include you. This option is only available if you are a manager with direct reports.
When this option is selected, a table displays all of your direct reports, alphabetized by last name.
- Select the Include Self checkbox to include yourself in the assignment.
- Select the My Team checkbox to automatically select all users on your team.
- Select the checkbox to the left of a direct report to assign the development plan to the user. All direct reports are selected by default.
- To select all direct reports, select the My Team checkbox. To deselect all direct reports, deselect this checkbox.
- To include a direct report's subordinates in the assignment, select the Include Subordinates checkbox to the right of the user.
- This option can only be selected for direct reports who are already selected. If a direct report is not selected, the Include Subordinates option for that direct report cannot be selected.
- To include the subordinates for all selected direct reports, select the Include All checkbox.
Select this option to assign the plan to any combination of users, organizational units (OUs), and groups.
When this option is selected, a button is available. Select this button to open the Select Users flyout. From the drop-down menu, select the user criteria type, such as User, Group, and OU type. You can select any combination of criteria to create the assignment, and the selected criteria appear in the Selected tab. You must have permission to assign OU development plans to select an OU type as a criterion.
Designate this as the Primary Plan for Assignees
Select this option to automatically set this development plan as the primary plan for all users who are assigned the plan. This option is only available until the plan is submitted.
Submit Plan / Save as Draft / Discard Changes
When you are finished creating your plan, select the button to send your development plan to the appropriate approving user; the plan status is Pending Approval. If approval is not required, the plan is automatically approved.
If you are creating a plan, but are not ready to submit, select the button. This saves the plan in Draft status and you may continue editing it prior to submission.
To discard the plan or any unsaved changes, select the button.
Navigation Warning: When creating or editing a development plan or development plan template, if you navigate away from the page without saving your changes, a confirmation pop-up opens to notify you that any unsaved changes will be lost. The pop-up gives you the option to leave the page and lose your unsaved changes, or stay on the page to avoid losing your unsaved changes.