Manage Applicant Statuses
From this page, administrators can:
- View the complete list of default and custom statuses for the portal
- View the list of default statuses
- Rename default statuses
- Create custom statuses
To access Manage Applicant Statuses, go to .
The functionality of an applicant status is determined by the status type defined for the status.
- For the default statuses, which are Closed, Hired, and Offer Letter, the status type is predefined by the system and cannot be modified. See the Default Statuses section below for more information.
- For custom statuses, the status type is defined when the status is created or modified. See the Custom Statuses section below for more information.
Defining a type for each applicant status enables administrators to control the functionality associated with each status and more effectively define the various steps of the application process. Some status types can be used multiple times, which allows administrators greater flexibility in defining the functionality associated with a status.
Note: The status types that are available to select for custom statuses are system-defined. New status types cannot be created.
Applicant Statuses by OU
Applicant statuses can be defined for each organizational unit (OU) or for the portal as a whole. Defining statuses by OU allows each OU to set the statuses that are relevant for their hiring process. This also prevents other OUs from using the statuses that are specific to another OU.
By default, a master applicant status list is created at the top OU level, including default and custom statuses. Administrators who create job requisitions and recruiters who change applicant statuses should only have access to the applicant statuses at their OU level so that the master applicant status list is only modified by top-level administrators.
When managing the applicant statuses at the child OU level, the statuses are initially an exact copy of the parent OU's statuses.
- All custom statuses may be deleted from the child OU status list, regardless of whether they are in use. Note: At the top OU level, custom statuses can only be deleted if they have never been used.
- At the child OU level, new custom applicant statuses cannot be created. Instead, administrators can only create custom statuses from the master list defined at the top level OU.
Create Custom Status
Click the link to add a custom applicant status. See Create Custom Applicant Status at Top OU Level.
Include Inactive
Select this option to include inactive applicant statuses in the display.
Note: Inactivating an applicant status does not remove it from existing requisition templates and requisitions, but rather prevents it from being added moving forward. To prevent the status from appearing on future requisitions, the status needs to be removed from requisition templates where it is in use.
Default Status List
Click Default Status List to view and define the default list of statuses for the OU. See Define Default Status List.
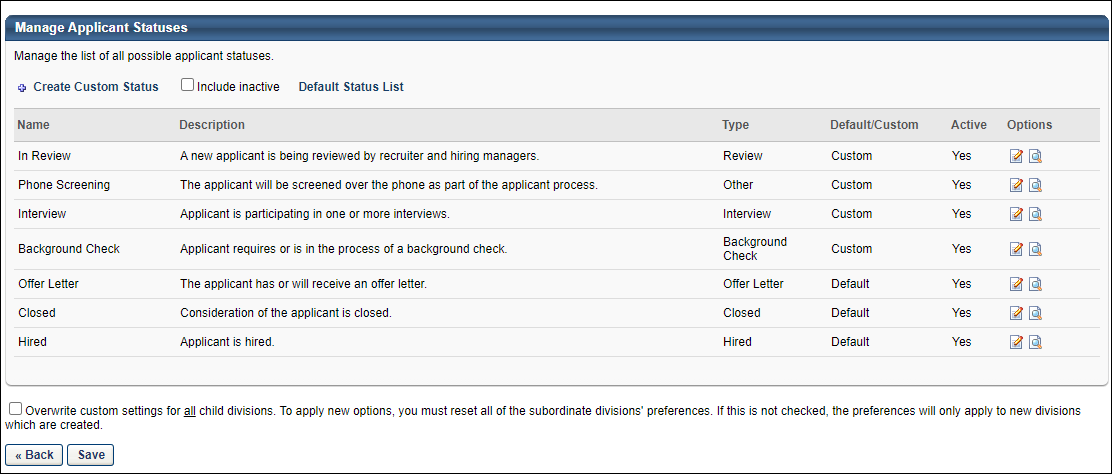
Manage Applicant Statuses Table
The following information displays for each status:
- Name - This column displays the names of default and custom applicant statuses. By default, statuses are listed in the order in which they are added. New statuses appear first.
- Description - This column displays the status descriptions that were defined during creation.
- Type - This column displays the status type defined for the status.
- Default/Custom - This column displays whether the applicant status is one of the default statuses or a custom status.
- Default statuses are available by default and cannot be deleted but can be modified. Some default statuses have specific preferences and functionality associated with them. When a default status is modified, these additional options can be configured. See Default Statuses below for additional information.
- Active - This column displays whether or not the status is active. All custom status can be activated or inactivated when the status is created or when editing the status. Note: Inactivating an applicant status does not remove it from existing requisition templates and requisitions, but rather prevents it from being added moving forward. To prevent the status from appearing on future requisitions, the status needs to be removed from requisition templates where it is in use.
- Options - The following options are available in the Options column:
- Edit
 - Click this icon to edit the details of the applicant status. If a status is currently in use, any modifications are applied to all requisitions, requisition templates, and applicants to which the status applies. For default statuses, the display name can be edited but the status type cannot be changed.
 - History
 - Click this icon to view the modification history of the status, including the creation and any modifications to the status.
 - Remove
 - Click this icon to delete the status. This option is only available for custom statuses that are not being used in status workflow templates or job requisition status workflows. Default statuses cannot be deleted.
- Edit
Back/Save
Click to return to the OU selection page for managing applicant status.
Click to save the changes to the Overwrite custom settings option.
Overwrite Settings
Select this option to overwrite custom settings for child division OUs. If you overwrite custom settings for child division OUs, the selected settings are applied to both new and existing child OUs. Any previously customized child OUs are updated with the selected settings.
- If there are no customizations to the child OU, then the parent OU customizations are applied to all child OUs.
- Overwrite custom settings checkbox setting
- If this option is selected, all child OU customizations are deleted from the database, which means the parent OU customizations will be applied to new and existing child OUs.
- If this option is unselected, all existing child OU customizations will remain unchanged, and any new child OUs will inherit the parent OU customizations by default.
- If a child OU has been customized to display any widgets, then regardless of the parent OU customizations, the child OU customizations are applied.
- If a child OU has been customized to hide all widgets, then parent OU customizations will take precedence and will be applied.
Contents
The following information is available within this folder. Click a link to navigate directly to the appropriate topic: