The notify applicant option is used to send a notification to the applicant that an interview has been scheduled. A single notification is used to notify the applicant, even if there are multiple interview sessions occurring at different times and on different days. Once a notification is sent to an applicant, the last sent date displays as a link to the left of the button.
Applicants are notified via the Applicant Scheduling pop-up. Within the pop-up, all interview sessions display for the applicant for the associated status. Each session displays in a separate session box. Within the pop-up, you can configure details about the session, such as date and time, as well as remove individual sessions.
To access the Interview Scheduler, click from Manage Candidates. Or, navigate to the Statuses tab of the applicant's profile page, and then click in the applicable status panel.
| EMAIL NAME | EMAIL DESCRIPTION | ACTION TYPE |
Send Notification
To notify an applicant that an interview has been scheduled:
- Click . This opens the Applicant Scheduling pop-up. All existing settings for the interview session display. One or more sessions may display, depending on the configuration of the Interview Scheduler page for the applicant.
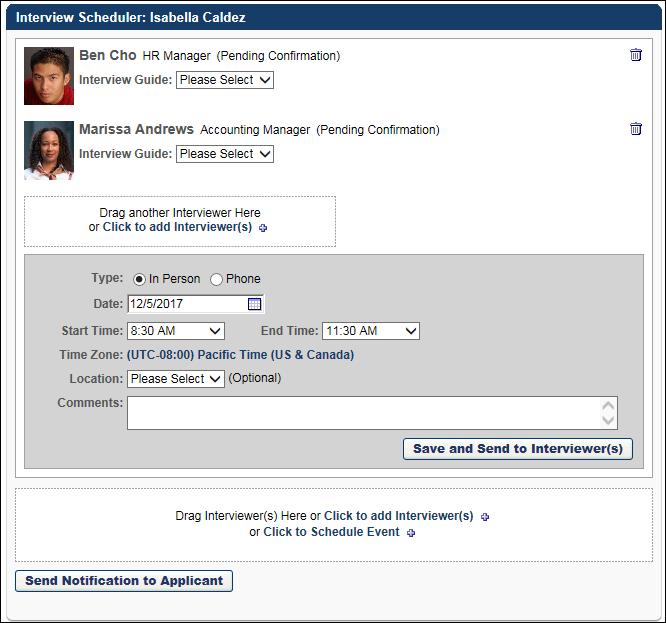
- Review and/or complete the following fields in the pop-up:
- Date - This field displays the date for the interview. You can edit the date by entering a different date in the Date field or using the calendar option to select a date. This is a required field.
- Start Time - This field displays the time at which the interview begins. You can edit the start time by selecting a different time from the drop-down. This is a required field.
- End Time - This field displays the time at which the interview ends. You can edit the end time by selecting a different time from the drop-down. This is a required field.
- Time Zone - This field displays the time zone in which the interview occurs. To change the time zone, click the time zone link. This opens a drop-down from which to select a different time zone. This is a required field.
- Type - This field displays the interview type. If Live Video is selected in the Type field on the Interview Scheduler page, then the field cannot be edited in the pop-up. If In Person,or Phone are selected in the Type field on the Interview Scheduler page, then you can edit the field by changing the option to In Person or Phone.
- Location - This field displays for In Person interview types. This field enables you to specify where the interview will take place. You can edit the location by selecting a different location from the drop-down. The selections that are available are the locations defined by the administrator in Interview Management Preferences. This is not a required field. Note: If you change the interview type in the Type field, the selected location is not retained.
- Phone Number - This option displays for Phone interview types. This field enables you to define the phone number for the interview. You can edit the value by entering a different phone number in the field. There is no character limit. This is not a required field. Note: If you change the interview type in the Type field, the information entered in this field is not retained.
- Interviewer(s) - This field displays the interviewers defined for the interview session. You can add and remove interviewers from the list. Note: To add interviewers, you must have permission to edit interviewers.
- Add Interviewers - To add interviewers, click the Add Interviewer(s) link. This opens the Add User pop-up. Select one or more users. There is no limit to the number of users that can be added as interviewers for In Person and Phone interview types. For Live Video interview types, the maximum number of interviewers or interview reviewers for a session is three. Click . This adds the users to the interview session. Note: Users can only be added to a session once. They cannot be an interviewer for the same session multiple times.
- Remove Interviewers - This option allows you to remove interviewers from the list. Clicking the Trash Can icon removes the interviewer. The Remove option is beneficial to organizations that may prefer not to provide the list of interviewers to applicants when notifying applicants that an interview is scheduled.
- Add another Interviewer - This option allows you to add an interview session. Clicking the link adds a blank interview session box to the bottom of the pop-up. You must define the settings for the required fields in the session. See the field descriptions above for required settings. See Create Interview - Set Schedule Details and Send Interview.
- Comments to Applicant - This field enables you to enter a note to the applicant. There is no character limit. This is not a required field.
- Click . This sends the notification to the applicant and adds the Last sent link to the right of the button. This also triggers the Interview Scheduling Notification - Applicant email.
Resend Notification to Applicant
You can resend a notification to an applicant to let them know that an interview is scheduled. This can be done by resending the notification without making changes to the notification. Or, you can edit the notification and then resend.
To resend a notification without editing the notification:
- Click Last sent. This opens the Applicant Scheduling pop-up. All fields are pre-populated with the existing settings for each interview session.
- Click . This resends the notification to the applicant and updates the Last sent link.
To resend a notification by editing the notification before sending:
- Click . This opens the Applicant Scheduling pop-up. All fields in the pop-up are editable.
- Once all fields are configured, click . This resends the notification to the applicant and updates the Last sent link.
Resending a notification triggers the Interview Scheduling Notification - Applicant email, if configured by the administrator in Email Administration. In addition, the Interview Notification Sent to Applicant event is logged on the History tab of the applicant's profile.
Note: When viewing the Applicant Scheduling pop-up, the date and time display in the viewer's time zone.
Remove Interview Session
When two or more interview sessions appear in the Applicant Scheduling pop-up, you can remove an interview session by clicking the Trash Can icon in the upper-right corner of the session box. This removes the session from the pop-up and from the notification that is sent to the applicant but does not remove the session from the interview schedule for the status. This only removes the session from the notification that is sent to the applicant.
The option to remove sessions is only available when there are multiple sessions scheduled. There must be at least one session in the Applicant Scheduling pop-up in order to send the notification to the applicant.