The Available Fields section on the Build tab enables administrators to add fields to the form. In addition, a few questions can be included from the question bank. Forms must include at least one user field, question, or rich text field.
Editing Note: When editing a form, fields cannot be added or reordered.
To create a form, go to . Then, select the button.
| PERMISSION NAME | PERMISSION DESCRIPTION | CATEGORY |
System Fields
User Standard Fields
Standard fields can be added to forms.
To add a field, drag and drop the field into the form or click the plus icon to the right of the field title. This adds the field to the form, and the field no longer appears in the User Standard Fields list.
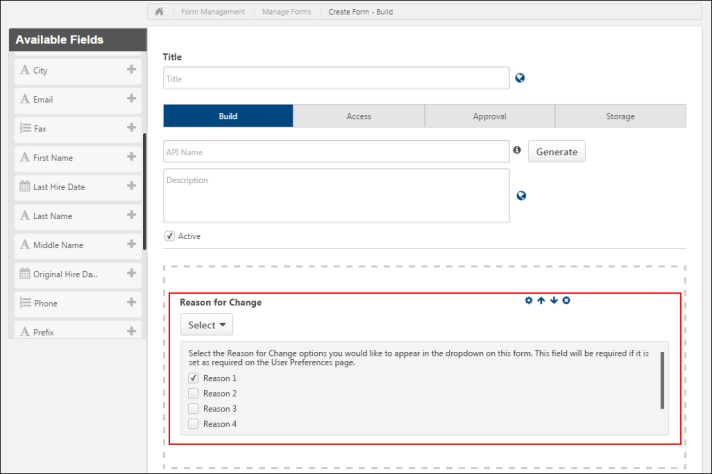
Cornerstone HR - Reason for Change Field
For portals with Cornerstone HR enabled, a Reason for Change field can be added to forms. Only one Reason for Change field can be added to a form.
The Reason for Change field enables administrators to track the reason a change is made to the user record as a result of user data captured on forms, such as changing a user's last name. When users complete the form, they can be required to fill out the Reason for Change field and select the reason that there is a change to their user data. Once the form is submitted and approved (if approval is required), then the system automatically captures the reason for the change in the Modification History section on the User Record page.
Add Field Requirement: For portals with Cornerstone HR enabled, if a standard user field is added to a form, then the Reason for Change field must also be added in order to save the form.
Situation
Gayashri has decided to change her name on her employee record to her married name. She needs to ensure that her name is updated in the organization’s system of record.
Process
- The talent administrator creates an Employee Data Change Form. He includes all pertinent fields, such as First Name, Last Name, and address fields. Because he has added user fields to the form, he also needs to add the Reason for Change field to the form. For the drop-down options on this particular form, he selects the following reasons to be available for users to select: Data Correction, Employee Relocation, and Personal Data Change. He also makes sure to set the form as Self-Service for all employees so that they can easily access the form whenever it is needed. He sets up an approval workflow for the form so that Human Resources can confirm with the employee prior to approving the changes.
- Gayashri searches for the Employee Data Change Form in Global Search. She fills out her updated Last Name on the form and selects Personal Data Change in the Reason for Change field. Then, she submits the form for approval.
- Laura, a Human Resources Manager, receives a request for approval of Gayashri's Employee Data Change Form. She quickly confirms with Gayashri that she does indeed want to update her name, and then she approves the form.
- Gayashri's user record is updated with her new last name. Her user record reflects the change in the Modification History section with Personal Data Change as the reason.
Once the Reason for Change field is added, the reasons that will be available to users to select must be defined for the field. To select the reasons:
- Click the Settings icon
 for the field. This enables the drop-down options to display below the field.
 - Check the box next to each option that you would like to be available for users to select in the drop-down. The options that are available are the active options defined for the field by the administrator in User Preferences. If a reason is inactivated, the reason only displays on published forms if the user has not yet submitted the form.
User Type and Employment Status
This section is only available to organizations that have the User Type and Employment Status sections enabled in the User Record. In addition, forms with these fields are excluded from onboarding tasks and applicant workflows.
This section only contains one option, User Type and Employment Status. When this option is added to the form, all User Type and Employment Status fields are added to the form. This is because all User Type and Employment Status fields are related. Individual fields cannot be selectively added to the form.
When a user is viewing the User Type and Employment Status fields within a form, only certain fields are visible depending on the values that are selected in the User Type and Employment Status. For example, the Eligible for Rehire field is only visible if the User Type field is set to Terminated, and the Leave Type field is only visible if the User Type field is set to On Leave.
These fields can be set to Required or Read-Only. Also, they can be set to auto-fill the user's latest response to the field.
User Custom Fields
The User Custom Fields section displays all User custom fields for which the administrator meets the availability requirements. Note: Branched Drop-down and Hierarchy custom fields are currently not supported for Form use.
To add a field, drag and drop the field into the form or click the plus icon to the right of the field title. This adds the field to the form, and the field no longer appears in the User Custom Fields list.
If the field is removed, and at a later time the administrator no longer meets the availability criteria for the field, then the field no longer displays in the User Custom Fields section for the administrator.
Add Field Requirement: For portals with Cornerstone HR enabled, if a custom user field is added to a form, then the Reason for Change field must also be added in order to save the form.
Encrypted Fields
For encrypted user custom fields, when users complete and submit the form, the information they enter into the field will be encrypted. Users can enter a maximum of 50 alphanumeric characters when filling in the field. Data can only be decrypted after the data has been exported via an outbound data feed, and then your private key is used to decrypt the exported data.
Scenario
ACME Inc. is a consulting company with many international employees that travel around the globe to meet with clients. As part of their onboarding process, they ask for the new hire passport information so they can ensure they have it on file in the event of travel emergencies.
Enablement
ACME Inc. has contacted CSOD to create a Work Order to enable Encrypted Short Text Box for the User Record Custom Fields. ACME provides CSOD with the Public Encryption Certificate for CSOD to begin the enablement process. Once enablement has been completed, ACME Inc. is ready to start using Encrypted Short Text Box fields on the user record as well as in forms.
Administrator
- Isadora is an admin at ACME Inc. She wants to ensure ACME can collect Passport Numbers from new hires. She first configures a new custom field for the User Record. She selects the Encrypted User Short Text Box type and names it Passport Number. She proceeds to create other custom fields needed to collect passport information and selects whether they can be regular fields or encrypted depending on the sensitivity of the information.
- After all the fields that are required are created for the user record, Isadora can start creating the form that needs to be assigned to new hires. She goes to Manage Forms to create a Traveler Information form. She is able to see all the User Record fields she had previously created under the User Custom Fields section of Available Fields. She puts all the necessary User Custom Fields on her form, including Encrypted Fields like Passport Number.
- Isadora can then configure the onboarding task in Form Task Administration so that she can include the Traveler Information form as a form task in the onboarding workflow that will be assigned to new hires when onboarding is launched.
New Hire
- Roger is a newly hired consultant for whom onboarding has just been launched. Roger sees on his Actions tab in Universal Profile that he has a task to complete a Traveler Information form.
- Roger launches the form task and starts to fill out his information. As he fills out the form, he can see the data he has entered for the encrypted user custom fields, such as the Passport Number, in clear text.
- After Roger has completed the form, he submits it. The data that he has entered in the encrypted user custom fields is then encrypted using ACME's public encryption key.
- When Roger opens his Snapshot Document folder where his completed Traveler Information form is saved, he can view the responses he has entered for the form he submitted. However, for Roger and any other user who may have access to Roger's Document folder, the responses entered in the Passport Number field and other encrypted user custom fields display as ***** in place of the data that was entered.
Administrator
- Isadora needs to ensure that the encrypted data in the user record, which was collected via forms, makes it over to the company's HRIS system. She works with CSOD to have the data outputted via an outbound data feed (ODF). The ODF includes the encrypted fields.
- ACME uses its private decryption key to decrypt the data feed before the data is inputted into the correct fields.
Organizational Units
This section contains all active OU types, including custom OUs. Groups cannot be added to a form. To add a field, drag and drop the field into the form or click the plus icon to the right of the field title. This adds the field to the form, and the field no longer appears in the list.
Once an OU is added to a form, the OU will remain on the form even if it is made inactive. As a result, users may view or provide information for inactive OUs on a form.
Employee Relationships
Employee relationship fields control which users are assigned to a particular role for a user. For example, the Manager employee relationship field controls who is assigned as a user's manager. If an employee relationship field is modified, then the corresponding field on the user's User Record is also updated.
Depending on the configuration of the employee relationship field, these fields can be added to a form to display a read-only view of the employee relationship or allow a user to update the employee relationship.
The following employee relationship fields may be available, and they are displayed in alphabetical order:
- Approver
- Manager
- Custom Relationships
Only active employee relationships are available. If an employee relationship is made inactive, the corresponding field remains on the form until it is removed from the form. At that point, the inactive field cannot be added to the form unless it is made active.
- When a user views a form, only active employee relationships are displayed. Any employee relationships that are inactive are not visible on the form.
Question Bank
If additional information is needed which is not available in the User Record, but is necessary to supplement the form, the Question Bank section enables administrators to configure questions from the Form Management Question Bank.
The Question Bank is organized by the question categories that are configured in the question bank. Each category displays all associated questions that are available to the administrator. The categories that display are the categories for which the administrator meets the availability criteria and that are within the permission constraints for the permission to manage the question bank. The categories for which the administrator does not meet the availability criteria and are not within the permission constraints do not display in the Questions section.
To add a question, click the category name. The questions associated with the category display below the category name. Click the plus icon to the right of the question to add it to the form, or drag and drop the field into the form. Once added, the question no longer appears in the list of questions for the category.
Note: Forms are not intended to be used as surveys to collect a large amount of data via Question Bank fields. The main purpose of Forms is to update User Record data via self-service. Using an extensive amount of Question Bank fields may lead into performance issues.
Reference Letter Forms
When creating a form that will be used to request reference letters, it is recommended that the form include a question that is a Text field question type. The text field allows referrers to copy and paste a reference letter into the field. The text field question may need to be created in the Question Bank by the administrator if the question has not already been created. Text field question types that are used for large amounts of data should be set up as multiline in the Advanced Options section, with character max set to 10,000.
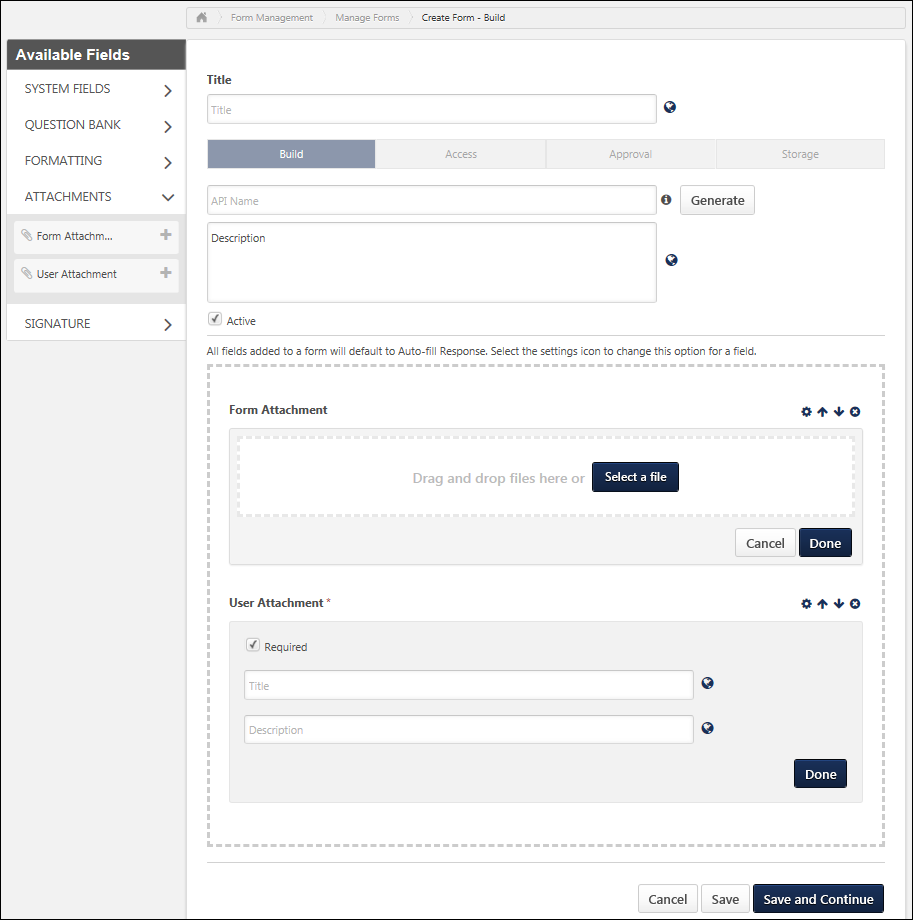
Attachments
The following fields are available in the Attachments section:
- Form Attachment - Add this field to the form to attach a document to a form, which can then be downloaded by users who are completing the form. When this field is added to the form, you can then drag and drop a file into the field within the form builder to attach the document to the form.
- User Attachment - Add this field to the form to enable users to attach documents to the form as they complete the form. Each User Attachment field accepts up to three attachments. This field can be added to a form an unlimited number of times. This field cannot be configured to be auto-populated or read-only. When this field is added to a form, you can configure the following settings for the field:
- Required - Select this option to require users to attach at least one document to the form to complete the form. This option is selected by default.
- Title - Specify a title for the field that will be displayed to end users. This field is required and accepts up to 250 characters. If multiple languages are enabled for your portal, select the Translate icon to translate the field into other available languages.
- Description - Specify a description for the field that will be displayed to end users on the form below the field title. This field is optional and accepts up to 250 characters. If multiple languages are enabled for your portal, select the Translate icon to translate the field into other available languages.
- Preview
 - When editing the field, select the Gear icon in the upper-right corner of the field to preview the field as it will appear on the form.
 - - Select this button to save and preview the attachment field configuration.
Effective Dating Note: Attachments can be added to an effective dated form. However, the attachment data is not effective dated.
Reorder Fields
To change the position of the field in the form, click the field and drag and drop it anywhere within the form.
Additional Options
Once a field or question is added, the following options may display :

Settings
Click the Settings icon ![]() to open the following options:
to open the following options:
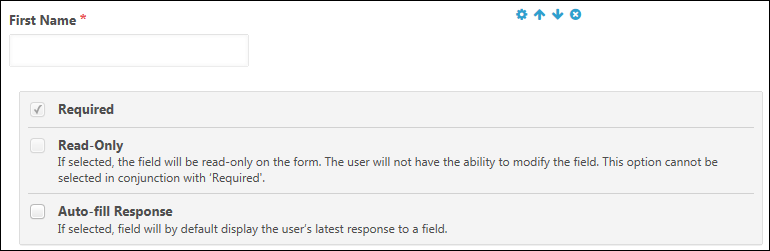
- Required - This option is selected by default. When selected, end users are required to complete the field. When unchecked, the field is not required to be completed. This option cannot be selected if the Read-Only option is selected.
- Read-Only - When this option is selected, the field is read-only and cannot be filled out by end users. This option cannot be selected if the Required option is selected. This option is not available for encrypted user custom fields.
- Auto-fill Response - When this option is selected, the field is auto-filled with the end user's current data. This option is selected by default.
Move Up/Down
Use the Up ![]() and Down
and Down ![]() arrows to move the fields to the desired location on the form. Fields can be moved above and below page breaks.
arrows to move the fields to the desired location on the form. Fields can be moved above and below page breaks.
Remove
Click the Remove icon ![]() to delete the field. Once removed, the field reappears in the User Fields or Question Bank list and can be added back to the form.
to delete the field. Once removed, the field reappears in the User Fields or Question Bank list and can be added back to the form.
Cancel/Save/Save and Continue
Click to move to the next step of creating the form. The settings defined on the previous step are saved.
Click to save the form without publishing and return to the Manage Forms page. The form settings are saved, and the administrator can return to the form to add or change settings, and then publish the form.
Click to cancel creating the form.