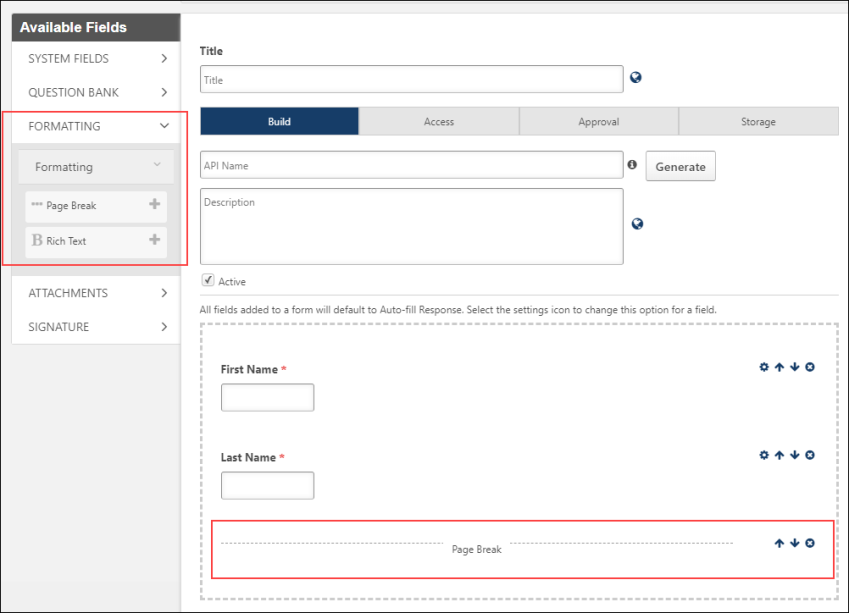
When creating a form, administrators can define formatting options on the Build tab, which include adding page breaks, text fields, and attachments.
To create a form, go to . Then, from the Manage Forms page, select the button.
| PERMISSION NAME | PERMISSION DESCRIPTION | CATEGORY |

Formatting
The Formatting section includes the following options:
- Page Break
- Rich Text
Page Breaks
Page breaks can be added by clicking the plus icon to the right of the Page Break option. Page breaks allow the administrator to turn the form into a series of pages. Each page break represents a single page in the form.
When page breaks are added, they display at the bottom of the form. Use the Up ![]() and Down
and Down ![]() icons to move the page break to the desired location.
icons to move the page break to the desired location.
Click the Remove icon ![]() to delete the page break. All fields within the page break are joined with the previous page.
to delete the page break. All fields within the page break are joined with the previous page.
Rich Text
Text fields can be added by clicking plus icon to the right of the Rich Text option. Text fields are text boxes in which administrators can enter text content. Basic formatting options are available for text fields, such as bold, italics, and underlining. There is no character limit for the field.
Note: The Rich Text field does not support HTML text. It is recommended that you enter the text into the Rich Text field directly or copy and paste the plain text into the rich text editor, and apply formatting using the available rich text formatting options.
- To check the spelling of the text box contents, click the ABC icon
 in the text box toolbar. This opens the Spell Checker pop-up.
 - Once the text is added to the field, click or click to cancel the changes to the field.
- Click the Settings icon
 to edit the field. Use the Up
  and Down
  icons to position the field in the desired location.
 - Click the Remove icon
 to delete the field.
Attachment
This section enables administrators to add file attachments to the form. The Attachment section includes a Select File field. When the Select File field is added to the form, administrators can drag and drop files to the form or upload files using the button. The Select File field can be added to the form multiple times.
Add Attachments - Select a File
To add attachments using the button:
- Add the Select File field from the Attachment section. This adds an Attachments section to the form.
- Click the button. This opens a file upload pop-up from your computer.
- Search for and select a file, up to 30 MB. The file name cannot exceed 50 characters and cannot include invalid characters. Accepted file types are ARF, AVI, BMP, DOC, DOT, DOTX, FLV, GIF, JPEG, JPG, M4A, DOCX, M4V, MID, MOV, MPEG, MPG, MPP, MP3, MP4, PDF, PNG, PPS, PPSX, PPT, PPTX, RM, TXT, VSD, WAV, WMA, WMV, XLS, XLSX, and ZIP.
- Once selected, the file is added to the Attachments section.
- Click to add the section to the form.
- Click to cancel adding the section to the form.
To add more attachments, repeat the steps above.
Add Attachments - Drag and Drop Files
Files can be dragged from anywhere on the administrator's computer and dropped into the Attachments section.
Collapse Attachments Section
To collapse the Attachments section, click the Options icon ![]() .
.
Move Attachments Section
To move the Attachments section, click the Up ![]() or Down
or Down ![]() arrow to place the section in a different location on the form.
arrow to place the section in a different location on the form.
Delete Attachments Section
To delete the Attachments section, click the Remove icon ![]() .
.
Next Step
Prior to moving to the next step of creating the form, at least one file must be uploaded when the Select File field is added to the form.