The New Load page enables you to either perform a one-time bulk import or validate your data. Following the validation or data load, an overview of the process is displayed.
To create a new data load, go to . Select the Loads panel. Then, select the button. This opens the New Load page.
| PERMISSION NAME | PERMISSION DESCRIPTION | CATEGORY |
| Access Edge Import | Grants access to the Edge Import tool, which enables administrators to load data into their portal. This permission cannot be constrained. This is an administrator permission. | Edge Import |
| Create/Update Configurations | Grants ability to create and update Edge Import configurations. This permission cannot be constrained. This is an administrator permission. | Edge Import |
| Download Reports Access when portal opts-in for Restrict reports access - Edge Import |
Grants ability to download Edge Import load details reports for loads performed by others. Users who do not have this permission cannot download load import results for loads performed by others. In addition, users without this permission cannot load data for someone who has previously only validated their data. This permission cannot be constrained. This is an administrator permission. This permission is only available and applicable when the portal has enabled the restriction for Edge Import load details report access. |
Edge |
Edge Import Migration Guides
- Core Loads Migration - Select this link to download the Edge Import Core Loads Migration Guide.
- Important: For customers using the following Data Load Wizard features that are not available in Edge Import, we do not recommend migration of Inbound Data Feed (IDF) for Users and OUs from Data Load Wizard to Edge Import at this time:
- Sensitive Personally Identifiable Information (SPII) fields - Date of Birth/SSN
- Customers using the above features will be informed when these features are available in Edge Import and will be given at least three months to deprecate.
- Important: For customers using the following Data Load Wizard features that are not available in Edge Import, we do not recommend migration of Inbound Data Feed (IDF) for Users and OUs from Data Load Wizard to Edge Import at this time:
Edge Import Guides
- Edge Import Starter Guide - Select this link to download the Edge Import Starter Guide.
- Capabilities - Select this link to download the Edge Import Skill and Capabilities Guide.
- Compensation - Select this link to download the Edge Import Compensation Guide.
- Performance - Select this link to download the Edge Import Performance Guide.
- Recruiting - Select this link to download the Edge Import Recruiting Guide.
Limits and Best Practices
What is the max file size limit for Edge Import and how can I reduce the impact?
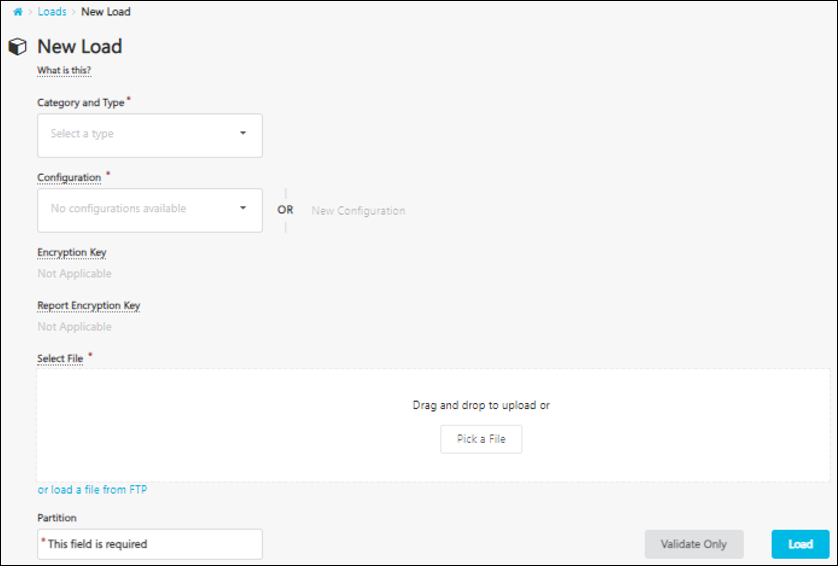
New Load
- Category and Type - From this drop-down menu, select the data type that applies to the data you are loading. This drop-down only includes the data import types for which the administrators has permission to access. For example, the Employee Salary load type only appears if the administrator has the Load Employee Salary permission.
- Configuration - In this field, you have two options for selecting a configuration for your data load. Note: Administrators must have the appropriate permissions to modify or create a configuration.
- From the drop-down menu, select the configuration that most closely matches your data. You can modify the default Options and Mapping settings from the configuration for your data load by selecting the button, but the modifications are not saved to the selected configuration.
- If none of the available configurations match your data, then select the button to create a new configuration. See Edge Import - Create Data Import Configuration.
- Encryption Key - From this drop-down, select the encryption key that is used with the data load. Encryption keys are created on the Manage Keys page. See Key Management - Manage Keys.
- Report Encryption Key - From this drop-down, select the report encryption key that is used to decrypt PGP-encrypted load report. Report Encryption Keys are created on the Report Manage Keys page. See Key Management - Manage Report Encryption Keys.
- Select File - In this field, select the file that contains the data that you are loading. See the File Format Information section below for additional information. Files can be selected in the following ways:
- Pick a File - Pick a file from your computer by dragging and dropping a file into the field or by selecting the button to browse for and select a file from your computer. With this method, the maximum file size is 20 MB.
- Select from FTP - Select a file from your Cornerstone FTP location by selecting the or load a file from FTP link. Then, specify the FTP path. All paths are relative to the FTP directory. If the file is located in the root of the FTP directory, only the file name needs to be provided. With this method, the maximum file size is 25 GB for .xls, .xlsx, .csv and .txt files. Up to 150 columns (data feed) and 300 columns (manual load) can be loaded per file. The number of records you can load varies by environment and load type, and are listed in the template guides for each load.
Once the file is loaded and the settings are configured, you have two options:
- Select the button to only validate that your data is in the correct format and does not contain errors. When this button is selected, the Validation Details are displayed. See the Validation Details section below for additional information.
- Select the button to validate the data and load it to the system. See the Load Details section below for additional information. Note: Depending on the portal configuration, if an administrator has only validated their data, another administrator may not able to perform a data load for this data unless they have the appropriate permission.
Validation Details
When you choose to only validate your data, the system analyzes the selected file, and the Validation Details provide an overview of the validation.
The Record Details chart provides a visual overview of the validation progress and the number of records in each status. While data is being processed, the data is displayed as a bar graph. Once the data is fully processed, the data is displayed in a pie chart.
The Information section displays the following details about the validation or load:
- Category
- Type
- File Name - Select this link to download the original file that you uploaded for the Edge Import data load.
- The link to download the file is only available for 30 days.
- The link to download the file is accessible even if you were not the person who originally uploaded the file. However, the link respects the existing permission which is available via a backend setting. If this permission is enabled, then only users who have this permission can download the file.
- Configuration - Select the View link to open a flyout that displays the Options and Mapping settings from the configuration.
- Validated By/Loaded By - This displays the name of the user who initiated the validation or load.
- Started - This displays the date and time at which the validation or load began.
- Completed - This displays the date and time at which the validation or load completed.
The Quick Stats section displays reports that can be downloaded.
- Valid Records - This displays the number of valid records that were processed. Valid records may be processed successfully or with warnings. Any warnings are displayed in the downloaded report so that you can adjust the data, if necessary, prior to loading it.
- Not Valid - This displays the number of invalid records that were processed. Any errors are displayed in the downloaded report so that you can adjust the data and then load it.
- Total - This displays the total number of records that were processed.
To download a report, select the record count in the Download column. Note: Depending on the portal configuration, administrators may only download a report for loads that they performed unless they have the appropriate permission.
The Warning Details section appears if your records have any warnings. This section displays any warnings that occurred and the number of records that encountered the warning.
The Error Details section appears if your records have any errors. This section displays any errors that occurred and the number of records that encountered the error.
Select the button to load the data to the system. Note: Depending on the portal configuration, administrators may only perform a data load for data that they validated unless they have the appropriate permission. See the Load Details section below for additional information.
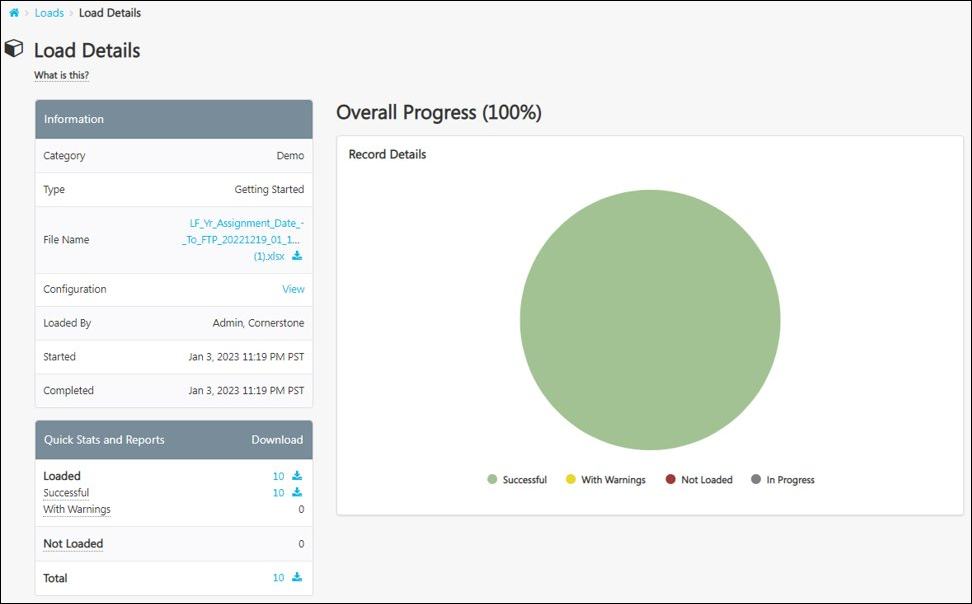
Load Details
When you load your data, the system analyzes the selected file and then attempts to load the data. The Load Details provide an overview of the load.
The Record Details chart provides a visual overview of the load progress and the number of records in each status. While data is being processed, the data is displayed as a bar graph. Once the data is fully processed, the data is displayed in a pie chart.
The Information section displays the following details about the validation or load:
- Category
- Type
- File Name - Select this link to download the original file that you uploaded for the Edge Import data load.
- The link to download the file is only available for 30 days.
- The link to download the file is accessible even if you were not the person who originally uploaded the file. However, the link respects the existing permission which is available via a backend setting. If this permission is enabled, then only users who have this permission can download the file.
- Configuration - Select the View link to open a flyout that displays the Options and Mapping settings from the configuration.
- Validated By/Loaded By - This displays the name of the user who initiated the validation or load.
- Started - This displays the date and time at which the validation or load began.
- Completed - This displays the date and time at which the validation or load completed.
The Quick Stats section displays reports that can be downloaded.
- Loaded - This displays the number of valid records that were processed and loaded. Valid records may be processed successfully or with warnings. Any warnings are displayed in the downloaded report so that you can adjust the data, if necessary, prior to loading it.
- Not Loaded - This displays the number of invalid records that were not loaded. Any errors are displayed in the downloaded report so that you can adjust the data and then load it.
- Total - This displays the total number of records that were processed.
To download a report, select the record count in the Download column. Note: Administrators can only download a report for a load they did not perform if they have permission to access the associated data load type. Depending on the portal configuration, administrators may only download a report for loads that they performed unless they have the appropriate permission.
The Warning Details section appears if your records have any warnings. This section displays any warnings that occurred and the number of records that encountered the warning.
The Error Details section appears if your records have any errors. This section displays any errors that occurred and the number of records that encountered the error.
Frequently Asked Questions (FAQs)
The file remains on the FTP after the load.
Administrators can always download a report for a data load that they performed.
Administrators can only download a report for a load they did not perform if they have permission to access the associated data load type. In addition, depending on the portal configuration, administrators may only download a report for loads that they performed unless they have the appropriate permission.
File Format Information
The following file types are supported:
| File Type | Details |
|---|---|
| Text File |
|
| Excel File |
|
PGP and GPG encrypted files are supported for data feeds and one-time loads. It is important to note that when encrypted data is loaded, the data in the load report is also encrypted. It is recommended to keep a copy of the original plain text file before encryption from your source data system.
Edge Import supports text and Excel files with and without column headers. The first row in the file should be the header with column names. As a best practice, use column headers to make the configuration and maintenance process more user-friendly and less vulnerable to errors.
Validation Tips
- For non-translation loads, each row needs to be unique.
- Examples: For employees, this could be User ID or GUID. For OUs, this is the OU ID.
- If more than one record contains the same identity value, the first record will be loaded, and the other records will be marked as duplicate (error).
- Required columns must have a valid value.
- Values need to be acceptable and comply with the maximum field size, follow the latest template guide.
- For enumerated fields, the ID or Code must match the values listed in the relevant template guide.
- Optional fields with invalid data will be omitted, but the record itself will be loaded and logged with warnings.
- Ensure that the format of cells in Excel files are correct.
- The cell must be in text format for a number that starts with "0.". Example: "00123" must be provided in a cell formatted as 'Text.' If the cell format is defaulted by Excel as 'Number,', it will be incorrectly saved as "123".
- IDs associated to a record must match an existing unique ID value that’s already in the portal or is provided for creation in the current load file.