Custom Transaction Field Administration

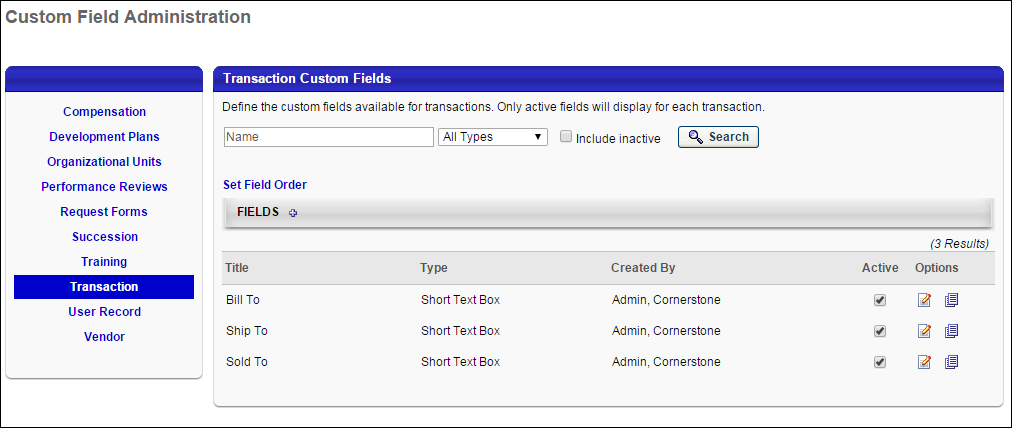
The Transaction tab in Custom Field Administration enables administrators to create custom fields for transactions and add the fields to the transactions that are created when training is purchased. The fields can be added to the Shopping Cart, My Account, and Manage Transactions functionality.

To access custom Transaction fields, go to Admin > Tools > Core Functions > Custom Field Administration.

Feature Description
Search Filters

The following search filters are available:

  • Name - Enter search terms in the Name filter. The field displays results for a partial or exact match to the search terms.
  • Field Type - Select a field type from the drop-down.
  • Include Inactive - Check the Include Inactive option to include inactive custom fields in the search.

Once all filters are defined, click Search. This refreshes the fields table with the filtered results.

Set Field Order Click the Set Field Order link to open the page, which allows the administrator to rearrange the order in which custom Transaction fields appear to users. See Custom Transaction Field - Set Field Order.
Add Field Click the Add Field icon in the Fields panel header to create a new custom field. See Custom Transaction Field - Add.
Custom Fields Table

This table displays all existing custom fields. The table is sorted in alphabetical order by name. The Title and Created By columns are sortable. The following displays for each field:

  • Title - This column displays the title of the custom field.
  • Type - This column displays the field type, which includes drop-down or short text box.
  • Created By - This column displays the name of the administrator who created the field by last name, first name.
  • Active - This column defines the active status of the field. To activate the field, check the box in the Active column. To inactivate the field, uncheck the box. Note: If a custom field is inactivated after the field is added to a transaction, then the field still displays on the transaction but is read-only, and the field cannot be used for future transactions until the field is activated.
Options

The following options are available in the Options column:

  • Edit - Click the Edit icon to edit the field. The field name, type, email tag, and availability settings can be modified. Also, where the field appears in the system can be modified. See Custom Transaction Field - Add.
  • Copy - Click the Copy icon to copy the field. All fields and their values are copied.
  • Delete - This option only displays for fields that have not yet been used in a transaction. Click the Trash Can icon to delete the field. When a field is deleted, it no longer appears on the Shopping Cart, Manage Transactions, and My Account pages. In addition, the email tag for the field is not automatically removed from any emails that contain the tag. The tags must be manually removed by the administrator.