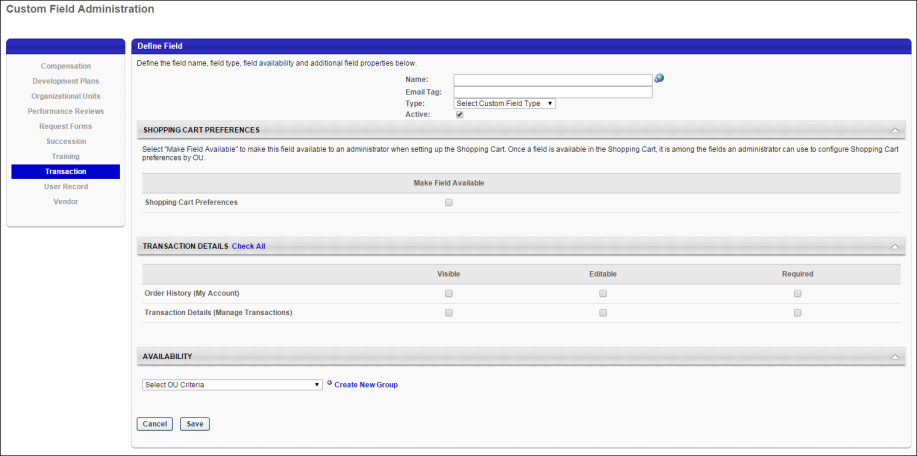
The Define Field page allows administrators to create custom Transaction fields in Custom Field Administration. Administrators define the general values for the field, such as the name, email, tag, and type. They will also define where in the system the field displays. Custom Transaction fields can appear in the following areas of the system:

Name
This is a required field. Enter the name of the custom field that will be visible to end users. The character limit for this field is 50. If multiple languages are enabled, click the globe icon to translate the name into other available languages.
Email Tag
This is a required field. Enter the tag name for the field, up to 50 characters. The name must be unique and cannot be used by another tag. All tags automatically begin with "CUSTOM." If a space is entered, the system translates the space into a period.
The tag displays in the View Tags pop-up on the Shopping Cart Preferences and Email Administration.
Editing Note: When editing the custom field, the tag in the Tag Name field cannot be modified.
Type
From the drop-down list, select the type of field you are creating. The following options are available in the drop-down:
- Dropdown
- Short Text Box
Depending on the field type selected, options may be available to configure for the field. See Custom Field Admin - Custom Field Type Options.
Active
The Active box is checked by default. To inactivate the custom field, uncheck the Active box. When active, the custom field displays in the areas of the system in which it is configured to display, including the Shopping Cart, My Account, and Manage Transactions pages.
If a custom field is inactivated after the field is added to a transaction, then the field still displays on the transaction but is read-only, and the field cannot be used for future transactions until the field is activated.
Shopping Cart Preferences
This section allows the administrator to add the custom field to the Shopping Cart Preferences page. To add the field, check the Make Field Available option. This makes the custom field available to an administrator when configuring Shopping Cart Preferences. From the Shopping Cart Preferences page, the administrator can then choose to make the field visible to end users on the Payment or Confirmation/Thank You page during the shopping cart checkout process.
Note: This section only displays for portals that have the Shopping Cart functionality enabled.
Transaction Details
This section allows the administrator to add the custom field to the My Account > Order Details page and the Manage Transactions > Transaction Details page. The administrator can also select to make the field editable and required. The following options are available:
- Check All - Select the Check All option to the right of the Transaction Details header to select all options in the section.
- Visible - Select this option to make the custom field visible on the Order Details (My Account) page and/or Order History Details page in Manage Transactions. Users must have permission to view the order history details in order for the field to be visible on the Order History page. Users must have permission to manage transactions for the field to be visible on the Transaction Details page. If the Editable option is not also selected, then the field is visible but read-only.
- Editable - Select this option to make the custom field editable on the Order Details (My Account) page and/or Order History Details page in Manage Transactions. When this option is selected, the value in the field is editable on the Order History page by users with permission to view the order history details. The field is editable on the Transaction Details page by users with permission to manage transactions. Note: The Visible option is automatically selected when Editable is selected.
- Required - Select this option to make the custom field required on the Order Details (My Account) page and/or Order History Details page in Manage Transactions. If a field is required, then the user must enter a value in the field before saving the page. Note: The Visible and Editable options are automatically selected when Required is selected.
Note: The Order Details (My Account) option only displays for portals that have the Order Details functionality enabled for My Account.
Availability
In the Availability section, set the availability for the custom field to determine which users can see the fields on the My Account > Order Details page and the Manage Transactions > Order History Details page. Select the organizational unit (OU) criteria from the drop-down, and then select the OU or users from the pop-up. This section is required.
The users who meet the availability criteria defined in the Availability section will see the field if the field is made visible in the Transaction Details section. If a custom field is not made visible, then the field does not display for users, even if the users meet the availability criteria.
Considerations
- All custom Transaction fields that are made visible in the Shopping Cart Preferences section are visible on the Shopping Cart Preferences page, regardless of the availability settings defined in the Availability section.
- For Billing emails in Email Administration, all active email tags display in the View Tags pop-up, regardless of the availability settings defined in the Availability section. However, once an email is sent to a recipient, the availability for the field is respected and the system considers whether that field is available to the email recipient before populating the email tag with a value for the custom field.
Cancel/Save
Click to cancel adding or editing the field.
Click to save the field.