Certification - Create - Scheduling - One Time Only
A One Time Only certification is a certification that only requires users to become certified one time, and the certification does not require users to renew their certification.
- Pros: One Time Only is a simple, easy way to create a certification that only needs to be administered one time for any given person. After a user completes the certification, they remain certified forever.
- Cons: The One Time Only scheduling option is very limited and does not allow any flexibility or automation options for scheduling the certification again or on an ongoing basis.
To create a certification, go to . Then, click the Create a New Certification link or copy an existing certification by clicking the Copy icon in the Options column.
Overall Process
When creating a One Time Only certification, complete the following steps:
- Select One Time Only as the certification period type.
- Configure the basic settings for the initial training period.
- Set the due date and expiration date for the certification.
Select Certification Type
When configuring the certification schedule, the first step is to select the type of certification you are creating. The certification type that is selected determines which option are available when configuring the certification schedule.
To create a One Type Only certification, select the Select Period Type field. Then, select the One Time Only option and click . This opens the Configure Training Period pop-up.

Note: The certification type can be modified after creating the initial period if necessary, but changing the period type erases all previously set up periods. If the certification is assigned to a user, the period type cannot be changed.
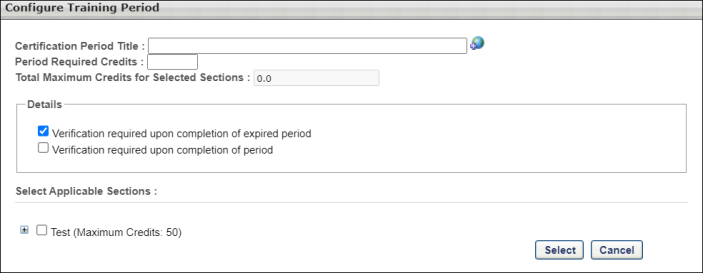
Configure Initial Certification Training Period
Enter the following information about the period:
- Certification Period Title - Enter a title for the initial certification period. The character limit for this field is 100. If multiple languages are enabled for your portal, select the Translate icon to translate the field into other available languages.
- Period Required Credits - Enter the number of credits that are required to be completed for the period. This minimum requirement must be reached in order to receive the certification.
- Total Maximum Credits for Selected Sections - The maximum credits that can be obtained from all selected sections. It gets automatically populated based on the sections that are selected under Select Applicable Sections and cannot be less than the Period Required Credits.
- Verification required upon completion of expired period - This option is enabled by default. When it is disabled, the expired certifications do not require completion approvals if the user completes all certification renewal requirements, thus bypassing the need for an approval. The administrators or certification owners can disable this option on one or all certification periods depending on certification renewal requirements. All completion approval requests that have already been generated still need to be approved. The Verification required upon completion of expired period setting can be changed at any time for any existing certifications, and it applies to any expired training completion approvals that are generated after the setting is changed.
- Verification required upon completion of period - Select this option to force certification users to submit evidence of completion to the administrator when they have completed the certification period. The user's status remains In Progress until the administrator verifies completion.
- Select Applicable Sections - Each section in the certification is displayed. Select the sections that should be included in the initial certification period. You may click the plus icon to the left of the section to view the items within, but only sections can be added to a period. Individual training items cannot be added to a period.
Note: If both Verification required upon completion of expired period and Verification required upon completion of period are checked, then it will generate two completion approvals if the user completes requirements for an expired certification. The first completion approval will be for the expired certification and the second completion approval is for validating the completion of expired certification. To know more, See Use Cases - Certification Completion Approval Settings.
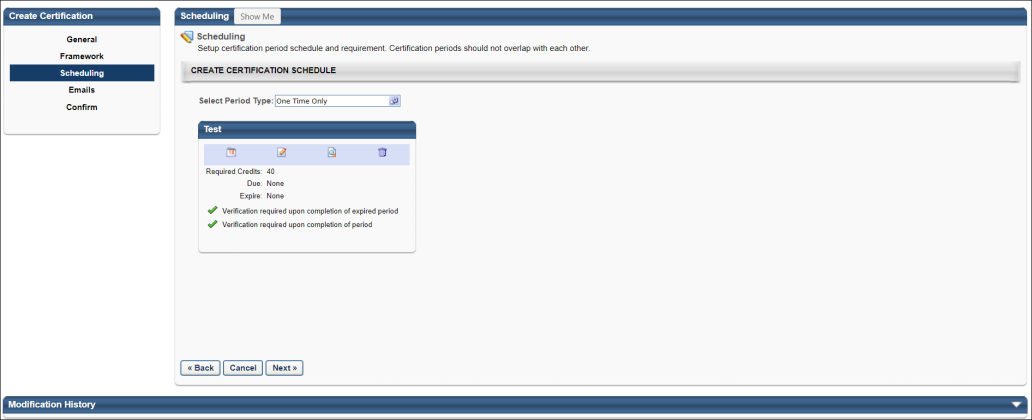
Click to add the initial period to the schedule. The period appears on the page.
If the number of credits required to complete the certification period is greater than the sum of maximum credits set for all selected sections, a warning appears at the top of the page. The maximum credits for each selected section displays next to each selected section title. The administrator can then correct either the Period Required Credits field or the selected sections and create a certification period which can be successfully completed by users.
The administrator cannot proceed with creating the certification until they have corrected either the Period Required Credits field or the selected sections.
Configure Certification Periods - Due Date and Expiration Date
To configure the due date and expiration date for a certification period, click the Period Date icon ![]() below the certification period title. The Configure Certification Period window appears.
below the certification period title. The Configure Certification Period window appears.
If a user has not completed the certification by the due date, the status becomes Past Due. The user may still continue to complete the certification and become certified up to the Expiration date if the expiration date is different from the due date. The Past Due status can be used as a grace period and allows administrators to report and track these users.
If a user has not completed the certification by the expiration date, the status becomes Expired. Depending on the expiration settings set when creating the certification, users may be able to access and complete the certification training, but they are not moved to a Certified status unless they request and receive completion approval. Completion approvals can be approved or denied from the Certification Management page. See Certification Requests - Pending Requests.
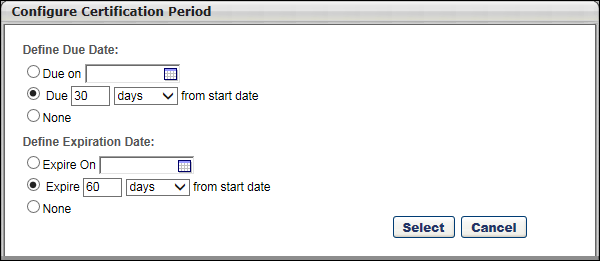
Define Due Date
Note: When setting a due date, the due date must be prior to the expiration date.
- Due on XX/XX/XXXX - Select this option to set the due date to a specific date. Then click the calendar icon to select the due date.
- Due XX days/months/years from start date - Select this option to set the due date to a date that is relative to the start date. Then enter the number of days, months, or years after the start date the period is due.
- None - Select this option to not set a due date for the period.
Define Expiration Date
- Expire on XX/XX/XXXX - Select this option to set the expiration date to a specific date. Then click the calendar icon to select the expiration date.
- Expire XX days/months/years from start date - Select this option to set the expiration date to a date that is relative to the start date. Then enter the number of days, months, or years after the start date the period expires.
- None - Select this option to not set an expiration date for the period.
Edit a Period
To edit a period after it is created, click the Edit icon ![]() for the appropriate period. This opens Configure Training Period window where you can edit the details of the period.
for the appropriate period. This opens Configure Training Period window where you can edit the details of the period.
View the Training Item Contents of a Period
To view the framework of a period and view which training items are included in a period, hover the cursor over the View icon ![]() for the appropriate period. This displays a pop-up that shows the training framework and contents for the period.
for the appropriate period. This displays a pop-up that shows the training framework and contents for the period.
Delete a Period
To delete a period, click the Delete icon ![]() for the appropriate period. This deletes the entire period, including the selected settings.
for the appropriate period. This deletes the entire period, including the selected settings.
Next
After completing all required items in the Scheduling step, click to proceed to the Emails step. Note: You must complete all required items before proceeding to the next step. See Certification - Create - Step 4 - Emails.
Modification History
Click the arrow next to the Modification History heading to expand the section and view the modification history for the certification.