The View People Preferences page allows you to configure the following preferences for View People:
- Organizational unit (OU) filters
- OU custom field filters
- Succession metrics filters
- Employee attributes filters
- User Record custom field filters
- Define the OUs that will display for each user in their employee card
- Determine whether or not permission constraints should apply for users when viewing a shared list
To access View People Preferences, go to .
| PERMISSION NAME | PERMISSION DESCRIPTION | CATEGORY |
| View People Preferences Page | Grants access to the View People Preferences page, which allows administrators to configure the View People page according to their needs per organizational unit (OU). This permission can be constrained by OU, User's OU, User, User Self and Subordinates, and User's Subordinates. | View |

Organization Filters
This section allows you to select the OU types and OU custom fields that will display in the Organization filter.
- Claire is the head of Human Resources for a multi-national company with 10,000 employees.
- Her company tracks critical roles as a custom Position organizational unit (OU) field, and also tracks Division OUs that are working on key initiatives for the current fiscal year.
- Claire uses View People to identify employees that are in key roles and review their compensation vs. performance status.
- She can review their succession metrics and take initiative to assign training or move them into talent pools.
- She can also review the performance of Division OUs that are tied to key initiatives and review their existing skill set and progress toward year end goals.
By default, up to 15 system OUs display in the Organization filter on the View People page: Division, Position, Grade, Cost Center, and Location. You can use the Organization Filters section in View People Preferences to determine if you would like different or additional OUs to display, such as custom OUs.
To define the OU filter options:
- Click . This opens the Select OU Type to Add pop-up.
- Select an OU from the drop-down. The OUs that display are the active system and custom OUs for the portal. Group OUs and multi-type OUs are not available to select.
- Click . This adds the OU to the list of filters.
You can add more OUs by repeating the steps. Up to seven OUs can be added.
Reorder OU Position
You can change the order in which the OUs appear in the filter by clicking Move Up or Move Down from the drop-down in the Options column.
You can add up to 10 OU custom fields to this section. The fields that you add will appear in the OU Fields filter in the Organization section of the Filters panel on the View People page.
The following custom field types can be added:
- Checkbox
- Dropdown
- Formula Metric
- Metric Grid
- Multiple Checkbox
- Numeric
- Radio Button
- Rating Scaling Metric
To add OU custom fields:
- Click the button. This opens the Select OU Custom Field to Add pop-up.
- Click the Please Select drop-down.
- Select an OU custom field.
- Click . This adds the field to the OU custom fields table on the View People Preferences page.
OU Custom Fields Table
The following information displays for each OU custom field in the table:
- Order - This column displays the order in which the custom field displays in the filter.
- Custom Field - This column displays the name of the custom field.
- OU Type - This column displays the type of OU that is defined for the custom field.
- Field Type - This column displays the type of custom field.
- Option - The following options are available in the options drop-down:
- Delete - Click this option to delete the custom field as a filter.
- Move Down - Click this option to move the custom field down one position.
- Move Up - Click this option to move the custom field up one position.
Performance Filters
Note: This section only displays for portals with Performance or Succession.
This section allows you to configure Performance and Succession metrics. Up to 15 metrics can be added.
By default, the Performance filter on the View People page displays the first five allowable succession metrics. You can modify the metrics that display by adding metrics in this section. The allowable metric types are checkbox, radio button, rating scale, metric grid, formula metrics, numeric, and dropdown fields. There are no metrics selected by default to display in the Performance filter on the View People page. The metrics must be added in this section in order to appear as filters.
To add succession metrics:
- Click the button. This opens the Select Succession Metric to Add pop-up.
- Select an SMP metric from the SMP Metric drop-down. The metrics that display are the active system and custom OUs for the portal. Group OUs and multi-type OUs are not available to select.
- Click . This adds the OU to the list of filters.
You can add more metrics by repeating the steps. Up to 15 metrics can be added.
Once succession metrics are added, they display in a table below the metrics. The following information displays in the table:
- Order - This column displays the order in which the metrics display in the Performance filter.
- Succession Metric Title - This column displays the name of the metric.
- Metric Type - This column displays the type of metric field.
- Color Assignment - This column indicates whether or not colors have been assigned to the ratings to aid in comparison. The following values display:
- Complete
- Incomplete
- Not Assigned
- Options - The following options display in the options drop-down:
- Delete - Click this option to delete the metric from the filter.
- Move Up - Click this option to move the metric up one position.
- Move Down - Click this option to move the metric down one position.
The Display Overall Ratings option allows you to hide the Overall Performance filter on the View People page. Check the box to hide the filter. Uncheck the box to show the filter.
Attribute Filters
Note: This section only displays for portals with Compensation or Succession.
This section allows you to add Resume, Career Preferences, and User Record custom field filters. You can also define compensation filter options.
If the resume section of Universal Profile is enabled, then the Resume Filters section allows you to select up to five employee attributes that will display as filters.
To add attributes:
- Click the button. This opens the Select Resume Attribute to Add pop-up.
- Select an attribute from the Resume Attributes drop-down. The field types that can be added are Attribute List, Numeric, Checkbox, Short Text Box, or Dropdown.
- Click . This adds the attribute to the list of filters.
You can add more attributes by repeating the steps. Up to 10 attributes can be added.
Resume Attributes Metrics Table
Once attributes are added, they display in the table. The following information displays in the table:
- Order - This column displays the order in which the metrics display in the filter.
- Resume Attribute - This column displays the name of the attribute.
- Field Type - This column displays the type of attribute field.
- Options - The following options display in the options drop-down:
- Delete - Click this option to delete the metric from the filter.
- Move Up - Click this option to move the metric up one position.
- Move Down - Click this option to move the metric down one position.
This section enables you to add questions that are active in the Career Preferences section of Bio Resume and Career Preferences. The questions that are added are available as Attributes filters on the View People page.
To add career preferences attributes:
- Click the button. This opens the Select Career Preferences Attribute to Add pop-up.
- Click the Please Select drop-down.
- Select a career preferences question from the drop-down.
- Click . This adds the question to the Career Preferences Attribute section.
To add more questions, repeat the steps above. Up to 10 questions can be added.
Career Preferences Attributes Metrics Table
Once career preferences attributes are added, they display in the table. The following information displays in the table:
- Order - This column displays the order in which the metrics display in the filter.
- Career Preferences Attribute - This column displays the career preferences question.
- Field Type - This column displays the type of attribute field.
- Options - The following options display in the options drop-down:
- Delete - Click this option to delete the metric from the filter.
- Move Up - Click this option to move the metric up one position.
- Move Down - Click this option to move the metric down one position.
You can add up to 10 User Record custom fields to this section. The fields that you add will appear in the User Fields filter in the Attributes section of the Filters panel on the View People page.
To add User Record custom fields:
- Click the button. This opens the Select User Custom Field to Add pop-up.
- Click the Please Select drop-down.
- Select an User Record custom field.
- Click . This adds the field to the User Record custom fields table on the View People Preferences page.
Note: User Record custom date fields cannot be added.
User Record Custom Fields Table
The following information displays for each User Record custom field in the table:
- Order - This column displays the order in which the custom field displays in the filter.
- Custom Field - This column displays the name of the custom field.
- Category - This column displays the type of category that is defined for the custom field.
- Field Type - This column displays the type of custom field.
- Option - The following options are available in the options drop-down:
- Delete - Click this option to delete the custom field as a filter.
- Move Down - Click this option to move the custom field down one position.
- Move Up - Click this option to move the custom field up one position.
Note: This section only displays for portals with Compensation.
You can configure the following compensation filter options:
- Display Compensation - This option is only available for portals with a single currency. When this option is selected, it displays a sliding Compensation filter in the Attributes section of the Performance filter, which allows users to filter by a compensation range.
- Display Compa-Ratio - Including this option displays a sliding Compa-Ratio filter in the Attributes section of the Performance filter, which allows users to filter by a compa-ratio range.
- Display Tenure - Including this option displays a sliding Tenure filter in the Attributes section of the Performance filter, which allows users to filter by a tenure range.
Employee Card Configuration
This section allows you to define the OUs that will appear in a user's employee card on the View People page. By default, the Position OU and Location OU display for each user on the View People page. If the Position OU and/or Location OU are inactive, then an active system OU displays for users on the View People page.
You can select up to two OUs that will appear in the small card and six that will appear in the large expanded card.
The OU options that are available to select are dependent on the OUs that you added in the Organization Filters section. If there are no OUs added to the Organization Filters section, then no OU options will be available to select in the drop-downs in the Employee Card Configuration section.
To select the OUs:
- Click the drop-down below the user name "John Doe."
- Select the OU from the drop-down. The options that are available to select are dependent on the OUs that you added in the Organization Filters section.
For the large card, you can configure up to six additional organizational units (OU), OU custom fields, User Record custom fields, and Performance and Succession metrics, including any career preferences that are selected in the Career Preferences Attributes section. The fields and metrics will appear on the expanded user cards on the View People page.
A Human Resources executive is in the process of completing the company’s annual planning. Weeks have been spent on annual reviews and succession and compensation plans, but the process is not over until they close the loop and take action on the findings.
To close the loop, they will need to use the results from the succession planning and employee skills and experience to identify the best candidates to lead the upcoming initiatives. Because there will be multiple matches, they are going to need a way to do side by side comparisons. In past years, this process resulted in hundreds of print outs and stacks of paper.
Using View People, they use the built-in filters to find the best matches based on the latest succession/performance ratings. When multiple matches are found, the expanded user cards allow a side by side comparison based on up to six key metrics. The best matches are added to the annual "best bets" list.
The final list is shared across the organization via View people, and decisions are finalized. In the upcoming week, the company’s best bets will be invited to meet with department heads.
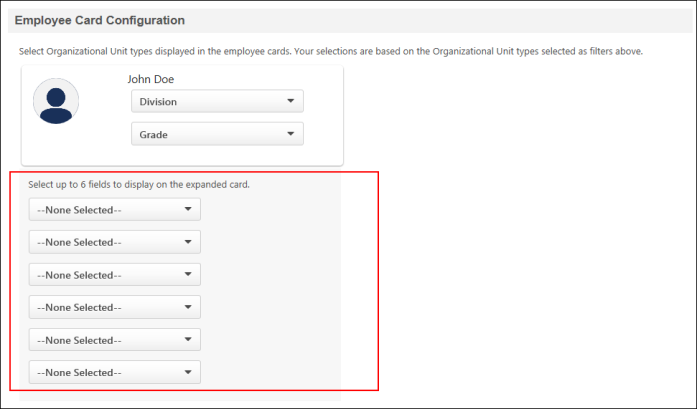
To add fields and metrics:
- Click the drop-down for the field. This opens a list of OU types and metrics.
- Click the desired OU type or metric.
Set Click Behavior for Employee Card
This option lets you set the click behavior of the employee (user) card on the View People page.
To set the click behavior of the user card, select one of the following options from the drop-down:
- View Employee Profile - This opens the employee's profile page within View People. This is the default click behavior of the user card.
- Universal Profile > Bio - This will open the Universal Profile > Bio page in a new tab. This option does not display if the Bio page is not available in your portal.
- Universal Profile > Snapshot - This will open the Universal Profile > Snapshot page in a new tab. This option does not display if the Snapshot page is not available in your portal.
- Universal Profile > User Record - This will open the Universal Profile > User Record page in a new tab.
Share List Settings
The following options are available in the Share List Settings section:
When this option is selected, shared lists are sent from the system "Default From Address," rather than the email address for the user who shared the list. The address that will display in the From field for email notifications for shared lists will be the default from address that is configured for the system, provided that a default address has already been set up.
If a "Default From Address" is not yet configured for your portal, you can submit a case to Global Customer Support to have the backend setting configured. Setting up a default address is an optional feature.
Information Icon - Hover over the information icon to view your portal's "Default From Address." If your portal does not have a default address created, then no information displays when hovering over the icon.
Note: If the "Default From Address" is removed from the system, then the value in the From: field on the email will be the email address of the user who shared the list.
When this option is selected, the system dynamically manages permissions to ensure all recipients of a shared list will see the contents in full, just as the sender would. If you disable this feature, user constraints could prevent the recipient from seeing the full list.
Overwrite Settings
Select this option to overwrite custom settings for child division OUs. If you overwrite custom settings for child division OUs, the selected settings are applied to both new and existing child OUs. Any previously customized child OUs are updated with the selected settings.
- If there are no customizations to the child OU, then the parent OU customizations are applied to all child OUs.
- Overwrite custom settings checkbox setting
- If this option is selected, all child OU customizations are deleted from the database, which means the parent OU customizations will be applied to new and existing child OUs.
- If this option is unselected, all existing child OU customizations will remain unchanged, and any new child OUs will inherit the parent OU customizations by default.
- If a child OU has been customized to display any widgets, then regardless of the parent OU customizations, the child OU customizations are applied.
- If a child OU has been customized to hide all widgets, then parent OU customizations will take precedence and will be applied.
Save Preferences
Click to save the preferences settings.