The User Record page is organized into sections. The General Information fields are available at the top of the user record, which include basic information about the user, such as name, photograph, and user name.
Note: An asterisk next to a field indicates that the field is required and a value must be entered in order to save the user record.
To add a new user record, go to . Then, select the Add User link.
Edit a user's user record in one of the following ways:
- Go to and select the name of the appropriate user.
- Navigate to the user's Universal Profile. Select the User Record tab from the Universal Profile navigation. Then, select the button.
| PERMISSION NAME | PERMISSION DESCRIPTION | CATEGORY |
| Universal Profile - User Record - Create Users | Grants ability to access the User Record Administration page and to create new users in the system. When creating a new user, this permission grants the ability to add general information, which includes first name, last name, username, assigned OUs, and custom relationships. The administrator must have additional permissions to add any additional fields. This permission can be constrained by OU, User's OU, User's Self, User Self and Subordinates, and User. This is an administrator permission. | Core Administration |
| Universal Profile - User Record - Edit Users | Grants ability to edit user records in the system. The administrator must have additional permissions to edit specific fields on the user record. This permission can be constrained by OU, User's OU, User's Self, User Self and Subordinates, and User. This is an administrator permission. Note: This permission DOES NOT grant the ability to view user records in the system. Administrators must have the Universal Profile - User Record - View Users permission in order to view user records. | Core Administration |
| Users - Edit Local System ID | Enables administrator to modify the Local System ID for a user via the admin/users screen. This permission only works when used in conjunction with the Users - View and Users - Edit permissions. This permission cannot be constrained. This is an administrator permission. | Core Administration |
| Users - View | Grants the ability to search for and view summary information about users in the portal via the Admin/Users screen. This permission can be constrained by OU, User's OU, User Self and Subordinates, and Users. If multiple constraints are added, these constraints are considered OR statements. This is an administrator permission. | Core Administration |
| Users – View General Information | Grants ability to view the general fields on a user record, including first name, last name, username, assigned OUs, and custom relationships. This permission works in conjunction with the Universal Profile - User Record - View Users permission. This permission can be constrained by OU, User's OU, User's Self, User Self and Subordinates, and User. This is an administrator permission. | Core Administration |
| Users - View Local System ID | Enables administrator to view the Local System ID for a user via the admin/users screen. This permission only works when used in conjunction with the Users - View and Users - Edit permissions. This permission cannot be constrained. This is an administrator permission. | Core Administration |
Additional permissions are required to view and edit the various fields on the user record. See User Record Permissions.
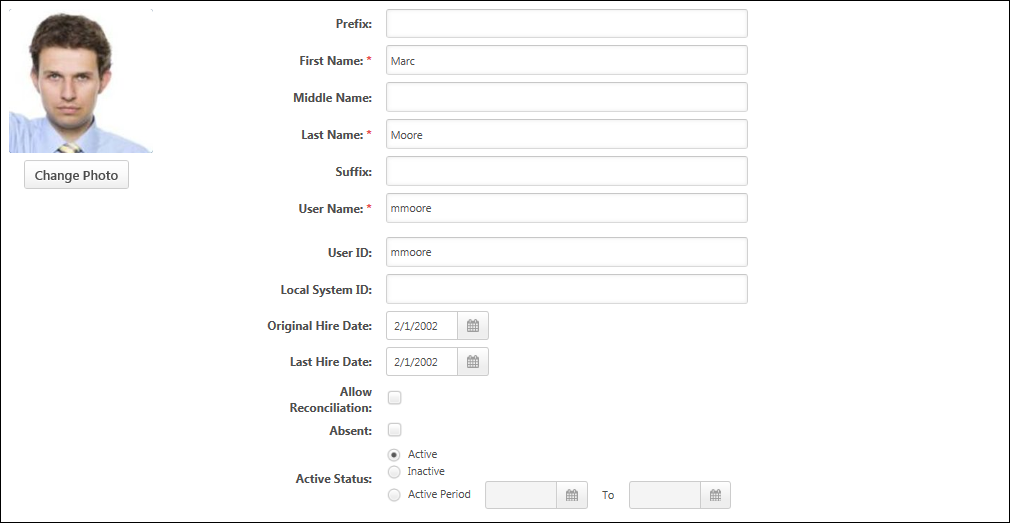
Photograph
Administrators can view or edit the user photo
- Change Photo - To upload a new photo or edit and crop an existing photo, click the button below the photograph. The recommended size for photos is 200 x 200 pixels. The available file types for photos are jpg, png, and gif.
- Remove Photo - To remove an existing photo, click the button below the photograph. Select the Edit tab at the top of the Change Photo window. Then, select the button. When a photo is removed, the default image is displayed for the user throughout the system.
Name
Enter the following name components:
- Prefix - The character limit for this field is 10.
- First Name - This is required. The character limit for this field is 200. This field is considered general information.
- Middle Name - The character limit for this field is 200.
- Last Name - This is required. The character limit for this field is 200. This field is considered general information.
- Suffix - The character limit for this field is 10.
User Name
This field is considered general information.
The value entered here is the user name that the user enters to access the system if the organization does not utilize Single Sign On functionality. This is required and must be unique.If the system is configured so that the User Name field is copied from the User ID field, the User Name field is not editable when creating a new user record or updating an existing user record. When the user record is saved, the User Name is copied from the User ID field.
- The User ID field must be populated prior to saving the user record.
- Any formatting restriction that exists for the User Name field is applied to the User ID field when this functionality is enabled (e.g., may only contain letters, numbers, underscores, spaces, hyphens, special characters, etc.).
User ID
The ID is the unique identifier of the user. If this value is populated by the data feed, it is not recommended to edit this area.
User ID - Auto-Generate
When creating a new user, if the Auto-Generate link is enabled and if the administrator has permission to edit the User ID field, administrators can click this link to automatically generate a User ID. The User ID is set to the First Name field combined with the Last Name field. For example, the generated User ID for John Doe is JohnDoe.
- The First Name and Last Name fields must be populated prior to clicking the Auto-Generate link.
- If a user with this User ID already exists in the system, the User ID is appended with a unique identifier.
- If necessary, the User ID field can be edited by the administrator after it is generated.
Note: All accented or special characters that may exist in the user's first and last name are removed when generating the User ID. The accented or special characters are removed from the User ID, however, they remain in the user's first and last name.
Note: This functionality is only available when creating a new user. The functionality is not available when editing a user. The Auto-Generate link only appears if the administrator has permission to edit the User ID field and if the functionality is enabled.
User ID - System Generated User ID
When Cornerstone HR and the System Generated User ID functionality are enabled, a User ID is automatically generated when a user is added to the system. The system-generated User ID value is entered in the User ID field for the new user. Once a User ID value is generated, that value is permanently reserved and cannot be reused.
- If the administrator does not have permission to view or edit the User ID field, the User ID is generated and stored, but the User ID field and value are not displayed on the page.
- If the administrator has permission to view the User ID field, the User ID is displayed on the page, but the administrator cannot modify the value.
- If the administrator who is creating the user has permission to edit the User ID field for the user, then the administrator can edit the system-generated User ID. As a best practice, the User ID value should not be edited after it is generated. In order to control this, administrators should only be granted permission to view the User ID field for users. This enables them to view the value, but they cannot edit the value.
The User ID value is generated according to the User ID Generation Rules. See User ID Generation Rules.
Local System ID
This field enables organizations to capture an identifier from a local system. This field is optional. Administrators must have permission to view or manage the Local System ID.
This field would typically be used when Cornerstone is generating User IDs for users and the organization wants to store the identifier from their local Human Resources (HR) or Payroll system in the Cornerstone system.
This field is supported by the Data Load Wizard.
Original Hire Date
Select the date on which the user was originally hired.
For external new hires, the value in the Original Hire Date field will be the value in the Hire Date field on the Start Onboarding page. If the Hire Date field is changed on the Edit Onboarding page, then the value on the user record is also changed. If onboarding is canceled, then the value in the Original Hire Date field is removed.
Last Hire Date
Select the date on which the user was most recently hired. For example, if a user was hired to the organization multiple times, this field displays the date of the most recent hiring.
Allow Reconciliation
Select this option to allow the system to deactivate a user that is not in the data feed. Note: This option does not impact passwords.
The User ID field is the unique identifier that the system uses to match and update a user's record.
- If this option is selected and a User ID is NOT sent in the data feed, the user becomes inactive.
- If a User ID is matched, the system ALWAYS updates the user record regardless of the Allow Reconcile setting.
Allow Reconcile functionality is used for the purpose of deactivating user records, NOT for controlling updating of user records.
Use Cases:
- If you manually create a user and do not select the Allow Reconcile option, the system does not deactivate the user's record if it is missing from the data feed. This might be used for creating a contractor ID or Admin ID that won't be in the data feed. If the User ID field is blank, the system does not change that user's records because the incoming data feed does not recognize this record since there is no User ID to match.
- If you manually create a user and enter a User ID, a record in the data feed with the same user ID updates the user fields with new information whether or not you have the Allow Reconcile box selected.
- Users that come in through the feed always have a User ID on their record. The system and the data feed work together to ensure proper maintenance and active status between your source system and Cornerstone.
Absent
Select this option to mark the user Absent. An Absent user is still active, but has been marked absent because they are either on a leave of absence or on vacation. Administrators must have permission to view or edit the absent status.
- If the Absent functionality is selected and the user is a manager/approver with training requests to approve, the approval request is routed to the next person in the approval chain if the approval process is required. This functionality only pertains to training requests, not other functions requiring approval.
- A user can mark themselves absent by checking the On Vacation checkbox from the My Account > Preferences > Settings page. See My Account - Preferences - Settings.
- When a user that is marked absent logs in to the system, the following options appear:
- Yes, change my status to Available.
- No, leave my status as Absent.
Active Status
Select the appropriate Status option. An Active user can log in and access the system. An Inactive user cannot log in and access to the system, however administrators can access and report on inactive users and can re-activate users at any time.
- Active - Select this option to set the user as active.
- Inactive - Select this option to set the user as inactive.
- Active Period - Select this option to set a date range, during which the user record is active. After selecting this option, use the calendar tool to select the active period.
- Active Start Date - The first date field represents the date on which the user record becomes active. This field is required if the Active Period option is selected. Entering the current date makes the user record active immediately upon saving the user record. If a past date is entered, this has the same effect as entering the current date.
- Active End Date - The second date field represents the date on which the user record becomes inactive. If no end date is selected, the user record remains active until this setting is modified. The Active End Date must be after the Active Start Date.